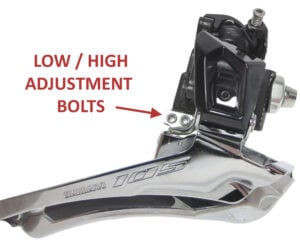
Introduction
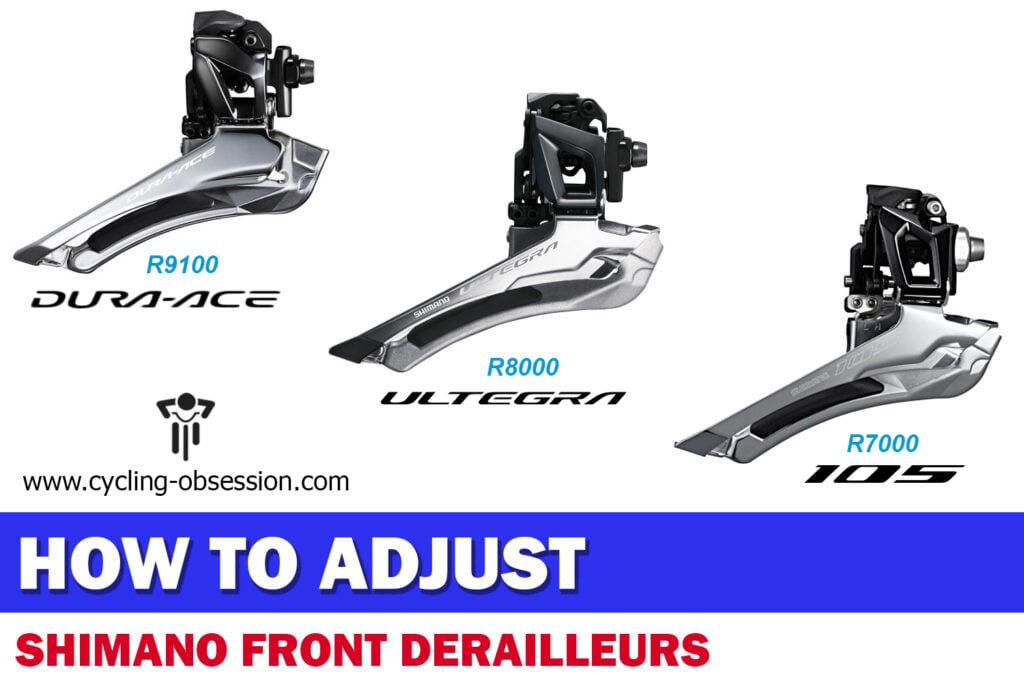
Shimano completely re-designed it’s front derailleur with the release of the Dura-Ace R9100 mechanical group set. This new modern front derailleur features a ‘toggle’ mechanism that is completely different to the ‘pivot’ design of the past. This new design has some different adjustment requirements which I will discuss later.
This new derailleur design has since filtered down to other Shimano group sets includes Ultegra (R8000), 105 (R7000) and GRX. Shimano explains the advantages of this new derailleur design to be;
- Reduced shift effort at the lever.
- More cable routing options (cable outer can now be terminated at the derailleur itself).
- Integrated cable tension adjustment (to eliminate the need for an inline barrel adjuster).
- Shorter minimum chainstay length of 410mm for disk brake equipped bikes (with 135mm OLD).
- Precise and easy front derailleur setup (once you know the steps).
Overview
Shimano’s new front derailleur design operates differently to it’s previous ‘pivot’ style derailleurs. The 2 major differences being;
- Inbuilt tension adjustment for the shift cable.
- Change in how the high limit bolt works.
In this article I will be explaining the procedures on how to adjust it as explained in the Shimano Official Dealer’s Manual and based on my own experience. Whilst this article features a Shimano 105 front derailleur, the adjustment process is the same for all mechanical front derailleurs from the following Shimano group sets;
- Shimano Dura-Ace – R9100 front derailleur (FD-R9100)
- Shimano Ultegra – R8000 front derailleur (FD-R8000)
- Shimano 105 – R7000 front derailleur (FD-R7000)
- Shimano GRX – front derailleur (FD-RX810, FD-RX400)
The front derailleur will either be fitted to the seat tube either using a clamp, or bolted directly to the braze-on mount. It doesn’t matter which way it is fitted, the alignment and adjustment process is basically the same for either mounting option.
Front Derailleur Adjustment Problems
At this stage you will probably find yourself in one of 3 scenarios;
- The front derailleur is not shifting the chain from one chain ring to the other.
- The front derailleur is over-shifting the chain. It falls off either the large or small chain ring.
- The chain is scraping inside the front derailleur cage in certain gear combinations.
It is quite common to experience these issues with a mechanical front derailleur and the most likely causes are;
- The front derailleur is not setup correctly. This can even be the case with brand new bikes where the mechanic was not familiar with the different installation process required for this new design front derailleur.
- The cable tension is incorrect. Common for bikes with recently replaced or newly installed shift cables & housings. All bikes will require minor cable tension adjustments over time due to cable stretch or housing compression.
- The shift cable is not routed correctly or is kinked.
- The gear shifter is faulty. (Rare)
Rather than recommending a specific fix for a particular problem, I believe you will get the best overall result by making sure the all aspects of the front derailleur are setup correctly as discussed in this article.
The good news is that once the derailleur is installed correctly and the high/low limit bolts set, then cable replacement and tension adjustment should be the only ongoing minimal maintenance.
Are You Trimming the Front Derailleur When Riding?
Riding in certain gear combinations can be noisy if you are NOT trimming the front derailleur when you change sprockets at the rear. If you are unfamiliar with trimming the front derailleur, make sure this is not the issue before altering the setup of the front derailleur.
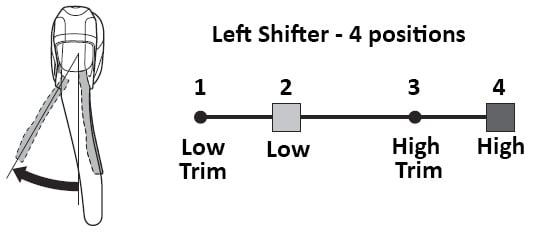
The front derailleur can be shifted to 4 different positions as illustrated in the following chart below. I will be referring to the names of these positions in the article later when we are setting up the derailleur.
This is a good time to test if your derailleur is shifting to these 4 different positions. Fit your bike into a workshop stand to make this process easier as you will need to rotate the cranks when shifting the front derailleur.
- Pressing the left brake lever all the way to right moves the front derailleur to the HIGH position which is the most outward position of the derailleur in relation to the frame. This setting is for riding the large chain ring and smaller rear sprockets.
- Pressing the small inner shift lever once, moves the front derailleur just slightly inward to the HIGH TRIM position. This position is for riding the large chain ring and the larger rear sprockets.
- Pressing the small inner shift lever again moves the front derailleur to the LOW position. This causes the chain to shift from the large chain ring to the small chain ring. This position is for riding the small chain chain ring and the smaller rear sprockets.
- Pressing the small inner shift one last time, moves the front derailleur just slightly inward to the LOW TRIM position. Now the derailleur is in it’s closest position to the frame. This position is for riding the small chain ring and the larger rear sprockets.
Are You Riding with a Crossed Chain?
Riding with a crossed chain means you are riding in one of these 2 gear combinations;
Position #1: Largest Chain Ring and Largest Rear Sprocket.
Position #2: Smallest Chain Ring and Smallest Rear Sprocket.
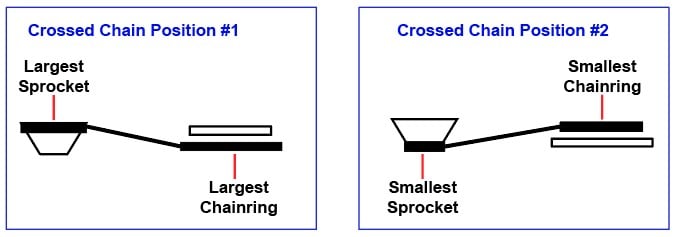
Riding in either of these 2 extreme gear combinations is not recommended (and not really necessary). It is a recipe for a noisy drive train and will increase wear on your components. If you experience noise riding in either of these crossed chain gear combinations, it will either be caused by the chain running at an acute angle to the teeth of the gears and / or the chain scraping against the inside of the front derailleur cage.
If you are ONLY hearing the chain scraping inside the front derailleur cage whilst riding in either of these crossed chain combinations, then the front derailleur adjustment is probably setup OK (or very close). The noise can be eliminated by riding in other non-crossed gear combinations.
Disc Frame Notes: If your bike is fitted with disc brakes, you may experience chain rub when your chain is on the smallest chain ring and second smallest sprocket. This is because road bikes fitted with disc brakes (135 mm quick release or 142 mm thru-axle) both have the same wider rear hub spacing of 135 mm versus a traditional road bike with rim brakes narrower 130 mm rear hub spacing. This extra 5 mm width results in the cassette being located 2.5 mm further out from the center line of the frame, but Shimano have NOT moved the chain rings to compensate for this difference. So there is an increased chain angle from small chain ring to the smallest sprockets. If you adjust the front derailleur to eliminate chain rub in crossed chain position #2, you will likely experience more chain rub in cross chain position #1.
Tools Required
The following tools are required to adjust the front derailleur.
- 2mm Hexagon Wrench (Allen Key)
- 4mm Hexagon Wrench (Allen Key)
- 5mm Hexagon Wrench (Allen Key)
- Torque Wrench (with 4mm & 5mm Hexagon fittings).
Highly recommended to avoid stripping the thread on the nut that secures the cable to the derailleur.
Adjusting a Modern Shimano Front Derailleur
Before deciding if this is a process you want to try, I recommend reading through the entire article before commencing any work. This article is an overview of how I adjust my own front derailleur and should not be treated as professional advice. Please read my disclaimer at the end of this article.
It’s a good idea to clean the chain, cassette, chain rings and derailleurs before commencing the adjustment procedure. Once dry, re-lubricate the chain and apply a light lubricant to the pivot points of the derailleur. I use Tri Flow as it has a small straw attachment that allows you to get into these locations. When everything is clean and lubricated, you’re ready to start.
Here are the steps for adjusting a modern Shimano front derailleur.
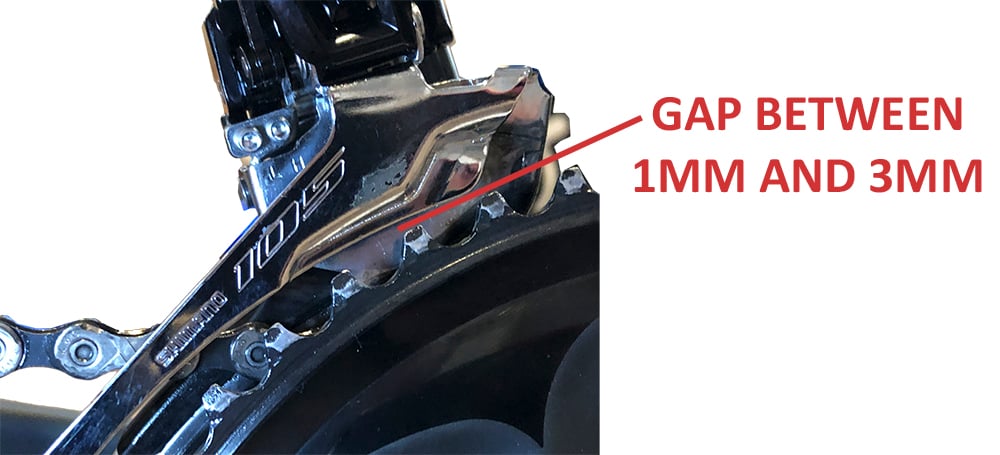
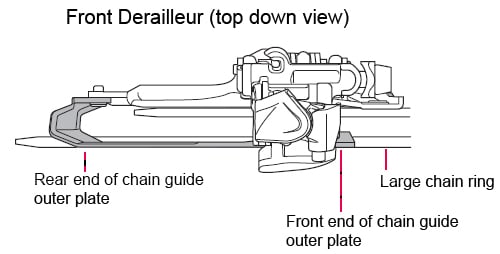
1. Check the Front Derailleur Clearance Above Large Chain Ring
- Using the left shift lever, rotate the cranks and change the chain down onto the small chain ring.
- Next we need to position the outside edge of the front derailleur cage directly above the teeth of the large chain ring. You can either use your fingers (pulling from behind the derailleur) or pull the shift lever to move the derailleur across. You will need to manually HOLD it in this position. Don’t shift the chain onto the large chain ring as you will not be able to see the gap.
- Whilst holding the derailleur in this position, check there is a 1 to 3 mm gap between the teeth of the large chain ring and base of the underneath OUTSIDE EDGE of the derailleur cage.
Note: The teeth on the large chain are not uniform in height, so perform a full rotation of the cranks to find the teeth that sit at the highest point. Now double-check there is still a 1 to 3 mm gap.
Problem: If your gap is not within the prescribed parameters of between 1 mm and 3mm, then this will need to be adjusted to ensure the best performance from the derailleur. If you need to align it correctly, I recommend reading my installation guide for a Shimano front derailleur.
2. Check Front Derailleur Alignment with Large Chain Ring
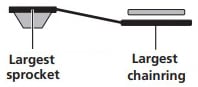
Next we will check the angle of the front derailleur in relation to the large chain ring.
- The chain should still be on the small chain ring from the previous procedure.
- Looking at the OUTSIDE edge of the derailleur cage from above. Check it is PARALLEL to the front chain ring as shown in the diagram. We don’t want the rear end of the derailleur angled in or out.
If the outside edge of the front derailleur cage is not parallel, then it may be possible to adjust it by tightening or loosening the support bolt (discussed below). If you need to align it correctly, I recommend you refer to my installation guide for a Shimano front derailleur.
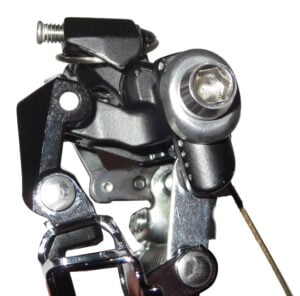
3. Check the Front Derailleur Support Bolt & Frame Protection Plate
The front derailleur frame support bolt is an important step that can be EASILY overlooked as the support bolt is hidden away from view. Setting this bolt correctly improves shift performance as this bolt provides a secondary contact point to counter the shifting forces.

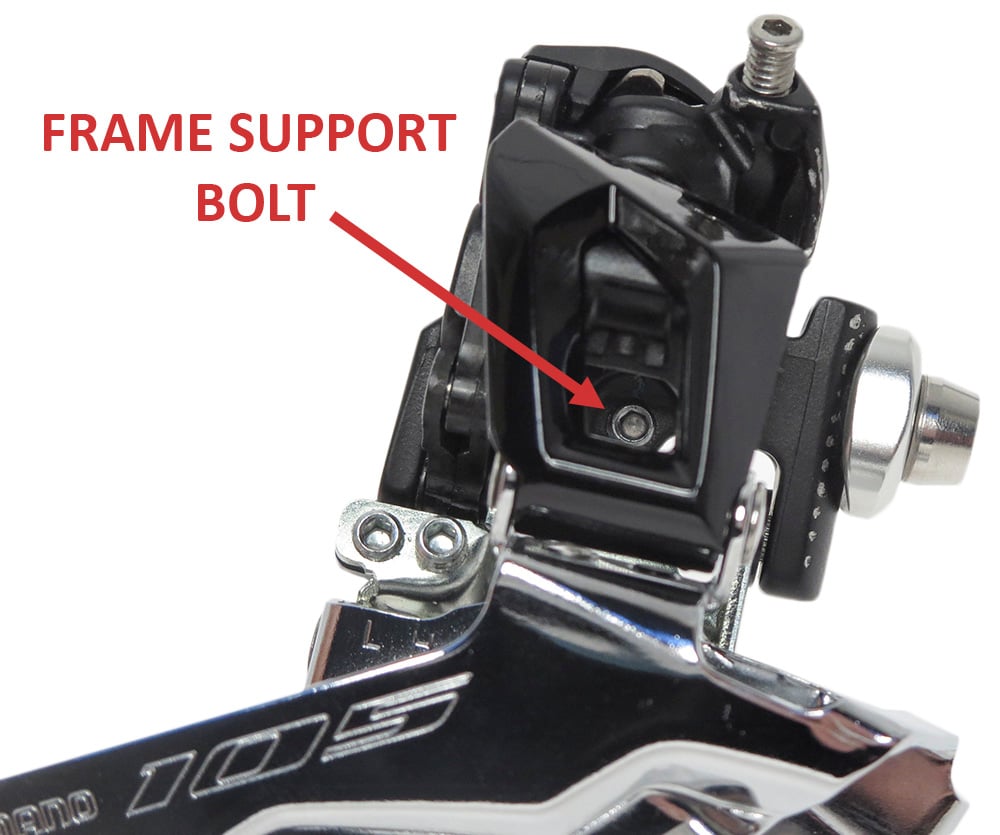
- Find the location of the support bolt in the center of the derailleur body.
- Take a look from behind the derailleur to see if this bolt is in contact with the frame. We don’t want the support bolt directly in contact with the surface of a carbon frame. Typically a small metal frame protection plate will be stuck to the frame where the support bolt makes contact with the frame. On some frames the support bolt may contact the braze-on derailleur mount instead.
- If you need a frame protection plate. Visit a local bike shop to see if they have a spare one. Fit the plate in the correct location where the support bolt will contact the frame. Tighten the bolt to make contact with the plate.
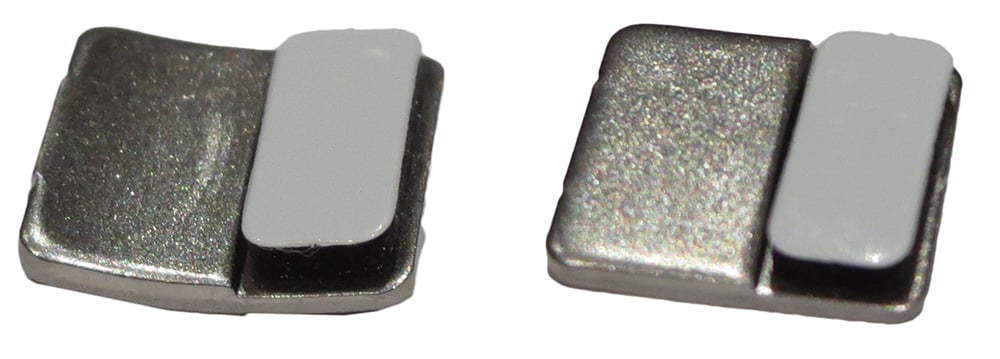
backing tape to stick to the frame prior to the derailleur support bolt pressing it into position.
You will know when the support bolt is in proper contact with the plate as tightening the bolt more will change the angle of the derailleur cage. Once the support bolt is in contact with the frame plate, check the rear end of derailleur cage is still aligned parallel to the large chain ring. Tightening the support bolt further will move the rear end of the derailleur cage out away from the frame.
4. Check the Shift Cable is Correctly Installed
Make sure the shift cable is routed correctly to ensure it is not interfering with the movement of the toggle mechanism on the top of the derailleur.
5. Preliminary Cable Tension Setting
Now we need to check the tension of the shift cable is sufficient. Make sure to always use a torque wrench when tightening the shift cable clamp bolt as the thread can be easily stripped if you over tighten this bolt. Shimano recommend a torque setting of 6 to 7 Nm.
Turn the cranks whilst moving the left brake lever all the way to the right to move the derailleur to the HIGH position. If the derailleur doesn’t move to the chain onto the large chain ring, the 2 most likely reasons are;
- The shift cable is slack. Loosen the shift cable clamp bolt and pull the shift cable tighter, then re-tighten the clamp bolt to correct torque. Try shifting to the large chain ring again.
2. The High limit bolt is not set correctly.
Note: The instructions I provide in this article on how to set the bolts are different to how the bolts are pre-configured on a new R7000 derailleur from factory. Thanks to Simon who provided the following information in the comments section (of my article regarding how to install a new derailleur) on how the bolts are set for a new front derailleur;
The Frame Support Bolt is retracted such that the ‘tip’ of the bolt is flush with the back of the derailleur. The High and Low ‘limit’ adjustment screws as being set at approximately 50% ‘screwed in’ but the High screw is slightly more screwed in than the Low screw. There is therefore quite a bit of ‘slop’ i.e. free movement of the top ‘toggle link’ part of the derailleur that the cable attaches to.
It’s up to you how you want to proceed, but I used this process successfully setup my own bike.
How to test: The chain should already be on the small chain ring. Press the inner (smaller) left shift lever multiple times until it no longer clicks as to release the derailleur cable tension. Now using your fingers, see if you can manually lift the upper ‘toggle’ section of the derailleur up from the main body. It should NOT move. If it can be lifted with your fingers, then the High Limit bolt is not set correctly. I recommend you refer to my installation guide for a Shimano front derailleur on how to reset the high limit bolt.
Once you are able to shift the chain onto the large chain ring, then continue with step 6.
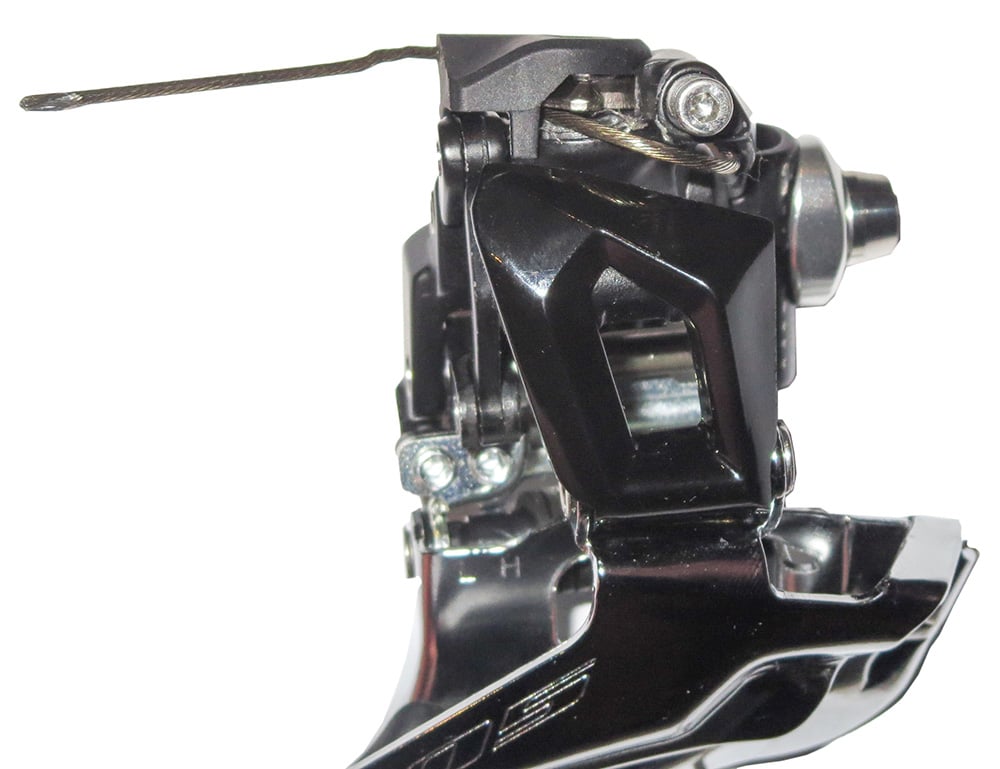
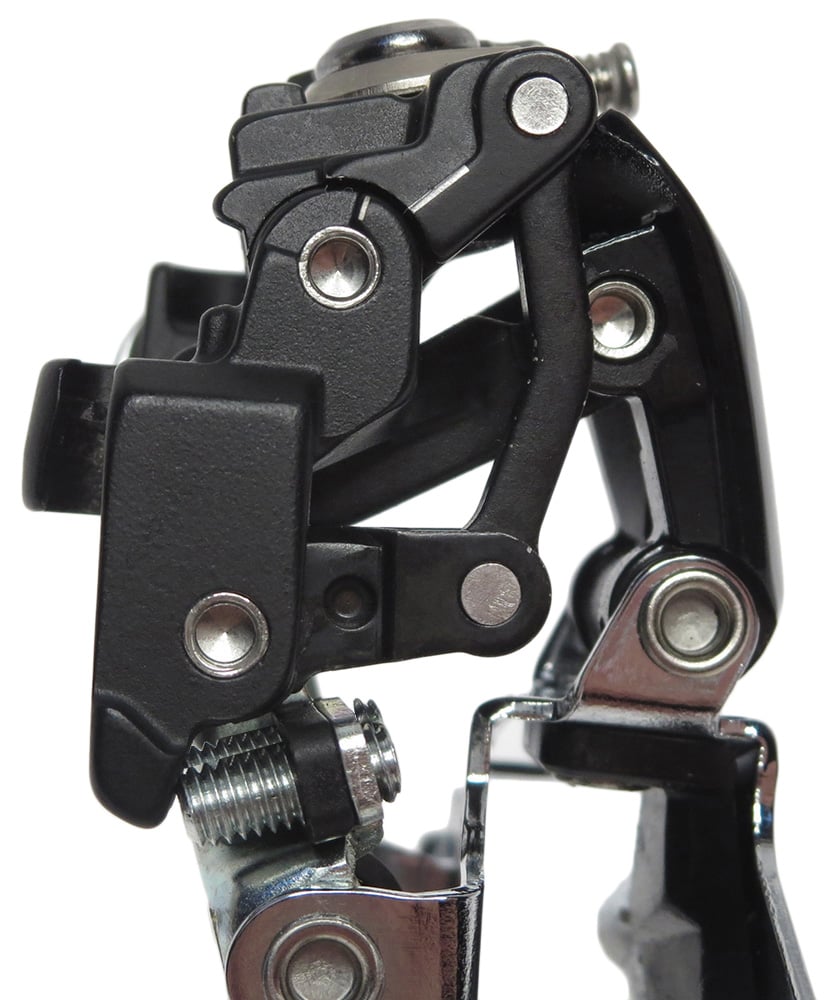
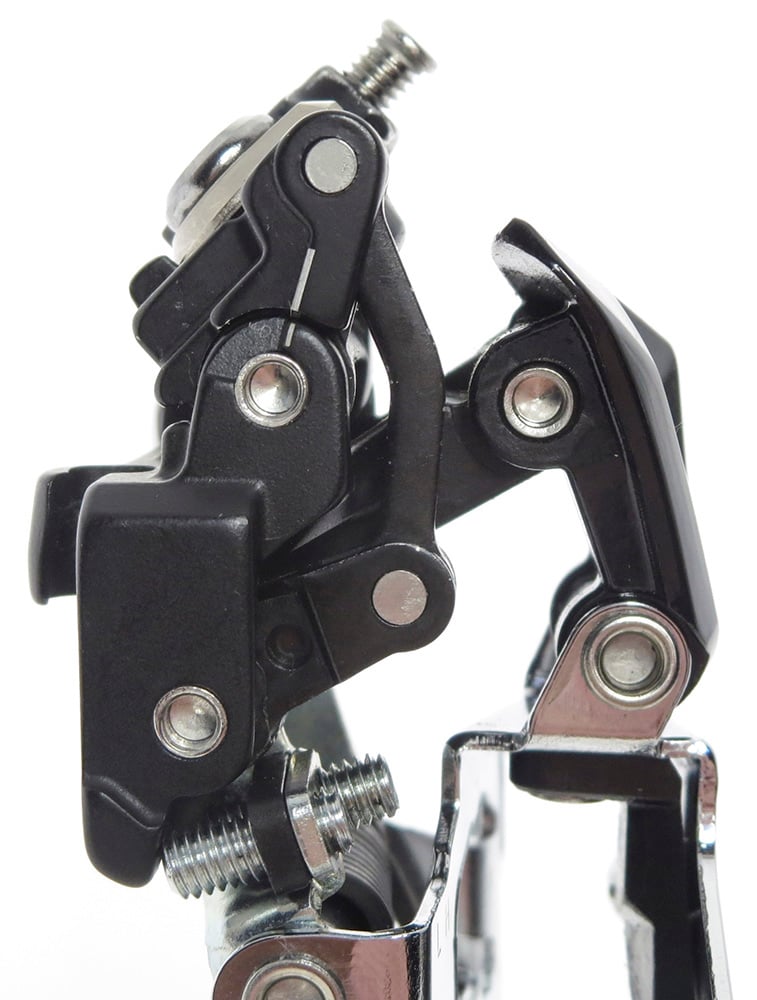
6. Fine Tune Cable Tension Setting
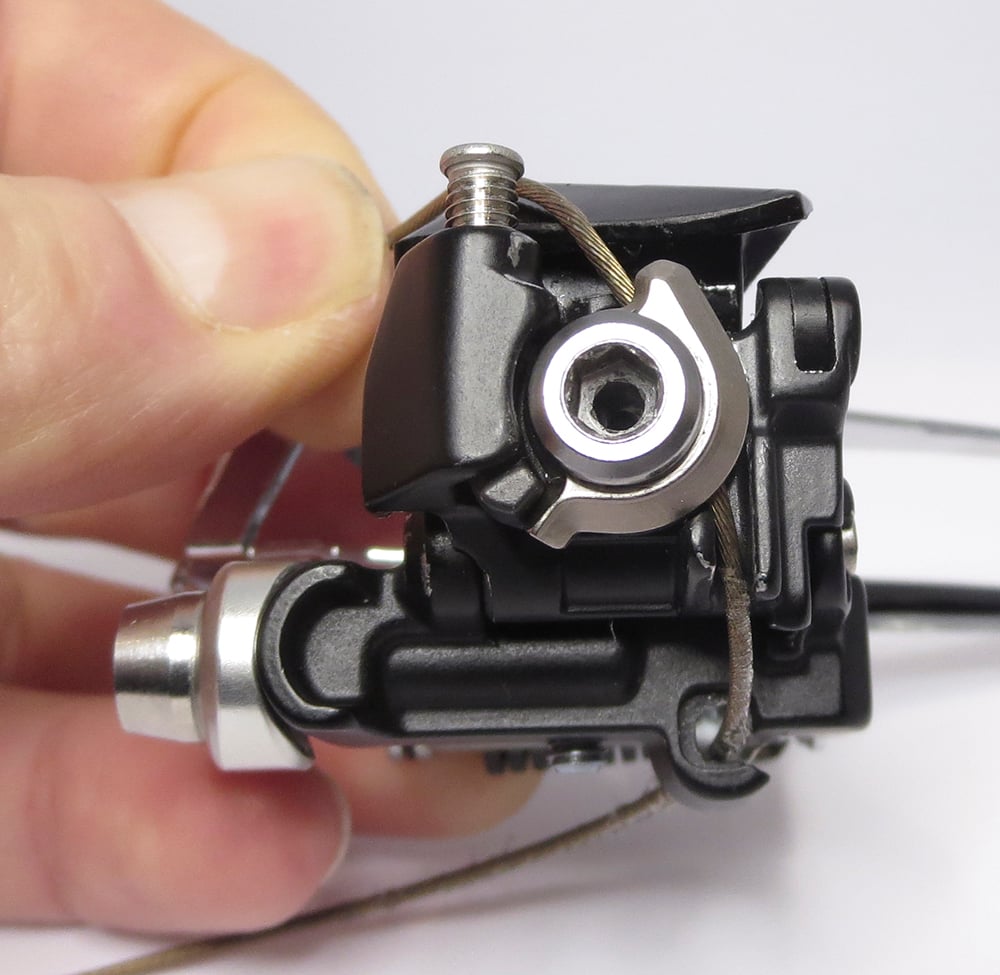
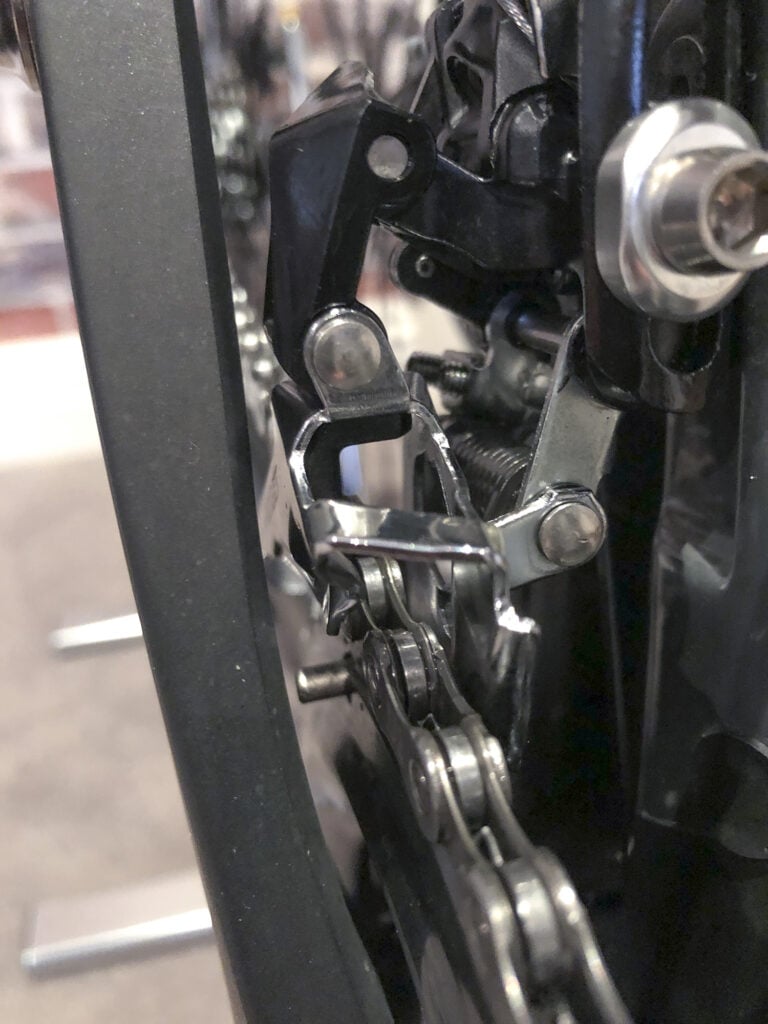
On previous designs of Shimano front derailleurs, there was no way to accurately judge the correct amount of cable tension. However, this new derailleur design features 2 markings that allow you to fairly accurately set the cable tension and therefore eliminate most of the guess work. Whilst the tension adjustment marks may be in visual alignment, the cable tension can be varied by small amounts whilst the 2 indicators remain aligned as discussed further in the Troubleshooting section later in this guide. This is how to set the cable tension;
- Move the left brake lever all the way to the right whilst turning the cranks. When the lever will travel no further, we are in the HIGH position.
- IMPORTANT: Press the small inner shift lever ONCE to move the derailleur down to the HIGH TRIM position.
- When in the HIGH TRIM position, look at the 2 markings on the rear of the derailleur as pictured. We want both these lines to line up and form a straight line. To achieve this, turn the cable tension bolt as required. Turning the cable tension bolt clockwise will move the upper line anticlockwise and visa-versa.
When they make a single straight line,
the cable tension is perfect.
Once the alignment is correct, turn the cranks and use the shift levers to move the derailleur through a full range of movement a few times whilst changing gears. Now return to the HIGH TRIM position to check the alignment is still perfect. If not, make a small adjustment otherwise this step is complete.
An inline barrel adjuster should NOT be required to fine tune cable tension. Try to use the cable tension bolt only. If the bolt is not able to adjust tension adequately, then the shift cable is either too loose or too tight. Loosen the cable clamp bolt and adjust the cable in or out to fix the problem. Attempt this step again.
7. Adjust Front Derailleur High Limit Bolt
The HIGH LIMIT bolt is designed to control the outward movement of the front derailleur, but this bolt works differently on the modern Shimano ‘toggle’ style front derailleurs when compared to the traditional ‘pivot’ style front derailleurs of the past. The difference being;
Traditional Pivot Style Front Derailleur: the high limit bolt simply RESTRICTS how far out the front derailleur can travel. In essence the high limit setting resists any over-tension of the shift cable when shifting onto the large chain ring. You would adjust this bolt so the front derailleur does not rub the inside of the crank arm and the chain does not rub inside the derailleur cage when riding on the large chain ring and smallest sprocket. This setting would only affect the front derailleur in the HIGH shift position.
New Toggle Style Front Derailleur: the high limit bolt still determines how far out the front derailleur can travel, but it it achieves this in a completely different way. The high limit bolt works in conjunction with the shift cable tension, not against it. The high limit bolt determines where the derailleur is positioned relative to the tension of the shift cable. For this reason, the high limit setting also changes the location of the front derailleur in both the LOW and HIGH TRIM shift positions as well. Therefore, keep in mind that when adjusting the high limit bolt, any adjustment can impact chain clearance in other gear combinations.
Shimano instructions recommend to adjust the High Limit bolt to stop the chain rubbing the front inside face of the front derailleur cage (closest to the frame). However, as mentioned above, the high limit setting can affect derailleur clearance in other gear combinations, you may need to find-tune this setting later on to achieve the best overall outcome.
The high limit setting is done in a crossed-chain position, with the chain on the large chain ring and largest sprocket. Whilst it is not recommended to ride in this gear combination, Shimano recommend you adjust the high limit setting in this gear combination.
- Move the left brake lever all the way to the right whilst turning the cranks. When the lever will travel no further, we are in the HIGH position. The chain should be on the large chain ring.
- Shift the chain is on the largest sprocket at the rear.
- The chain is now on the large chain ring and largest sprocket.
- Important: Press the small inner shift lever once to move the derailleur to the HIGH TRIM position.
- Now slowly turn the cranks and adjust the High Limit bolt until there is a 0 to 0.5mm gap between the inside front face of the derailleur cage and the chain. We want to achieve the smallest possible gap between this surface and the chain. If you create too much gap here, you could experience rubbing in other gear combinations, so start with a very conservative gap. It can be readjusted at any time by repeating this step.
8. Adjust Front Derailleur Low Limit Bolt
The final adjustment is the Low Limit bolt. This adjustment is designed to set the lowest position the front derailleur can shift down to. This setting is designed to eliminate any chain rub on the inside face of the front derailleur when the bike is in it’s lowest gear ratio. BUT, if the low limit bolt is screwed in too far, you may effectively negate the LOW TRIM position of the front derailleur. If this happens, shifting from LOW to LOW TRIM or visa versa will result in no visible movement of the front derailleur as the low limit bolt is stopping the front derailleur shifting down to the LOW TRIM position.

- Important: Press the small inner shift lever whilst rotating the cranks. When the shift lever no longer clicks, we are now in the LOW TRIM position.
- The chain should now be on the SMALL chain ring.
- Shift the chain to the LARGEST sprocket at the rear.
- The chain is now on the small chain ring and largest sprocket.
- Slowly turn the cranks and adjust the Low Limit bolt until there is a 0 to 0.5mm gap between the inside face of the derailleur cage and the chain. We want to achieve the smallest possible gap between this surface and the chain. Again, start with a very conservative gap. It can be readjusted at any time by repeating this step.
- Check if the front derailleur still moves when shifting from LOW TRIM to LOW positions.
Note: Depending on your bike, you may need to over-shift the lever a little past the ‘click’ to make the front derailleur move to the LOW position. This is due to a combination of acute cable angle, high spring tension and small cable pull.
9. Test All Gear Combinations
Now all the hard work has been done and you are familiar with how to set these adjustment bolts, we need to do a final test, shifting through all possible gear combinations. At this stage, you can fine tune the HIGH and LOW limit bolts further if there is still some chain rub. I also recommend doing a test ride on a quiet road to double check for chain rub in all gear combinations under load whilst riding.
10. Troubleshooting
Problem: Having followed all the steps in this guide, you are still experiencing some chain rub in the front derailleur cage using these gear combinations;
(i) Front derailleur in HIGH TRIM position, Chain on large chain ring and second largest sprocket (almost cross-chain). Chain rubs inside face of front derailleur cage.
(ii) Front derailleur in HIGH position. Chain on large chain ring and smallest sprocket (highest gear). Chain rubs outer face of front derailleur cage.
Solution: This is most likely due to shift cable tension being either a little too loose or too tight. Whilst the tension adjustment marks may be in visual alignment, the cable tension can be varied by small amounts whilst the 2 indicators remain aligned. By making small adjustments to the cable tension bolt and the high limit bolt independently, you should be able to find a setting that provides front derailleur clearance for scenarios (i & ii) mentioned above which are generally the problem areas.
Don’t forget when testing!
1. Riding in crossed chain positions may result in some drive train noise.
2. Trim the front derailleur (when required) when testing gear combinations. Double check the trim position is correct before making any further adjustment.
Finally, the chain stay length of some disc brake road frames is shorter than Shimano’s specified minimum length of 410 mm. Bike manufacturer’s do this to give the bike more snappy handling, but shorter chain stays can affect the chain line to a small degree which may result in noise as the chain moves toward a crossed gear combination.
11. Clearance Between Front Derailleur and Crank Arm
I was asked a question about how much clearance there should be between the front derailleur and the inside crank arm ie. when front derailleur is shifted to the HIGH position ie. chain on large chain ring, front derailleur shifted fully outward from the frame.
I measured this gap on my 105 (7000 series) group set to be approximately 3.5 mm. The gap to the crank arm was about the same for both the black upper body of the derailleur and the outside face of the metal chain cage.
Note: This gap may be slightly different on your bike, but you need to make sure that the front derailleur does NOT touch the crank arm when riding under load. If the front derailleur is too close or touching the crank arm, you may have allowed for too much clearance between the cage and chain when in the Large chain ring / Smallest rear cog gear combination. If so, first check the cable tension is correct (in High Trim position), then re-adjust the high limit bolt to move the front derailleur closer to the frame. Ultimately, you only want the MINIMUM distance required to achieve NO chain rub inside the front derailleur cage when riding in this highest gear combination.
Need to Install a Shimano Front Derailleur from Scratch?
Still having issues with your front derailleur or want to install one onto a new bike, check out my complete article on how to install a Shimano front derailleur. The article covers all aspects of the installation including;
- Resetting all the adjustment bolts on a previously used derailleur.
- Fitting and alignment of the derailleur.
- Connecting and tensioning the shift cable.
- Adjusting the frame bolt, high and low limit bolts.
- Fitting the plastic top cover.
If you are curious about how Shimano’s latest 12 speed di2 groupset performs, check out my article on Ultegra R8170: Best Ultegra groupset ever?
References
I hope you found this article interesting. I have listed the following website pages as general references.
Shimano Dealer’s Manual for Front Derailleur Installation
Disclaimer!
Please remember that this information is only to be used as a guide.
I consider myself an enthusiast, not an expert. The information I have presented in this article is only a guide.
Whilst I enjoy working on my own bikes, I am not a qualified bicycle mechanic. The content of this article is purely illustrative and does not constitute professional advice. For your own safety, any type of work should only be undertaken by a qualified bicycle mechanic. Incorrect assembly of parts could result in equipment damage, personal injury or death.
About Me.
I have been riding and working on my own bikes for many years now. I wanted to share my experiences, knowledge and research with others. My aim is to inspire people to get involved in all aspects of this amazing sport. Cheers.
Comments.
I welcome reader feedback in the comments section. Should you wish to suggest an amendment, please include a note advising the source of your information so that myself and other readers can ascertain the accuracy of your information. Note: Trolling or argumentative comments will be removed as they are counter-productive.
You, sir, have just about saved my sanity. I was tying myself in knots trying to work out how to set up and adjust my new 105 R7000 front mech until I came across your article. This is the most easy to follow and practically useful information for this task on the internet by a country mile. Way superior to the guidance provided by the Shimano manual. In particular, the detail about the function of the H screw and the toggle system when compared to older front derailleurs was really invaluable to me. After about ten hours of frustrating tinkering, I read your piece, followed it to the letter, and I now have a fully functional 105 front derailleur. Thank you!
Hi Martin, thanks for your kind words, great to hear the article was helpful. Enjoy your riding!
While trying to re-install my CX70 front derailleur I faced some troubles, specifically setting the trim positions properly. The trim function was an unknown feature to me and I’m asking myself how many riders are out there with actually improperly set up front shifters. Furthermore, I find it absolutely ridiculous, how the Shimano Manual and about all of the instruction videos on Youtube are totally useless and giving approximately 50% of the necessary informations. Not you. This is THE most comprehensive setup guide giving flawless explanation of the trim function. I thank you, I thank you a 1000 times.
Hi MK, Super Happy to hear this guide was of help to you regarding the trim functions of the front derailleur. Thanks for posting a comment.
Thank you for taking the time to explain how a 9100 front derailleur works. Your “guide” is better than anything on the internet.
Hi Neil, thanks for posting a comment, I’m glad to hear the article was of help to you. Enjoy.
Thanks very much for your excellent article on the new Shimano FD design. It perfectly augments the badly written Dealer Manuals (DM) published by Shimano.
-jg-
Cheers John, thanks for the comment, glad it was of help to you.
Hello there. I’ve set up several of these…my own 105 and Ultegra and several at the LBS where I work. I too have noticed the limit screw influence on the trim movements as you described. The one thing that puzzles me though is the difference in total movement between going inboard from low shift (2) to low trim (1) and then going back outboard from low trim to low shift. The inboard movement is much greater (with a more robust click) than the outboard movement…even when you have the cable tension set at it’s highest (while still allowing the derailleur to rest on the low limit screw when in position 1). After tinkering around with this, I have realized you have to push the shifter lever slightly past the click (which seems to happen way too soon) to get it to return to the same position it was in when moving from high trim (3) to low shift (2). However, when you do this, it appears to be staying there only by cable/spring tension as you can manually push the derailleur back inboard toward the frame to the index position of the original minuscule movement at the lever click. Was this the design intent? It seems to me it should move the same distance going inboard to (1) or outboard to (2). Your thoughts?
Hi Charlie,
Your observation about the shift from Low Trim (1) to Low (2) is absolutely correct. Generally you have to over-shift (move the lever past the click) to fully shift the front derailleur from Low Trim to Low position. If you do not over-shift, the front derailleur sometimes barely moves.
I believe this is due to;
1. The acute angle of the shift cable when derailleur is in the Low Trim position.
2. The small amount of cable pull used to shift from Low Trim to Low position.
3. The firm spring tension in the front derailleur that creates the resistance in outward shifting.
However, it is this spring tension that gives the front derailleur such a quick and crisp inward return action when cable tension is released. I’m guessing Shimano tuned this brand new design to maximize overall performance, with one downside being an over-shift is required from Low trim to Low positions. Obviously DI2 derailleurs solve a lot of these issues and offer auto trimming. But having said that, all my bikes are still mechanical and they still perform brilliantly.
Way better than anything I could find on YouTube. Thank you.
Thanks Eric. All the best.
Thanks Bro. You literally saved my and my families roadcycling life 🙂 Could not find anything better in the whole internet. I already maintained all mountainbikes, roadbikes and gravelbikes of my whole family based on your documentations. Thanks a lot & all the best for your upcoming rides
Hi Andi, thanks for your comments. Super happy to hear the article helped you maintain your entire FLEET of bikes. Congrats & Enjoy!
Thanks so much for writing this up, you’re a life saver! Spent ages trying to get my FD tuned but to no avail, then I came across this – and it has definitely saved me a trip to the bike shop!
Just one question/concern: when setting the cable tension, I had to undo the cable clamp bolt and pull the cable really hard in order for the line markings to line up (still out by 2-3 degrees) with the tension bolt all the way in. Is this normal? I’d like to get the marking lined up exactly, so to add more tension will I need to pull even harder?
Thanks again.
Thanks for your comments. The first thing I would check is the high limit screw may need to be RESET before doing the cable tension bolt as the high limit bolt has a big effect on how cable tension shifts the front derailleur. The high limit bolt is very different on this new derailleur design when compared with traditional front derailleurs. Check all the steps mentioned in my How to Install a Shimano Front Derailleur Guide.
Hi!
I have the Shimano 105 di2 and have som problems with chain hesitating to shift from small to large chain ring. Should the measures from the r7000 apply to the r7170 as well?
Regards Pär
Hi, unfortunately I have no experience with setting up Shimano di2.
My low limit bolt is gone, and the local shops seem lost on how to get a new one. Do you know the thread specs? I’m hoping I can go to the local hardware store and buy one.
Hi James, that’s unusual. When you unscrew the low limit bolt to the point of having no effect on the 105 front derailleur adjustment, there is still about 3.5mm of thread engaged in the derailleur body. However I’m not sure if this is the case with other versions of the Shimano derailleur eg. Ultegra, Dura-ace etc.
Bad news is I’m fairly certain Shimano don’t sell replacement screws. This screw is probably custom made to their requirements as it is a fairly long (10.09mm) grub screw with a recessed hex key head. I measure the overall diameter as 3.96mm but I don’t know the thread pitch (I assume Metric being Japanese). It is possible you may find a regular bolt that matches the thread, but the standard head (hex or screw) may interfere with the chain, depending on how much you have sticking out. It may be possible to cut the threaded section off the bolt to match the length of the original, then cut a small slot into the end to turn it using a small flat bladed screw driver.
Not sure what series your derailleur is, but you could also buy a new 105 derailleur (which are fairly cheap) and use the bolts from that assuming you have a dearer Ultegra, Duraace model and the bolts are the same. I expect they would be but dont have one to compare.
It’s actually a fairly standard metric setscrew. I don’t recall the spec at the moment, but one can take the low-limit, high limit, or frame support bolt to a good hardware store (at least in the US), and match it up.
i followed shimano’s r7000 pdf instructions which seems to only focus on the clearance of the inner side of the derailleur cage on both top and low adjustments, couldn’t get rid of the chain rub when i was on largest chainring and smallest sprocket on the outer side of the derailleur cage, turning the cable tension bolt(or the inline barrel adjuster) to increase tension didn’t help either, it only eliminated the trim function, so i just moved the chain to the largest chainring and smallest sprocket while on high shift position and adjust the top limit screw to give it clearance. or maybe i underestimated how narrow 0.5mm is, thats why it caused problems?
Hi, just remember that adjusting the top limit screw will affect the derailleur position in other gear combos. This screw is critical to be set correctly for overall performance. If you think it is not performing as it should, get a reputable bike shop to check over the setup, it shouldn’t take them very long for small adjustments. This new design has been around for a while now so most mechanics should be able to sort it out.
Thank you very much for the thorough analysis and clear advice.
M. Poland
Great tutorial! Thank you. Can u make similar one for rear derailleur with clutch (GRX 400 and others). It’s pretty hard to adjust and makes a lot of noise if setted up incorrectly.
Hi Michal, thanks for your comments. Whist I don’t have a GRX 400 rear derailleur, there are plenty of tutorials and videos on how to setup and adjust a rear derailleur. This process has been the same for years. I only wrote this tutorial because the design of Shimano’s new front derailleurs were quite different to previous versions and therefore different to previous models.
Hello. Thank you for the amazing guide here. I am running into one problem: I don’t see any movement when going from LOW to LOW TRIM. Any ideas how I can troubleshoot this?
Hi Sid, as mentioned in the guide, the most common reason the front derailleur doesn’t change from LOW to LOW TRIM is due to the low limit bolt being screwed in too much. This bolt can stop the derailleur moving in toward the frame. Try unscrewing this bolt all the way out to see if any movement occurs. If it doesn’t then maybe the cable is catching on something or too tight.
Hi I have a FD-R 8000 ultegra detailer on a new bike. The detailer poses no problems when using the large (outer chainring). However I cannot shift into the smaller sprocket, instead when I shift down it stays perched on the spines or gets caught between the two chain rings.
Do you have any suggestions to solve this problem?
Hi Steven, so be sure to understand your question, the problem is the chain doesn’t shift from large chain ring down to small chain ring correctly. Could be a number of reasons including too much cable tension, incorrect setting of high limit bolt, possible incorrect alignment of front derailleur, cable is kinked or catching something, faulty shifter? A bike shop should be able to sort out that problem if you were not able to have any luck after following the steps of my adjustment guide.
good morning, congratulations for the guide. I have a problem with an ultegra R8000 derailleur: with a large chainring and the 3 smallest sprockets, the chain has contact with the external surface of the radiator. I could solve it by increasing the distance with screw H, but contact is created between the crank and the derailleur (I already have a minimum gap of about 0.5mm). Derailleur height and angle are correct. thanks for an advice
Hi Manuel,
If the guide wasn’t able to help, I recommend taking the bike to a good mechanic to check over.
Thank you so much for this informative guide, especially (at least for me) for the info on trimming the front derailleur. If I had not come upon your excellent tutorial, I never would have known that this is a thing!
Cheers!
Hi Hart, glad to hear it was of help to you.
Thank you very much. You’re a cycling treasure!
I can never thank you enough!!!
We share the same Road Cycling passion but i leave in a country where there is no authorized Bicycle dealers and repair shops so i was struggling and really pessimistic on properly adjusting the FD-7000 on my unboxed brand new Scott Addict 30 Purchased overseas: Chain rubbing the derailleur cage when on the big chainring, and shifting not really smooth. so i was really lucky to find your article, i followed the instructions to the letter and it appears that frame support bolt was not even touching the frame and the FD cage edge 6mm away from the big chainring teeths. again, i followed your instructions to the letter especially coz i am not familiar with “Toggle” mechanism front derailleur, the result is exceeding my expectations so thank you very much for your detailed and valuable information.
Cheers from Algeria!!!
Hi Karin, thanks for your comments, I’m glad the article was of help, good luck with the new bike!
Wowwww! You just gave me hope on my understanding of mechanics. I thought I was doing things wrong, and I was! I mean I was doing them as I knew it was the method for front derailleur. But didn’t know it was a whole new way for this more expensive ones. Thanks for your generosity and clarity.
Very much appreciated.
Hi Raul, glad to hear this guide was able to help you. Thanks for posting a commet.
When it comes time to replace the shift cable, is the correct new cable tension usually able to be achieved simply via the tension screw, or does the H screw need to be reset first and then the two adjusted together again?
Hi Matt, when replacing shift cables it is best to start with all 3 adjustment screws reset to original. I recommend you check out my other guide on how to install a modern Shimano front derailleur.
Hi and thanks for a great guide. Could you clarify something for me please? In part 8 you say:
“Slowly turn the cranks and adjust the Low Limit bolt until there is a 0 to 0.5mm gap between the inside face of the derailleur cage and the chain. We want to achieve the smallest possible gap between this surface and the chain.”
In the Shimano dealer manual for this adjustment it states:
“Adjust the low adjustment bolt so that the clearance between the skid plate of the chain guide and the chain is 0 – 0.5 mm”
Do you mean the front inside face of the cage or the skid plate which is towards the rear?
Will it make a difference using the skid plate or the method you describe?
Hi Nick, glad to hear the guide has helped, I prefer the gap to be from the skid plate so the chain is not contacting anything. It will slide on the skid plate but that creates a small amount of friction and wear.
Thank you. After a recent wheel change and the mechanic fixing a problem with the chain rubbing the front mech on the big sprocket/small chain ring, I then had a problem in a lot of other gears. Have to say I spent more time reading than fixing the problem, which is now very much sorted and even better than before.
Again, thank you.
Hi Rod, fantastic to hear you resolved the issue. Enjoy riding the bike.
I don’t think this question has been asked, so here goes!
I’m converting a 2010 Trek with internal cable routing from its original 10 speed ultegra to r8000 11 speed, including this new front mech design.
The exit point for the (bare) cable from the frame was in the perfect position for the original front mech design, but it isn’t well positioned for the newer design, not sitting at a nice entry angle for the new mech’s grooves.
The simple fix would be to add a cable outer to the mix, and indeed the Shimano manual explains how and where to fit one. It suggests that the outer should have a resin type cap at the derailleur end of the outer, but when I set it up like this, the cap doesn’t seem to sit snuggly or securely into the front mech.
Does anyone know what I might be doing wrong? Is there a special super-slim end cap I don’t know about? Could I use the outer (which seems to fit snuggly) without an end cap? Is it ok to fit the bare cable even if its entry angle is a bit too obtuse?
Any advice gratefully taken on board!
Hi Simon. I haven’t setup a front derailleur in this way, but I did try inserting a bunch of metal and plastic shift cable ferrules into the 7000 front derailleur and none of them would go in, they were too thick. The ferrules supplied in a genuine Shimano shift cable kit may be thinner, but I doubt it. I also tried inserting the outer without the ferrule and it was too sloppy for my liking. You could try taking the front derailleur to a bike shop and see if they have anything that will fit in their spares drawer.
You can also buy ‘step-down’ ferrules online. I had to buy them to fit the shift cable to my vintage Super Record rear derailleur as shown in the Colnago Nuovo Mexico restoration article. You can see one step-down ferrule fitted to each end of the stainless steel shift outer which is a similar size to a regular shift cable outer. Unfortunately I don’t have a spare one to try, but maybe they will work. Best of luck!
Great write up! Just wanted to confirm if I understood this correctly that I will really experience some sort of rubbing with the big chain ring + biggest sprocket or small chain ring + smallest cassette combo due to cross chaning, correct? This is really expected even if the limit and tension are adjusted perfectly?
I’m a home mechanic and would like to know if there’s something wrong with my 105 R7000 set up as I am unable to have complete 0 rubbing in the big-big or small-small position.
Hi Jon, yes, even if you adjust it perfectly, it is likely there will be chain rub in at least one of those cross-chain combinations, so at that point you can adjust it to determine which combination and how much. I personally prefer to adjust the front derailleur so chain rub occurs in small chain ring with smallest and second smallest cogs, but not in big-big. Whilst I don’t deliberately ride with a crossed chain, occasionally I can end up in big-big and I dont want chain rub with that combo. One advantage of di2 systems being the front derailleur can trim further out/in to eliminate chain rub in any gear combination.
Great article. Clear and to the point.
One question. I have screwed the cable tension to the point where the two marks are almost aligned but I cannot screw it in any further. I have the lever in the low low position and manually pulled the cable as firm as I can comfortably get it then tightened the cable clamp bolt.
It shifts ok but I have run out of any future adjustment. Any suggestions?
Thanks Bill
Hi Bill, I suspect the high limit bolt was not set correctly before you set the cable tension. Refer to Step 1 of my installation guide. Unlike traditional front derailleurs, this new design requires you to set the high limit screw to a correct starting position before you fit the cable and set the tension. If high limit screw is not set correctly first, the cable tension bolt has to be screwed in much further to get the derailleur to shift, leaving you with no later adjustment.
Couple of months ago I was building my new bike from frameset, with mostly new parts. For front shifting I got Shimano FD8000 front derailleur. Previously I was using 105 5800, that I setup perfectly. Since this new type works totally differently, it took quite some fiddling, but with Shimano manuals, various youtube videos and your great guides I got it set up reasonably well: it shifts smoothly, all four shift positions working, there is only some slight rub in extreme cross chain positions but that doesn’t bother me much since I avoid crosschaining. What does annoy me however is how trimming works on this type of derailleur. While on old one I only had to use trim in extreme positions to avoid chain rub, this one works so that half of cassette works best in regular position, and the other half in trim position. Since most of the time riding around middle of cassette, it requires constant trimming. Is this how it’s suppose to work or I missed something while setting it up? Franky I’m seriously considering switching back to old 5800 derailleur, other than useful cable tension bolt I don’t see any advantages of this type of derailleur.
Hi Branko, when on the large chainring you should be able to use most of the rear cassette whilst in the HIGH TRIM position, then shift derailleur out further to the HIGH position for the smallest cog (& maybe second smallest cog). Use the HIGH LIMIT bolt to tweak the position of the derailleur. Remember this adjustment will change front derailleur position in the other locations, so you should test all 4 trim positions with each adjustment of the bolt then choose the compromise that suits you. Unlike di2, there will be chain rub in some cross chain situations. Also check the derailleur is parallel so that it is not rubbing unnecessarily.
Thanks for your write up. I have set everything up correctly. But i cannot get the crank arm to clear the FD without rubbing. I can adjust the tension or the H limit and clear the arm, but then the chain rubs the inner cage. Been going at this for several hours now. Absolutely maddening.
Might be worth taking to your local bike shop for a look.
Hi Rouleur, I had my semi integrated handlebars swappd at my LBS, now the downshift on both sides is alot harder to push especially the FD. Do you have any thoughts as to why or can I adjust it to be a lighter push?
Thanks
Hi Huey, at a guess that sounds like more friction has been introduced into the system if both shifters are not as light after the bar change.
If both derailleurs are shifting correctly, then it is not likely a settings issue causing increased resistance.
Things that typically increase resistance;
1. Does the cable routing (for the new bars) have more bends or tighter bends?
2. Were cheaper (non-Shimano specified) shift cables & outers fitted when bars were swapped?
The Shimano specified cables have special coatings to reduce friction and the reduced resistance can make a big difference in feel at the lever.
Bike shops typically stock a large bundle of standard shift cable and housing which don’t have those coatings and are cheaper.
The Shimano cables cost more and sold in separate packs in my experience.
This is exactly what I needed.
I’ve done my own maintenance since the days of accushift 7-speed downtube 105.
My new bike, sporting Ultegra R8000, had the front derailleur shear off at the derailleur mounting bolt.
Installing a replacement, I found myself in a different world, where 35 years of experience no longer applied.
Thank you!!!
Hi Dan, great to hear you have a learnt a new skill to add to your many years of experience.
This guide is so invaluable, thank you so much for taking the time to put it together! My new bike stopped shifting to the large chain ring and I followed this guide and it’s working like new again. It saved so much time vs going back to the shop for an adjustment.
Hi Rag, great to hear you were able to fix the shifting. The nice thing about doing it yourself is the sense of achievement as well.
Great article. Wish I’d had this before grinding through the manual!
Thanks Dan. Hopefully the bike is all good now.
When setting the derailleur height above the big ring I’ve found it helpful to wind the low limit screw in, so it’s not necessary to hold the cage by hand against the spring while carrying out this step.
I would like to add something to this that hasn’t been said, although I haven’t proved my theory yet.
I’ve had no problem with this type of derailleur on 3 different bikes, but my current bike it is impossible to adjust.
The difference is,this bike has a braze on already on the frame, and I believe it pushes the front derailleur too far out so that it cannot clear the chain in Large cassette ring/small chainring. This causes you too unscrew the low adjust screw too much, trying to clear the chain which affects the high adjust screw
I’ve ordered a shimano band-on adaptor,, to see if I’m right.
Hi Sam,
Interesting theory. The only thing I can think of that might cause that is the angle of the cable from the frame to the derailleur, but it could also be a setup issue.
There is no doubt that the location of the braze-on mount will change the position of the front derailleur relative to the chain rings.
eg. If the braze-on mount positions the front derailleur further out from the seat tube, the front derailleur will be located closer to the chain rings.
This will in turn affect the adjustment of the low limit bolt. However it sounds like you are able to adjust the low limit bolt so that the chain does not rub on the inside face of the front derailleur (in the large cog / small chain ring combination).
The low limit setting has no influence on the outward movement of the front derailleur which is solely controlled by (a combination of) the cable tension bolt and high limit bolt settings. Unlike the design of traditional derailleurs (where the high limit bolt restricts outward travel), the high limit bolt in this new design is used to fine tune the outward travel of the front derailleur mainly regulated by the cable tension bolt.
If the front derailleur is not able to travel out far enough, it’s typically caused by incorrect cable tension and high limit bolt settings.
Double check section 5.2. When there is no cable tension, the top of the derailleur should not be movable with your fingers.
Best of luck.
Thanks for your reply, sorry for the misunderstanding, there is rub in the small chainring large cassette combo even with no cable and the L screw backed out.
Hmm not sure what’s going on with the H screw then. Maybe the derailleur is just in a bad position from the start.
In regards to cable angle, it is coming from a cable stop on the seat tube, which probably does create a different angle than previous bikes I had.
(Follow up) I have now replaced the braze on (luckily bolted on!) With the shimano SM AD91 adapter
Result is plenty of clearance and perfect shifting!
Its crazy that the designer (Orro bikes) specifically designed this bike with an incompatible braze on! the only thing I can think of, is it was originally going to have different components.
Hi Sam,
Congratulations on sorting out that issue!
Glad to hear the shifting is back to perfect.
Enjoy the bike.
Excellent article – very clear and informative. Many thanks for taking the time to put it together. My issue was a stretched cable which was very easily diagnosed with the two small white line markers you pointed out which were nowhere near aligned before but they are no and changing rings is working great thanks. To be honest I didn’t know the marker lines were even there till I read you article – oops !
Hi David, thanks for your comments and glad the article was able to help you get your shifting working correctly.
Hello,
Maybe it has already been said in the comments. When i compare your procedure and the one of the shimano manual, it seems to be a difference for the adjustement of the High/top bolt.
In the shimano manual, they say
“Adjust the top adjustment bolt so that the clearance between the chain guide inner plate and the chain”
In your procedure, for the High/top you say “Now slowly turn the cranks and adjust the High Limit bolt until there is a 0 to 0.5mm gap between the inside front face of the derailleur cage and the chain.”
For the L bolt, you say ” between the inside face”.
I’m not a native english speaker, so i’m not sure that all of these are refering to the same placement
Thanks for your help !
Hi Wilhem, in the Shimano manual to adjust the high bolt they say; ‘Adjust the top adjustment bolt so that the clearance between the chain guide inner plate and the chain is 0 – 0.5 mm’ and they show a picture of the front derailleur (inside front face) and the chain.
In my guide, I refer to the ‘chain guide inner plate’ as the ‘inside front face of the derailleur cage’. I also added advice to rotate the cranks because the chain moves slightly closer and away from the chain guide inner plate during a full rotation of the cranks. You need to set the minimum taking this into account.
When setting the low bolt Shimano refers to the ‘skid plate of the chain guide’ which I again call the ‘inside front face of the derailleur cage’. I hope this clarifies it for you. The pictures in the Shimano manual are a useful reference.
First of all, thanks for the extensive write-up. I’ve recently bought a used road bike with 11sp 105 derailleurs, and I’m not getting along with the front derailleur.
I’ve had a few goes at finetuning, started from scratch twice, but always end up with very little to no movement from high-trim to trim positions. Adjusting the cable tension screw doesn’t seem to change anything one way or the other. What would cause this?
Hi Marc, the cable tension and high limit bolt control how far out the derailleur will move from the frame (HIGH position). Then pressing the inner shift lever once will move the derailleur SLIGHTLY inward to the HIGH TRIM position. There is no way to adjustment the amount of travel between those 2 positions, it is determined by the shifter releasing a small amount of cable tension. All you can do is tune the HIGH position using the bolts so that the derailleur cage just clears the chain when in large chainring & smallest cog. Then when you shift down into HIGH TRIM position, the small amount of inward front derailleur movement will allow you to ride the large chain ring and down into the second largest cog with either no or just minimal rub. Riding the large chainring and large cog will probably cause the chain to rub in the front derailleur even when in HIGH TRIM position.