
Regina was a highly regarded Italian manufacturer of high quality vintage freewheels and chains. This article discusses two different methods of servicing a Regina freewheel.
Method 1 is a basic service that involves no disassembly or tools.
Method 2 is a full service explaining how to disassemble, inspect, clean and lubricate all the internal parts before reassembling them.
Basic Freewheel Clean and Lubrication
The following image (taken from the inside of a Regina America Superleggera freewheel container) shows the official recommended cleaning procedure for a Regina freewheel. These steps involve no disassembly of the freewheel and are pretty easy to follow. I recommend using a good set of gloves for this type of service. The steps are as follows;
- The Regina freewheel should be cleaned by dipping it into gasoline or solvent bath and spinning it until all dirt is washed out.
- The freewheel should be upright and spinning during the cleaning process then dried with air pressure.
- As soon as the freewheel is completely dried, a light oil should be applied inside the body through the front face.
- The use of grease is not recommended as it will cause the pawls not to operate in and out, thus causing the freewheel not to work properly.

Inside lid of a Regina America Superleggera freewheel.
Full Freewheel Dismantle and Service
I enjoy the challenge of taking things apart and rebuilding them. By dismantling the freewheel, you can inspect the condition of the parts and fully clean and lubricate everything to ensure longevity and peak performance.
The internal construction of a freewheel is pretty simple, but performing a full service requires tools, time and patience. I can share my experience having now serviced two different models of Regina 6 speed freewheels. They each presented different challenges due to differences in design.
The first Regina freewheel I serviced was a Regina Extra Corsa 12t-19t with a ‘Scalare’ (close ratio) body. This one was easy to dismantle but difficult to reassemble because the pawls projected out into the lower bearings and knocked them out of position when reassembling the freewheel.
The second freewheel I serviced (Regina Extra America) which is the focus of this article, took a bit of effort to get the top cone ring loose, but was easy to reassemble as the pawls did not contact the lower bearings during reassembly.
Regardless, with some patience and persistence I managed to service both of them and they have worked well since. After reading this article, you can decide if it is a job you want to try yourself.
The freewheel that I will be servicing is a Regina Extra America 6 speed freewheel, but the process is similar for other models.
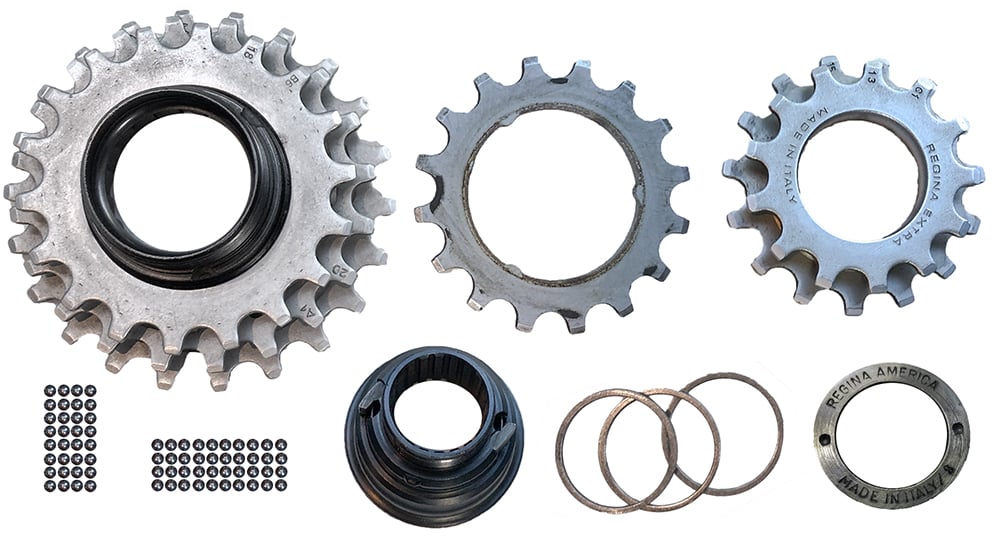
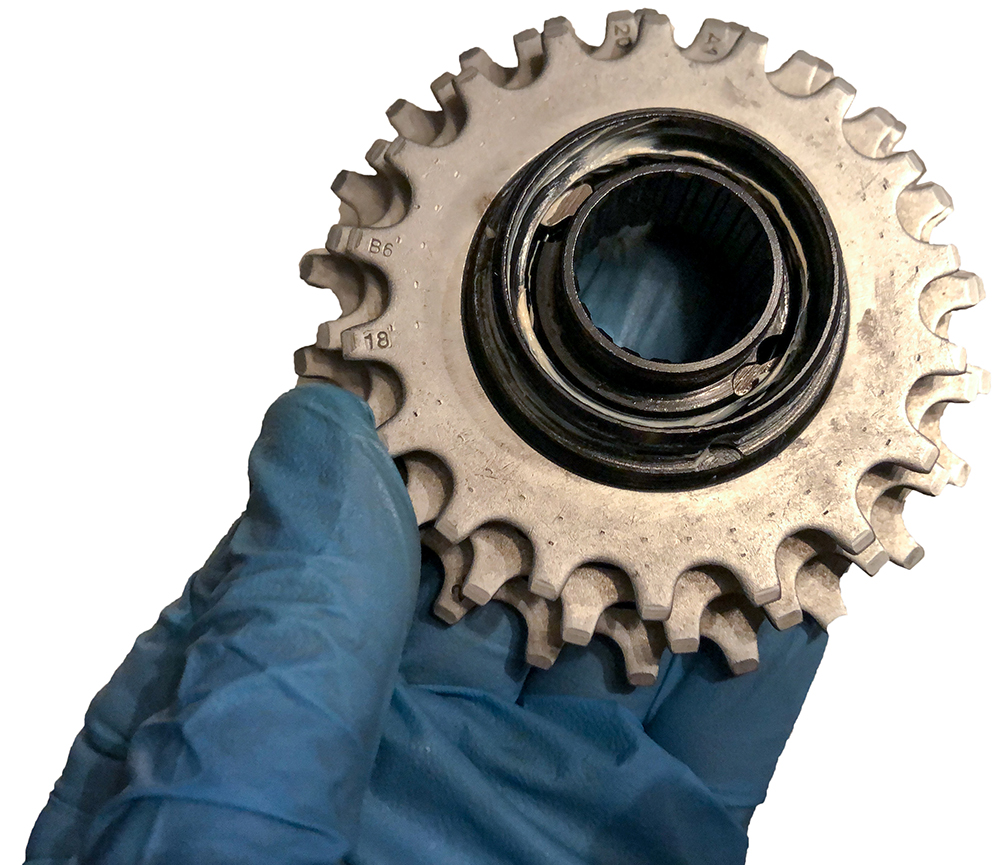
The above image shows a disassembled freewheel. The parts are;
1. Main freewheel body with largest 3 cogs fitted.
2. A 16 tooth cog with 3 notches (not threaded) – slides on.
3. The 2 smallest sprockets still threaded together. They were removed to get access to the top cone ring.
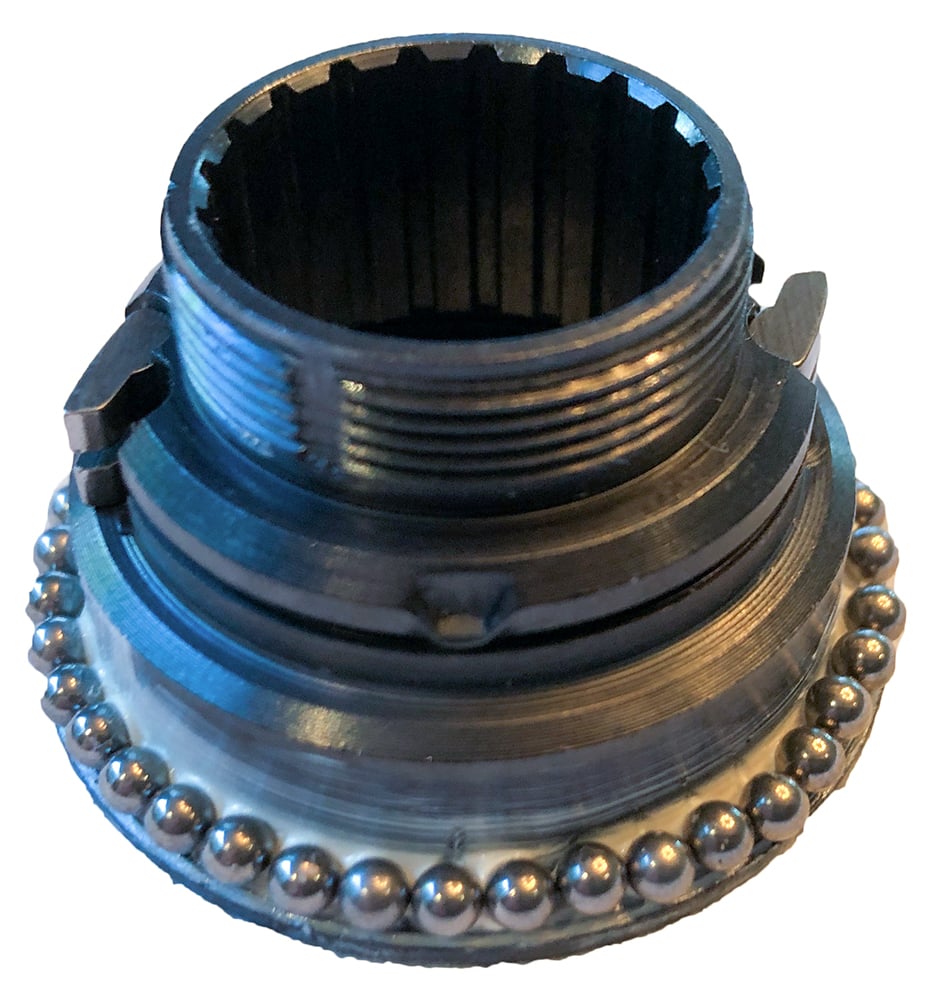
4. Upper and lower loose ball bearings (72 pieces).
5. Inner freewheel body with 2 pawls and springs fitted.
6. 3 x Spacer washers of different thicknesses.
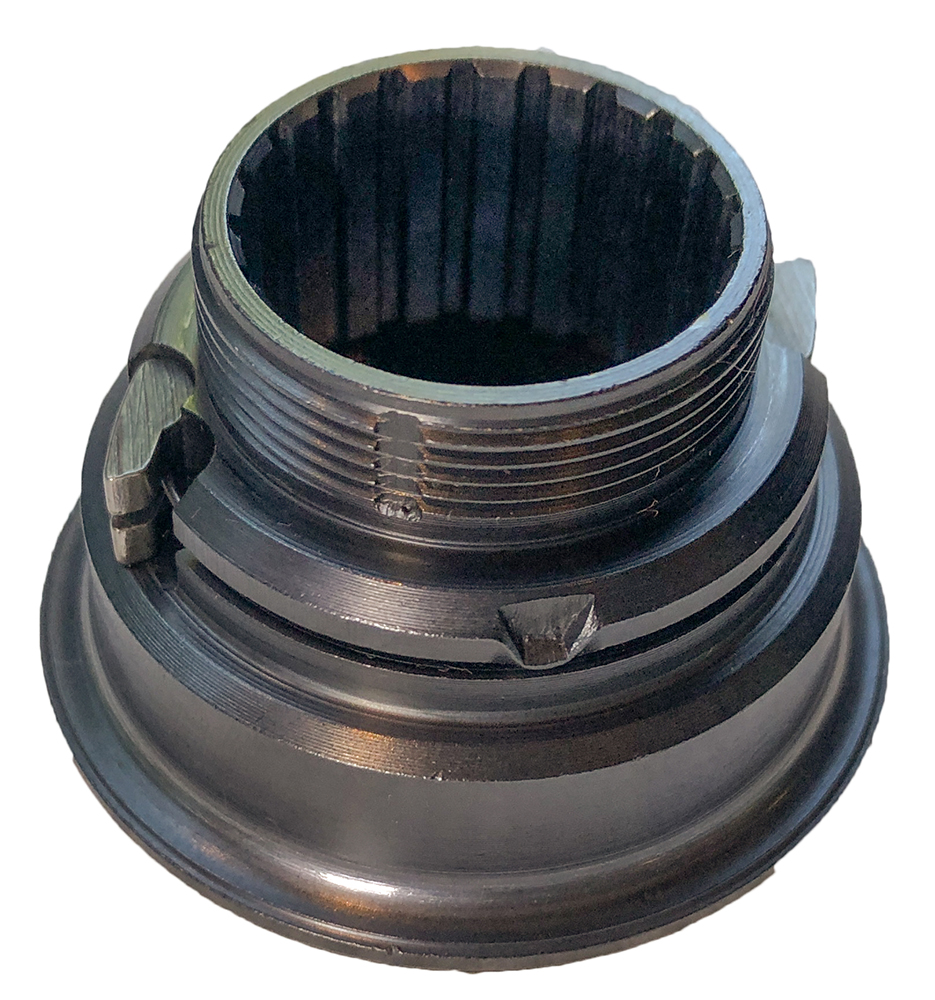
7. Top cone ring with 2 notches. These notches are very shallow but allow you to loosen and tighten the cone ring. The cone ring holds the inner and outer freewheel bodies together.
Tools Required
The tools I used to service my Regina freewheels were;
- Freewheel Removal Tool.
Required to remove the freewheel from the bicycle wheel. There are many different types to suit different brands and models do your research carefully before buying if you don’t have one.
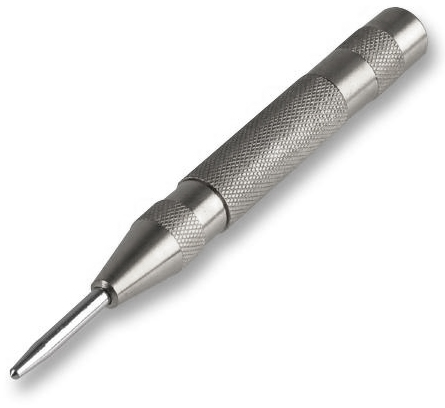
- Pin Spanner or Center Punch & Hammer.
Required to remove and replace the freewheel top cone ring. The top cone ring can be identified by the 2 round depressions opposite each other on top of the ring. This ring can be screwed on tightly. A pin spanner my not provide enough grip to initially loosen the ring, so a hammer and punch is sometimes required. Once the ring has been loosened, the pin spanner should be adequate. - 2 x Chain Whip tools or 1 x Chain Whip tool (plus some timber and screws).
These tools are used for removing any small cogs (if required). I use modern 11 and 12 speed Park Tool chain whips to remove cogs from my 6 speed freewheels. - 2 x Small containers.
To hold the 70+ loose ball bearings. Use one container for the upper ball bearings and one container for the lower ball bearings. - 1 x towel to catch any stray ball bearings that may fall.
- Fine nose pliers or tweezers to place and remove the bearings.
Essential when reassembling the freewheel. - Degreaser and paper towel (or clean rag) to clean all the parts.
- Bearing grease (preferably waterproof & corrosion resistant).
Essential to lubricate and hold the bearings in position. Oil will not work. - Bicycle oil (optional).
To lubricate the pawls if you don’t want to use grease for fear of them sticking and not engaging correctly.
Dismantle the Freewheel
To dismantle the freewheel, you will need unobstructed access to the top cone ring. Unfortunately, you can see my Regina freewheel (image 2 below) the 2 smallest cogs overlap the top cone ring. Once I removed these 2 cogs I had full access to the to cone ring (image 1 below). Learn how to remove cogs from a Regina freewheel.
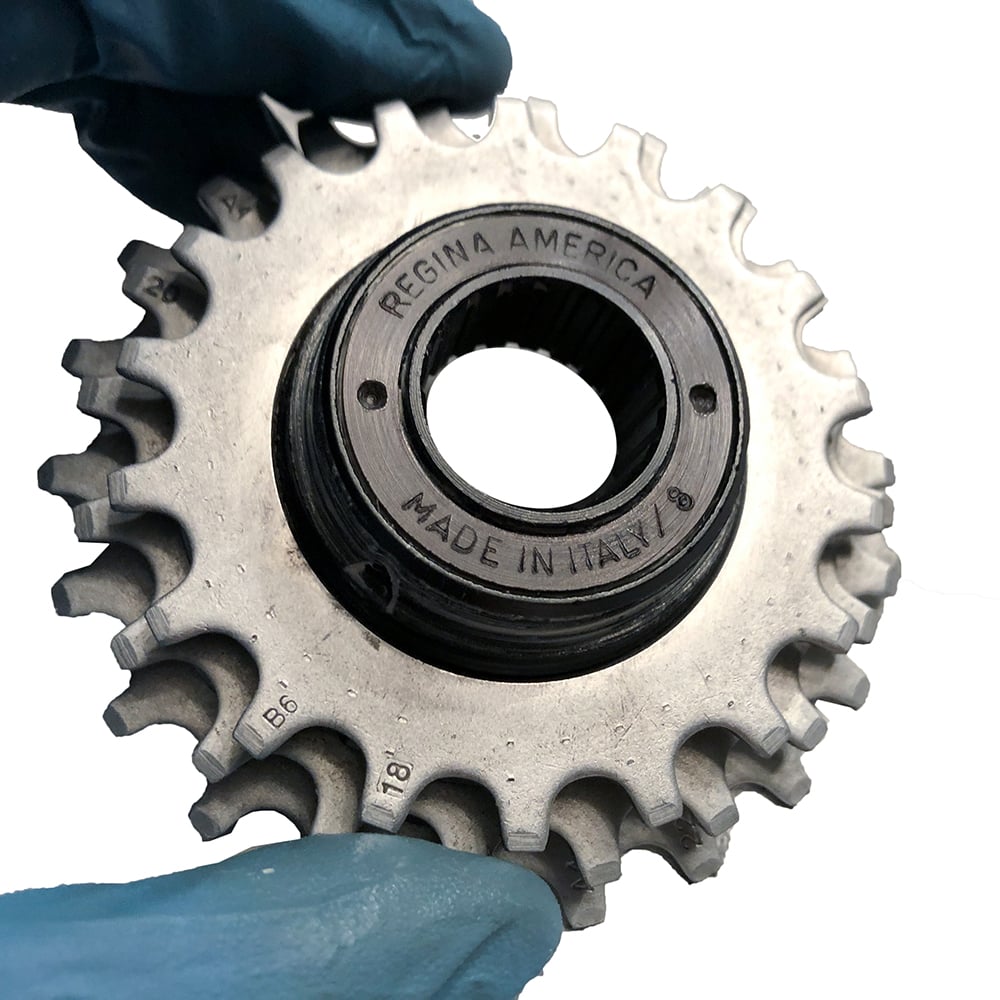 | |
2. Right image: Top cone ring not visible, obstructed by smaller cogs.
Step 2. Loosen the top cone ring on the freewheel.
This step is best done with the freewheel fitted on the bicycle wheel to give you more control and grip. I have explained 2 methods depending on the tools you have available and how tight the top cone ring is fitted.
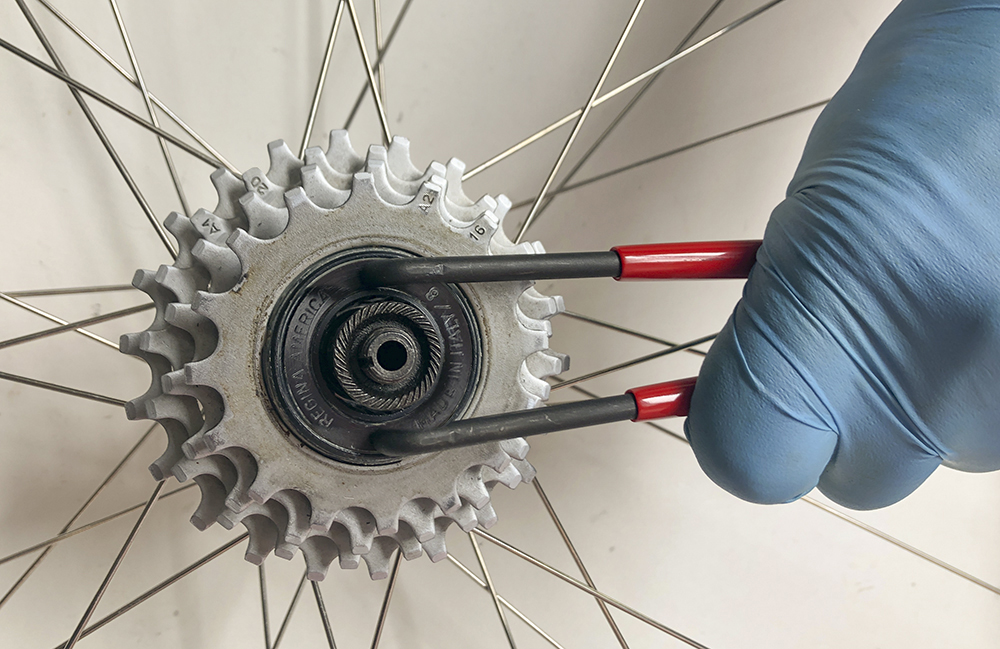
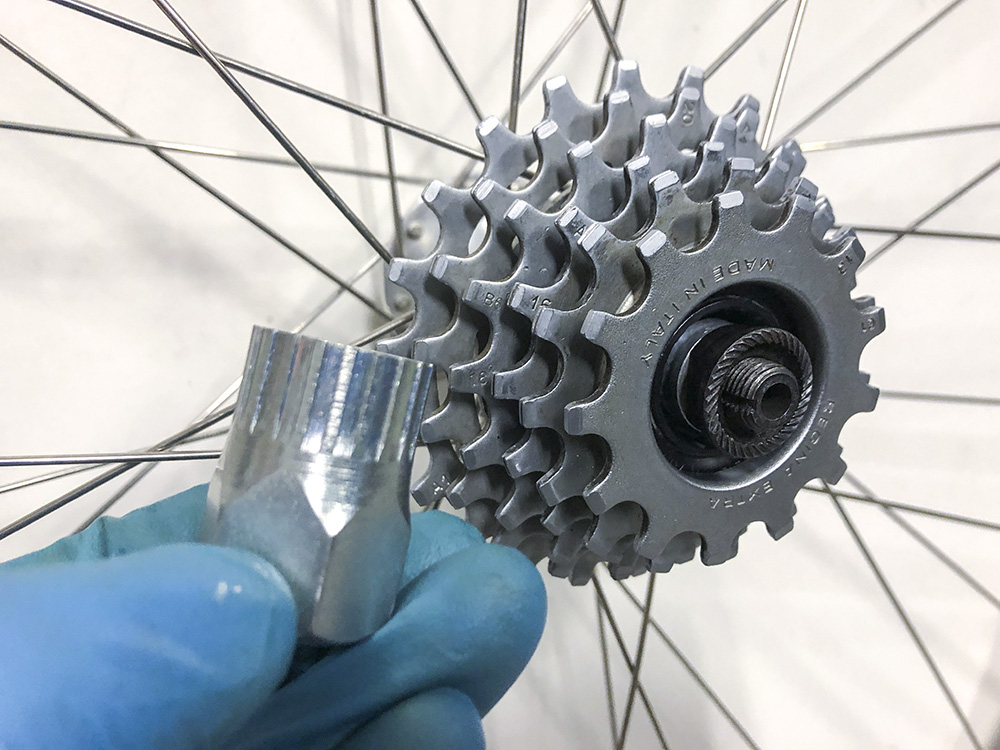
(i) Loosen the top cone ring using a pin spanner.
Make sure the tips of your pin spanner are a good fit as these tools come in a variety of different sizes. Turn the ring CLOCKWISE to loosen (yes, it is reverse threaded). Once it comes loose, do NOT unscrew the ring at this stage, we only want it loose enough to be able to turn it with our pin spanner. If it doesn’t come loose, you will have to resort to a hammer and center punch to knock it it loose. As I experienced with this freewheel, the 2 notches in the ring were very shallow and the ring was quite tight, so it required the hammer and punch to knock it loose.
(ii) Loosen top cone ring with hammer and center punch tool.
Thankfully the top cone ring is made of steel and those notches are quite durable. Stand the wheel up against your legs. Make sure you orient the 2 notches on the cone ring so they are parallel to the ground. You want each hammer strike to be forcing the punch down toward the ground to turn the ring in a CLOCKWISE direction. Once it comes loose, do NOT unscrew the ring at this stage, we only want it loose enough to be able to turn it with our pin spanner (or center punch).
Step 3. Remove the freewheel from the bicycle wheel.
You will need the appropriate freewheel adapter tool to remove the freewheel from the bicycle wheel. Insert the adapter and turn the adapter anti-clockwise to remove the freewheel. It might be tight due to the pedaling forces. Do NOT use a chain whip when removing a freewheel!
| 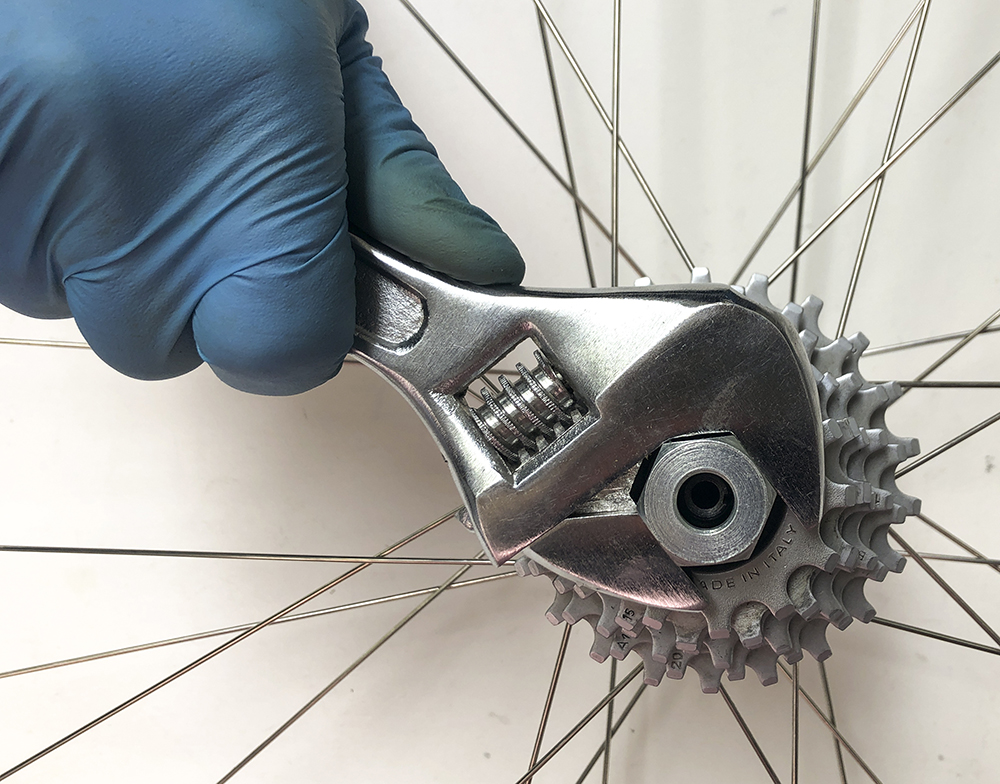 |
2. Right image: Unscrew freewheel anti-clockwise to remove.
Step 4. Remove the top cone ring from the freewheel.
Before we remove the ring, place the freewheel onto a towel or tray resting on a flat bench. This ring holds the entire freewheel body parts together, once it is removed the freewheel could fall apart and bearings would go everywhere. However by resting the freewheel on a flat surface before removing the ring, it will stay assembled. We have placed a tray or towel under the freewheel to catch the lower bearings in step 5.
Now unscrew the ring (clockwise) and remove it. Check no loose ball bearings are attached to the underside of the ring before putting it somewhere safe.
Step 5. Remove the top layer of bearings.
Now you should see the upper layer of loose ball bearings (32 pieces in my freewheel). Using tweezers or fine nose pliers, remove all these bearings and place them into a tray on their own. It is a good idea to count them and make a note of the quantity.
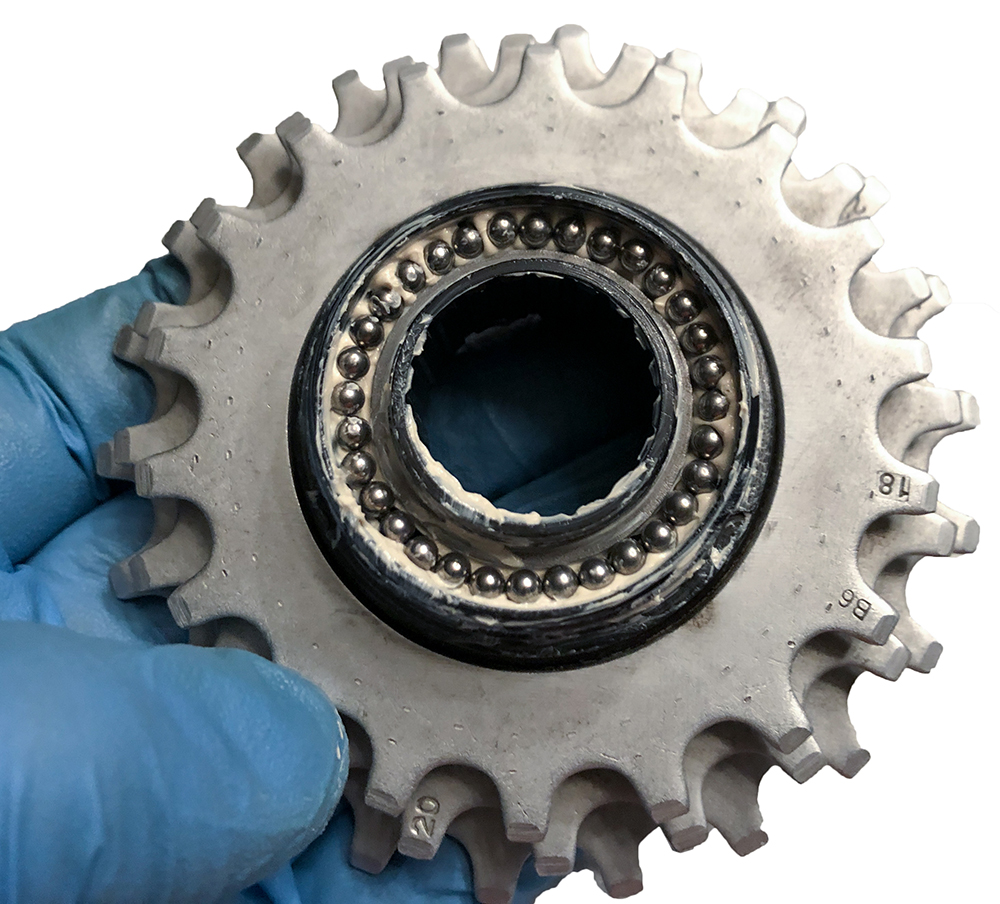
Step 6. Separate the freewheel bodies.
Lift the main freewheel body (by the cogs) away from the inner body. Check the underside of the main freewheel body for loose ball bearings. Place these bearings into a different tray. Also check for any pawls or springs that may have come loose. My freewheel has 2 pawls and a single retaining spring keeping everything in place, however my other Regina freewheel had 2 pawls with a spring for each. In this situation, all 4 parts were easy to dislodge, but were easy to reassemble too.
Step 7. Collect the lower ball bearings.
Finally place all the remaining loose ball bearings into the second tray that contains the lower bearings. Again count them and make a note of the quantity. I had 40 lower bearings in my freewheel. All 72 bearings in my freewheel were 1/8 inch size.
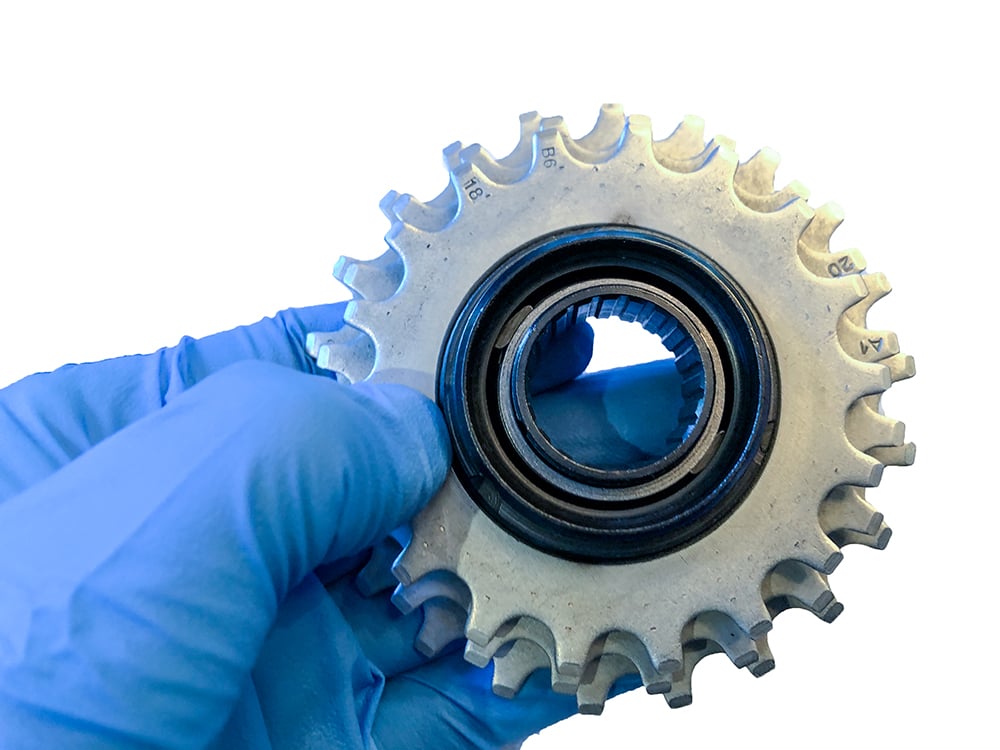
Step 8. Remove the spacer washers.
Remove any spacer washers from the top of the inner body. My freewheel had 3 spacer washers that were resting under the upper layer of ball bearings. 2 washers were thin and one was thicker. These washers prevent the top cone ring compressing the bearings when done up tightly. The thickest washer was located at the top.
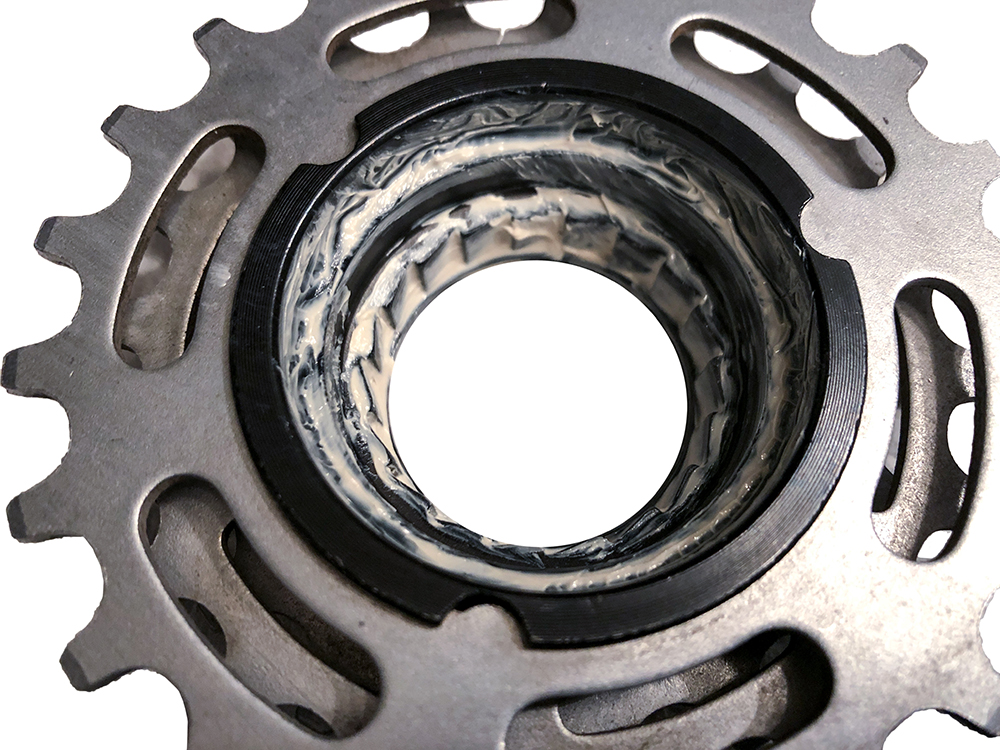
Clean and Inspect the Parts
Use degreaser and paper towel (or clean rag) to clean all the internal surfaces and parts of the freewheel including the loose bearings and the pawls. There is no need to remove the pawls or retaining spring. The can be cleaned using a small toothbrush. Once everything is cleaned and dry, inspect all the parts for any wear or damage before reassembly.
Reassemble the Freewheel
The most difficult part of reassembling the freewheel is to insert the inner body into the main freewheel body without dislodging any loose ball bearings.
The level of difficulty will depend on the design and location of the pawls. I found the Regina America freewheel easy to reassemble as the pawls are located well above the row of lower bearings, but the design of my other Regina freewheel was more difficult, so I enlisted a second set of hands to help with that step.
Step 1. Practice inserting inner body into main freewheel body.
Before we grease the parts and position the lower bearings, it is a good idea to practice reassembling the inner and main bodies. The most crucial step of reassembly is to align the pawls of the inner body to the ratchet teeth of the main body to fit the 2 parts together gently. If you are unsteady or rough, you may dislodge ball bearings which are only held in position by a layer of grease.
If the pawls on your freewheel are going to be a problem due to design or position, now is the time to practice using things like string / dental floss to hold them in a compressed position and being able to remove the string once inserted, or you may just require a second set of hands to fit the freewheel pieces back together. Once you are confident, goto step 2.
Step 2. Grease the bodies and pawls.
Apply grease to the ratchet teeth of the main body and bicycle oil to the pawls and springs, particularly where the hinge on the body.
Step 3. Fit the lower ball bearings on the inner body.
Apply a nice amount of grease to the lower flange of the inner body where the ball bearings are to be located. Using tweezers, position each bearing one by one so they are touching each other (no gaps). It’s not difficult but requires a steady hand.
Step 4. Insert inner body into main freewheel body.
After all the practice from step 1, hopefully you should be confident to now reassemble both parts. Align the pawls to the ratchet teeth before pressing the 2 halves together. Make sure no bearings fell out onto your towel (tray) or are stuck on the underside of the freewheel. Carefully place the freewheel back onto the bench making sure the inner body does not fall out and you have to start again.
Holding the inner and outer freewheel bodies together with my fingers.
Step 5. Fit the spacer washers.
Place the spacer washers back on top of the inner body in the same order they were originally.
Step 6. Fit the upper ball bearings.
Apply a good layer of grease to the top of the freewheel and using the tweezers, position each bearing one by one so they are touching each other (no gaps). This is easier than the lower bearings.
Step 7. Fit the top cone ring.
Grease the cone ring threads and screw the cone ring back onto the freewheel in an ANTI-CLOCKWISE direction using your pin spanner. You may need to use a chain whip to tighten the ring a bit more. I expect that the ring will probably self tighten through use (hence the reason it is reverse threaded).
Step 8. Test the rotation of the freewheel.
Holding the inside of the freewheel, rotate the cogs in both directions to ensure that the pawls engage in one direction and it spins freely in the other. Because we have used grease, it may feel a bit draggy and not spin freely, but this is no problem. It will loosen up with riding. The grease will provide a very good layer of protection from the elements for the very same reason it is used for bearings in wheels, headset, bottom bracket etc.
Step 9. Refit any cogs that were removed earlier.
Apply a small amount of grease the the threads before fitting the cogs. You can use the chain whips to tighten them, but just pedaling on the bike will pull them tight very quickly. Once all the cogs are fitted, the freewheel can be carefully threaded back onto the bicycle wheel hub in a clockwise direction. Pedaling forces will quickly pull it tight.
If you manged to successfully complete the process, well done. I find it quite rewarding doing these kind of jobs which can sometimes throw up challenges.
Disclaimer
Whilst I enjoy working on my own bikes, I am not a qualified bicycle mechanic. The content of this article is purely illustrative and does not constitute professional advice. For your own safety, this type of work should only be undertaken by a qualified bicycle mechanic. Incorrect assembly of parts could result in equipment damage, personal injury or death.
About Me.
I have been riding and working on my own bikes for many years now. I wanted to share my experiences, knowledge and research with others. My aim is to inspire people to get involved in all aspects of this amazing sport. Cheers.
Comments.
I welcome reader feedback in the comments section. Should you wish to suggest an amendment, please include a note advising the source of your information so that myself and other readers can ascertain the accuracy of your information. Note: Trolling or argumentative comments will be removed as they are counter-productive.
Voy a basarme en esta información para desarmar el Regina extra Made in italy, estube buscando por espacio de dos horas hasta que llegue a esta página y no queda más que agradecer su interés por trasmitir sus experiencias en esto de la mecánica de bicicletas y que dios lo bendiga.
Translated to English:
I am going to base myself on this information to disassemble the Regina extra Made in Italy, I was searching for two hours until I reached this page and all that remains is to thank you for your interest in transmitting your experiences in this matter of bicycle mechanics and that God Bless it.
Hi Wilson, thanks for your comments. I hope the article is of help in your endeavour.
Thanks for the guide! It was quite helpful for rebuilding a regina hub on an old concept2 rowing machine.
Hi Dave, great to hear the article was helpful to you. Enjoy the rowing machine.
Good results on Regina 6 speed Extra.
Some good tips….thanks!
One thing I did (in the light of experience)…..I reversed the spring and moved it round a bit to make sure the pawls were not rubbing on the same place as before….I have known springs break when the pawl eventually wears through the spring!
All the best
SK
Hi Simon,
Thanks for your comments, and tips on changing the spring location to spread the wear around.
Found your blog while trying to fix a Concept 2 Model A rower, just like Dave O. Great information. Without any disassembly of the freewheel and still on the wheel, I laid it flat in a bowl of degreaser. Blew it out and resoaked it 4X, took a few hours before Pawls freed up. Thanks!
Hi Richard,
Glad to hear you were able to get the freewheel working again and the article was helpful to you. Enjoy.
I found this tutorial really helpful with my Regina Extra Synchro!
Especially I wasn’t sure about the ball bearings count in my case, and I was glad I had also 72 of them!
I know it might be not much reccomended procedure, but you can accually dissasamble the whole unit without having special freewheel removal tool. I unfortunatelly did not have one.
You can strip down every element of the mechanism as you describe above, being extra careful with all the bearings. Going step by step (skipping the step with removal tool) you end up with the main body still firmly attached to the wheel.
If you remove spring and pawls what you get is two almost ideal points of grasp for a vice claws.
Mount the wheel with the body in vice so the wheel faces upwards. Make sure claws and main body are positioned at pawls points. You can use some wooden pads to avoid metal – metal contact if you want.
Turn the bicycle wheel counter clockwise and with some effort you should be succesful. Give it a couple of gentle but solid tries.
The freewheel body is a quite solid make of pretty fine steel and should withstand all this.
The special key method is of course more civilised way of doing this.
Hi Algrab, glad to hear this article was helpful to you. I guess there is always more than 1 way to get the job done..