Campagnolo’s threaded headsets were supplied in a variety of group sets over the years including their premium offerings; Nuovo Record, Super Record and C-Record from the 1960’s to 1980’s and beyond. Installing a headset is a relatively straight-forward process provided you have the correct parts and tools. In this article I will be installing a standard 1 inch threaded headset.
Before deciding if this is a process you want to try please note that this article is purely an overview of how I install a threaded headset and should not be treated as professional advice. Please read my disclaimer at the end of this article.
Tools Required
To install a Campagnolo headset, you will need:
- 32mm headset wrench (preferably 2 pcs).
- Crown race setting tool
- Headset press and a pair of alignment guides.
- A clean rag, cloth or towel.
- Good quality water proof grease for bicycle bearings.
- A pair of rubber gloves.
- Degreaser
Optional Items:
- Bicycle work stand.
- Head tube reaming and facing tool.
- Saw Guide for threaded fork steerer
- Hacksaw with steel cutting blade


Buy the Correct Headset
Vintage headsets were sold in 3 different thread standards for road bikes. I will be installing this headset on a Colnago Nuovo Mexico frame, so I have purchased an Italian 1 inch threaded headset (25.4 x 24F). Learn more about the different headsets Campagnolo manufactured.
Prepare the Head Tube & Headset
Before we fit the headset, we need to make sure all the parts are clean.
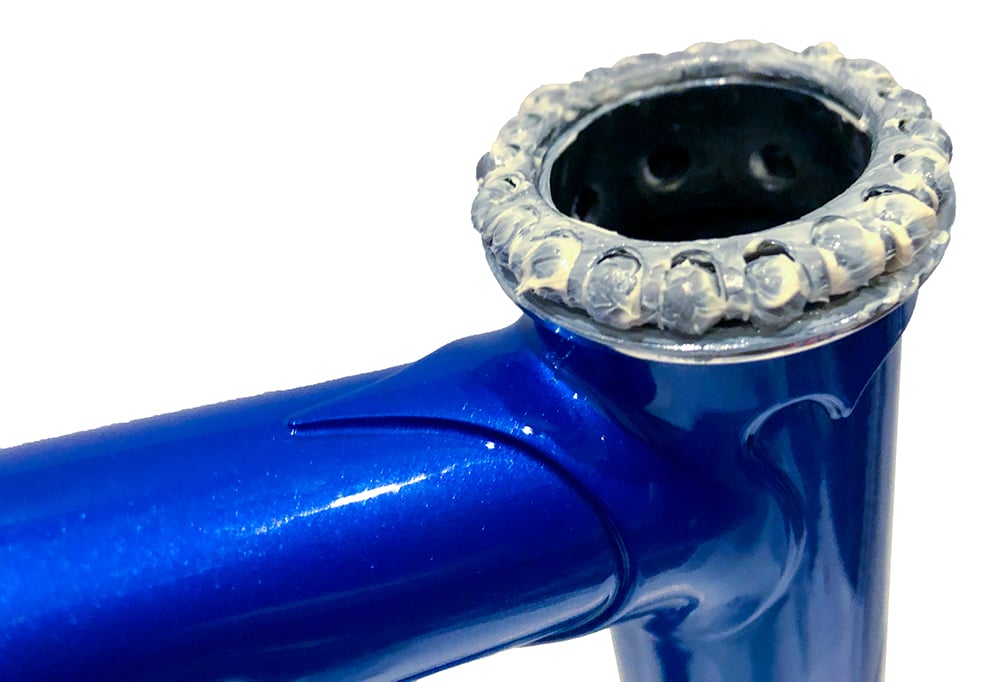
1. Prepare Frame Head Tube.
Clean the inside of both ends of the head tube to ensure the upper and lower headset cups press in cleanly. Degreaser and a hard bristle brush can be useful here.
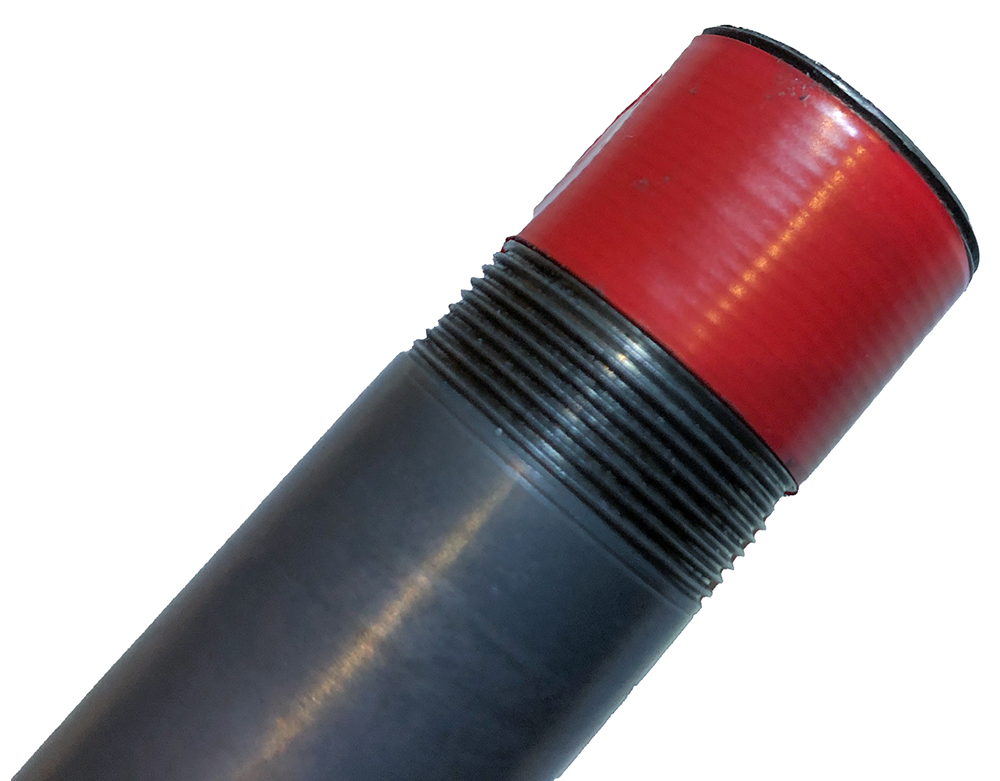
We also want to make sure the outer faces of the head tube are stripped back to bare metal; free of paint, corrosion etc. If you have a headset reaming and facing tool, then use that. Unfortunately I do not, so I just removed the fresh paint using a sharp razor blade and finished with a gentle sanding (as pictured below). You can apply some water proof grease to the shell face to prevent corrosion.

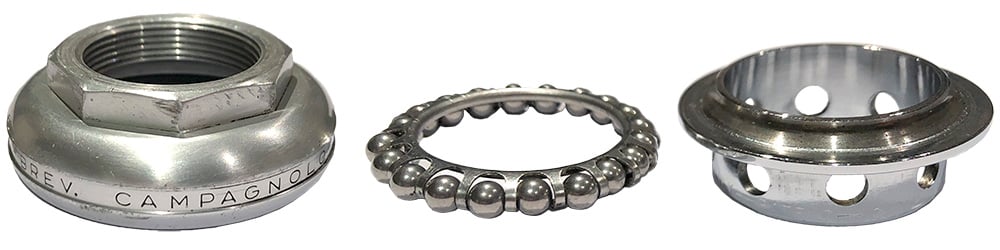
2. Prepare the Headset Parts.
Clean all the headset parts including the bearings. Make sure the headset parts are not pitted and the bearings rotate smoothly before we press them into the frame.
Before We Begin
I recommend you read all steps before trying this process yourself. We also need to check the following before we begin.
- Grease the upper headset threaded race and test screwing it onto the fork steerer. It should screw down by hand. Make sure you start slowly and don’t cross-thread. If you are having troubles, double check the headset is the correct thread for your fork as there are different standards.
- Check the flanges of the upper and lower headset cups fit a few millimetres into the top and bottom of the head tube. If they slide all the way in or can’t be inserted into the head tube the headset is the incorrect size.
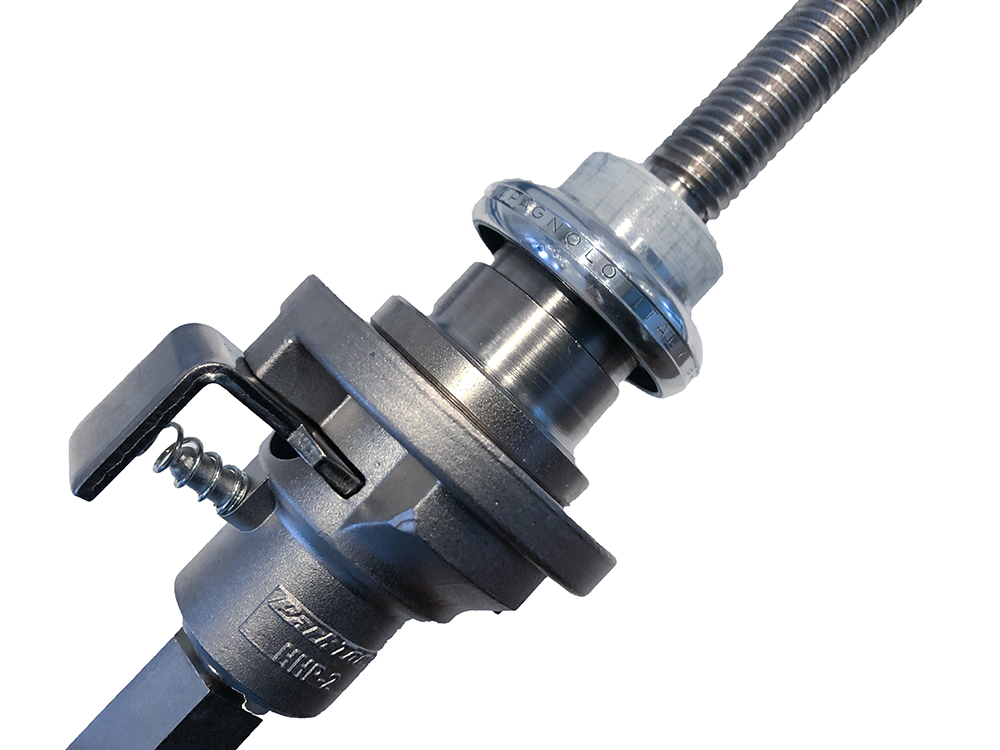
Fit the Crown Race to the Fork Steerer
Now that we have performed the above checks we can confidently proceed. This is probably the most tedious part of the installation and I have found they are generally a tight fit so they need quite a few hits to knock the crown race into place. This photo shows the finished result with the crown race fitted to the fork steerer.
How to Fit the Crown Race.
Ensure the crown race setting tool is the correct size for the headset you are installing. In my case, I have fitted a 1 inch adapter to the setting tool.
Start by placing the lower crown race as far down on the fork steerer tube as it will go. It should be resting above the base of the fork crown. Make sure the race is oriented up the correct way. Align the race so it is sitting level and not angled to one side.
Place the setting tool onto the fork steerer. Hold the forks in one hand and the setting tool in your other hand. Hit the race with downward strokes of the setting tool. Try to hit the race evenly and keep an eye on its alignment. The aim is keep it the race as level as possible as we hammer it down. Once the race is resting evenly on the fork crown (as pictured above) we are finished.
Fit the Lower Headset Cup
The remaining steps require less effort but do require some concentration to ensure you press the correct cup into the correct end of the head tube. Next I will install the lower headset cup, so make sure you select the correct part.
As mentioned earlier, I have already tested the lower cup in the base of the head tube to check it is the correct size. As pictured this piece can be inserted a few millimetres into the head tube before it stops, this is the perfect fit.

Remove the cup and apply a good quality waterproof grease to the inside of the head tube of the frame and onto the headset flange. Prepare the headset press tool by fitting the correct size adapter and place the headset cup on top of the adapter.
Insert the tool through the base of the headtube. Place the correct size adapter onto the tool before screwing the handle onto the tool has shown, but before we press the lower headset cup into the base of the head tube, I do one more thing..

This extra step is not a requirement but just a nice touch. Align the manufacturers branding (‘Campagnolo’) to the front of the head tube as pictured before pressing the part into the frame. Simply turn the press handle, the part should easily press into the frame. Stop when the part is flush with the base of the head tube – don’t use high force, it will stop when it is in position.

Fit the Upper Headset Cup
The process is the same to fit the upper headset cup. Below is an image of my earlier size check, perfect fit. Remove the part and grease both the head tube and the headset cup flange to ensure any easy press fit.

Fit the adapter to the tool and just like before, insert the press tool up from the underside of the head tube. Fit the upper headset cup. Fit the second adapter onto the tool and screw the handle to press the cup into the head tube. As before, stop when the cup is flush with the head tube.
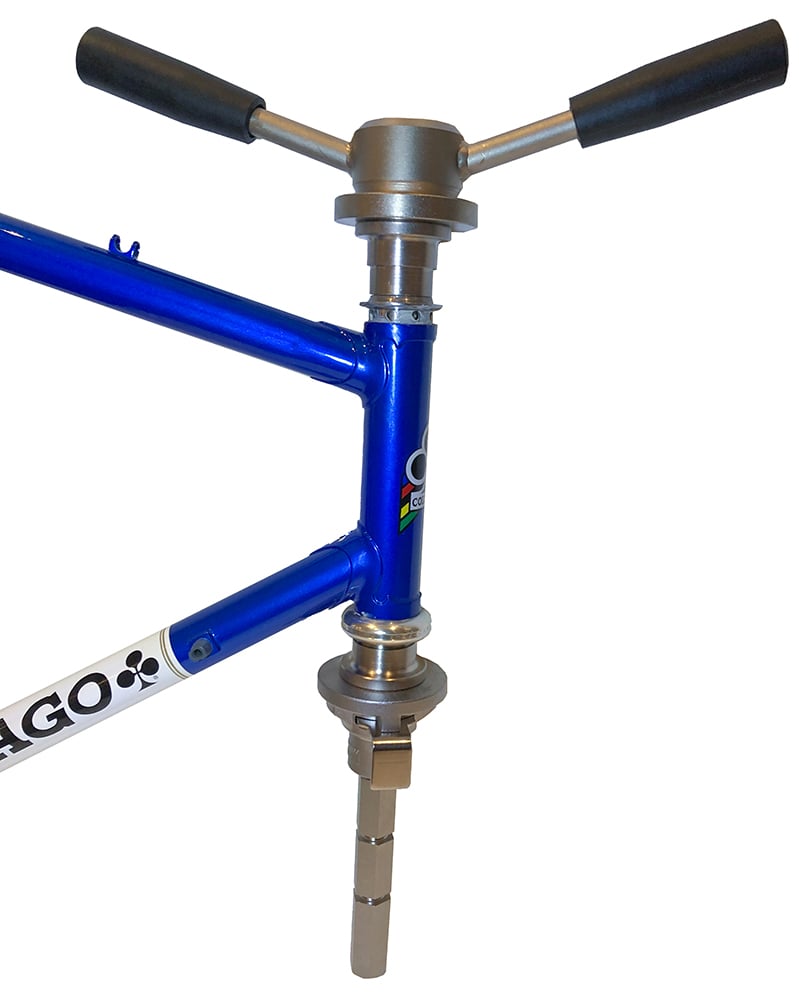
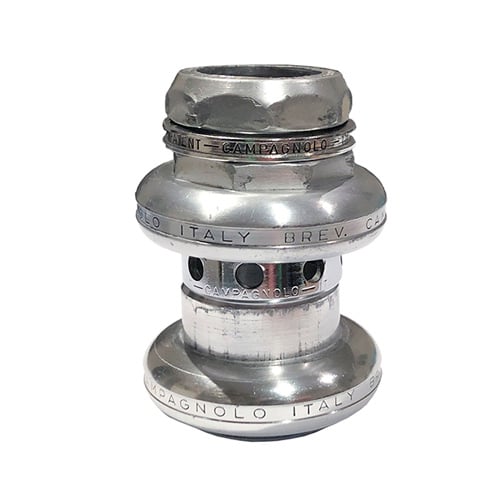
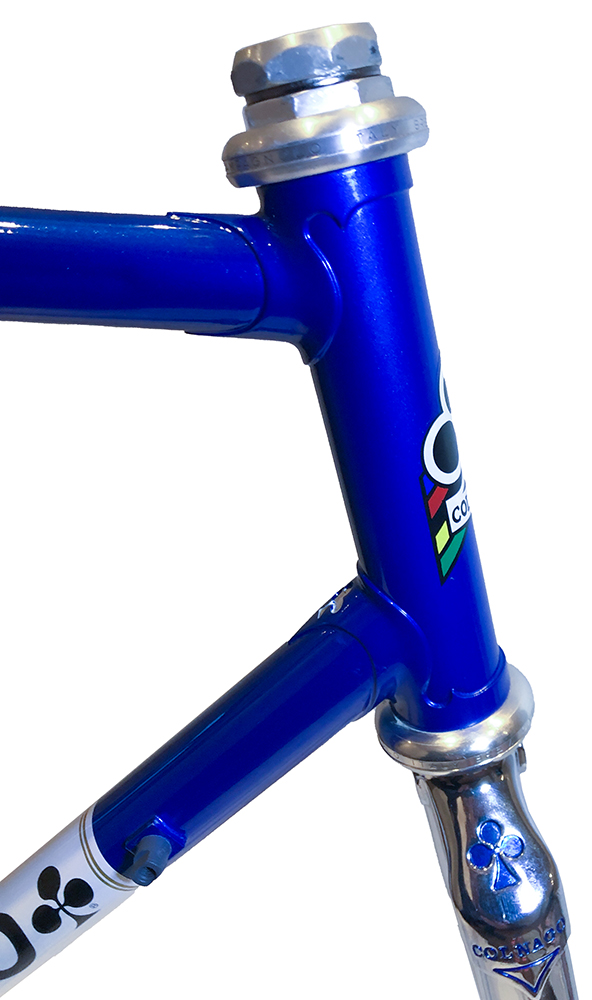
Now we have both headset cups pressed into the head tube of the frame. The next image shows my fitted with a vintage Campagnolo Super Record headset.

Fit the Forks to the Frame
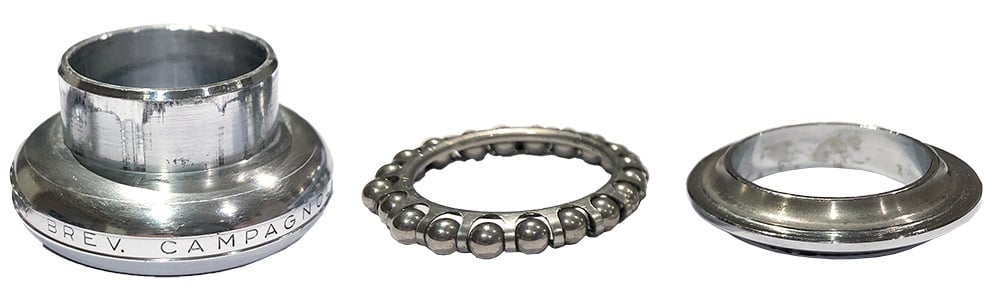
Apply quality grease to the headset bearings, cup and race. Be sure to orient the bearings on the crown race as show below.

Grease the bearings, cup and race of the upper headset. Also grease the threads of the upper threaded race. Fit the bearings on the upper headset cup as shown below.
Insert the fork steerer through the underside of the head tube all the way up the head tube. Push the forks all the way up to the base of the head tube.
Screw the upper headset race onto the fork steerer. As mentioned before, screw it down without using tools to ensure it is not cross-threaded. Screw the race down until it contacts the bearings and the forks have no up/down or left/right play.
At this point the forks are secured to the frame. Try different tensions of the threaded race to get the perfect setting ie. no play in forks, but the forks rotate smoothly and easily.
Check the Fork Steerer Length
Now we need to check if the length of the fork steerer requires adjustment. Because this is a second-hand frame, the fork steerer has already been cut to suit a specific headset / rider. As the original headset that was not supplied with the frame, I need to assemble the forks to the frame to see how my headset matches this fork steerer length.
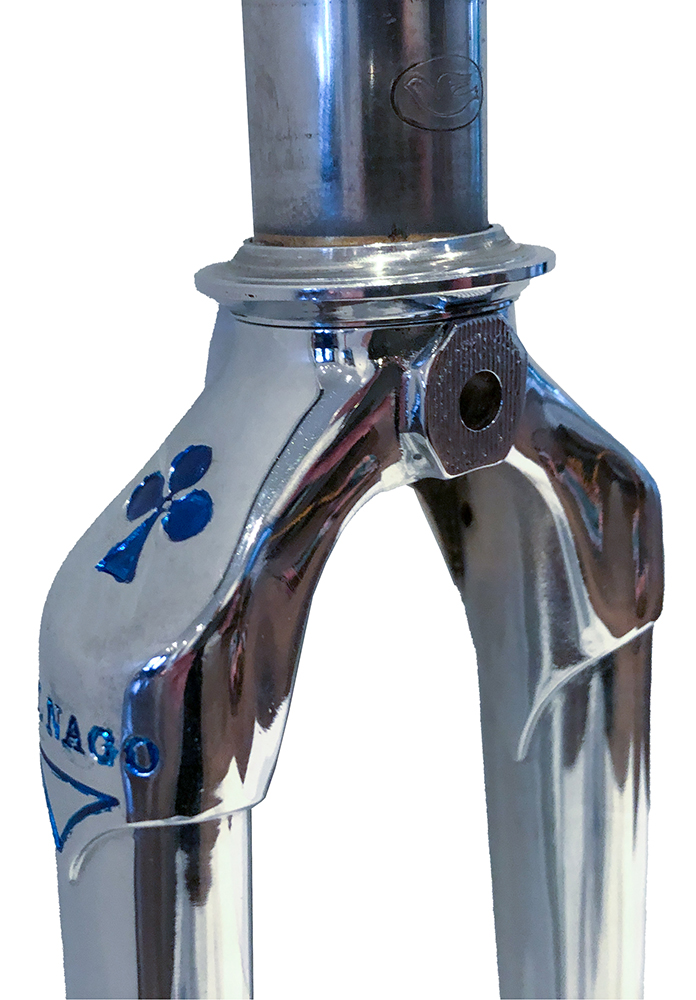
Grease the threads of the headset lock nut and thread it down. When the lock nut is screwed tight, it is recommended there is about 1mm of clearance between the top of the fork steerer and underside of the lock nut. This is visible as the small gap between the two parts as pictured below.
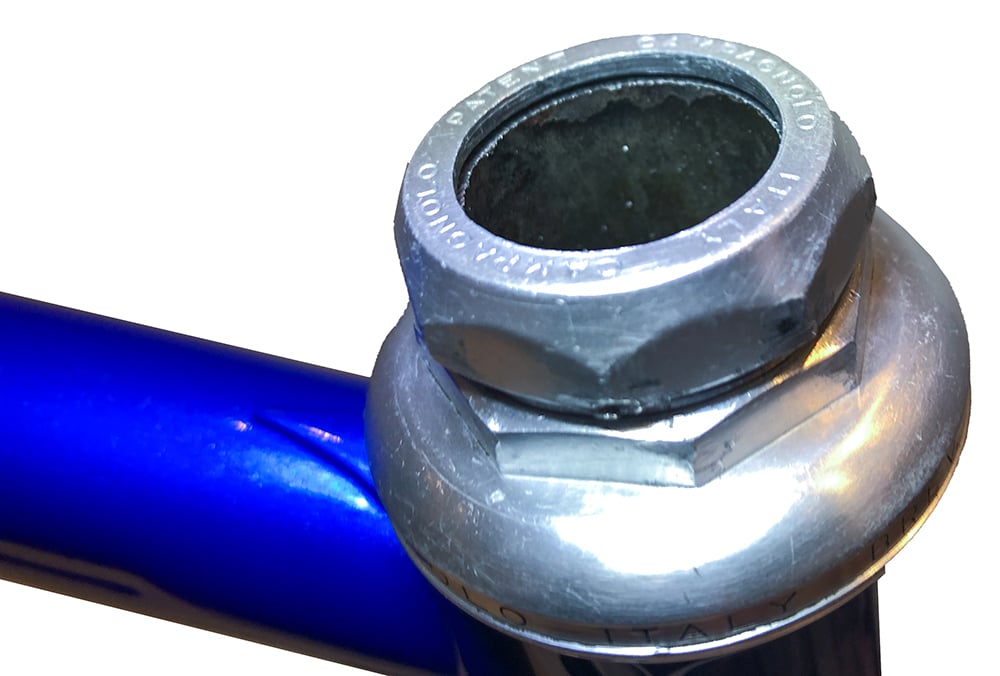
When I screwed the lock nut down tight on my fork steerer, I had a gap between the threaded race and the lock nut as pictured below.

So to overcome this situation, I had several options;
- Fit one or more spacers.
- Shorten the fork steerer.
Generally one of more spacers are fitted between the threaded race and the lock nut. Headset spacers commonly feature a notch as pictured below. You can read more about this feature of headset spacers in my article. As my fork steerer does not have a channel to suit this washer notch, I used a half-round file to remove it from inside the washer.
In order to determine which washers I required, I measured the size of the gap with a Vernier and checked the washer thicknesses.

As it turned out, a thin spacer fitted, but it wasn’t quite thick enough so I would have to short the fork steerer by about 1.5mm. I masked the fork steerer with a wrap of electrical tape leaving about 1-2mm exposed. Using a flat steel file, I evenly removed this material until I reached the tape and the final finish was square.
Final Assembly
Once the fork steerer was shortened I reassembled everything with the washer fitted, adjusted the threaded race tension (as described earlier) and fitted the lock nut. The lock nut was tightened leaving the required gap (mentioned earlier).
As this was a Super Record headset, the parts are soft alloy so I made sure to use the right tools and carefully tensioned everything. Unfortunately there was already some minor burring on the lock nut from a previous owner. If you want to avoid this situation, fit an all steel headset instead.
Make one final check that the forks rotate smoothly and there is no up/down or left/right play in the forks.
Installed with 1 small steel washer
References
I hope you found this article interesting. I have listed the following website pages as general references.
Park Tools – Threaded Headset Service
Disclaimer!
Whilst I enjoy working on my own bikes, I am not a qualified bicycle mechanic. The content of this article is purely illustrative and does not constitute professional advice. For your own safety, this type of work should only be undertaken by a qualified bicycle mechanic. Incorrect assembly of parts could result in equipment damage, personal injury or death.
About Me.
I have been riding and working on my own bikes for many years now. I wanted to share my experiences, knowledge and research with others. My aim is to inspire people to get involved in all aspects of this amazing sport. Cheers.
Comments.
I welcome reader feedback in the comments section. Should you wish to suggest an amendment, please include a note advising the source of your information so that myself and other readers can ascertain the accuracy of your information. Note: Trolling or argumentative comments will be removed as they are counter-productive.
Great site! A cautionary note for the crown race or bottom cone. It is very fragile. You must measure the od of the fork where the race will be set and compare with the ID of the crown race. It should be an interference fit to ensure the race does not rotate. The interference fit should not be greater than, IIRC, .002 inches or the likelihood of the race breaking is high. Feel free to correct my interference number or look it up.
I know this because I have a 1983ish SuperIssimo with a broken race. When I purchased the bike in 2009, I disassembled it to the bare frame and discovered the broken race. They are unobtainium. There was paint on the fork that added to the OD which contributed to the breakage.
A former TREK employee noted that they had a drawer full of broken and replacement races due to the fragility of the part. Wish I knew where the contents of that drawer is today!
Fortunately, I can not detect the brake when rotating the fork.
[url=https://flic.kr/p/itiZ6Y][img]https://live.staticflickr.com/2875/11467119446_9c6fdd9d3d.jpg[/img][/url][url=https://flic.kr/p/itiZ6Y]P9201322[/url] on Flickr
Hi Patrick, thanks for your contribution. I must have been lucky installing mine because I had to whack it hard multiple times to get it to seat on the fork crown. However, I was holding the fork in my hand, not in a vice when hammering it down. I figured the lower crown race was made from steel and therefore fairly durable however, looking at your broken part, maybe it was not as strong as I originally thought.
There are plenty of used (and some NOS) vintage Campagnolo headsets on eBay, but they are sold as a complete unit. I believe the lower crown race was the same for both Super Record or Record. I’ve bought several SR headsets over the last few years with many to choose from. The challenge was getting a Super Record headset in good condition as the soft alloy parts are often mangled by heavy handed mechanics. As the headset race lining is steel, most of the headsets look to be in good condition ie. not pitted. Cheers.
Great informative article. I don’t remember going through this procedure when I was a kid in the 60s and 70s – I cringe now at what damage I must have been doing to my bike.
I have a Campagnolo Record headset fitted to my 1980 vintage restored 531 frame which I have recently purchased. I think the headset must be a new one because it is pristine. I notice that there is a small movement in the upper head race when I rock the bike while on the front brake. I have tried loosening the locknut and tightening the top head race nut but the movement stays even when tightened until the fork rotation becomes stiff so have loosened off again. Would you know what the cause of the movement in the head race is by any chance?
Hi Ian, thanks for your comments.
Yes I can think back to when I was a kid playing around with the threaded headset on my first bike (and had no clue about what I was doing..).
So that is an interesting situation and has got me thinking as I haven’t experienced that issue before.
With both my bikes, the Campagnolo SR headset is rock solid well before the bearings become tight (when turning the bars).
Using the front brake for testing can also introduce movement from other locations, so just double check the stem, handle bars and brakes are not loose.
Assuming those items are all good, I would disassemble the headset and check the following;
1. The upper and lower headset cups (that are pressed into the top tube on the frame) are solid, no movement.
2. The crown race (pressed onto the fork) is solid, no movement and sits flush with the top of the fork crown.
3. The correct number (and size) of ball bearings are installed in both upper and lower races.
4. If the bearings are caged, the cage is fitted in the correct orientation in both upper and lower races.
If all of these things are correct, I’m not sure what could cause the problem as the system is quite simple.
Tightening the upper headset race compresses all the parts together to eliminate slack and the bearings allow the turning movement. Best of luck.
The movement is definitely the joint between the Upper Headset Bearings and the upper headset assembly. I’m wondering if the bearings are too small or disintegrating.
Hi I’m fitting a campag headset to a 1977 langdale road frame,the trouble is I got it all together but there is hardly any thread left at the top to screw down the lock nut(pre cut for cheap headset)can anyone suggest a way around this eg smaller washer -or do I have to get it all back off ?
Hi Julian, my Colnago Master has no spacers under the top lock nut and the headset works fine. If the forks are original to the bike, they should have been cut to the right height to suit most headsets. But if the threaded section of the fork steerer is too short, I think you probably need another fork with a longer steerer. I expect there would be a few on eBay. Good luck.
I would think your Langdale was originally supplied with a different headset that had a lower stack height than the Campagnolo one you are wanting to fit which is why there are insufficient threads for the locknut. The simplest solution is to use a headset with the correct matching stack height.