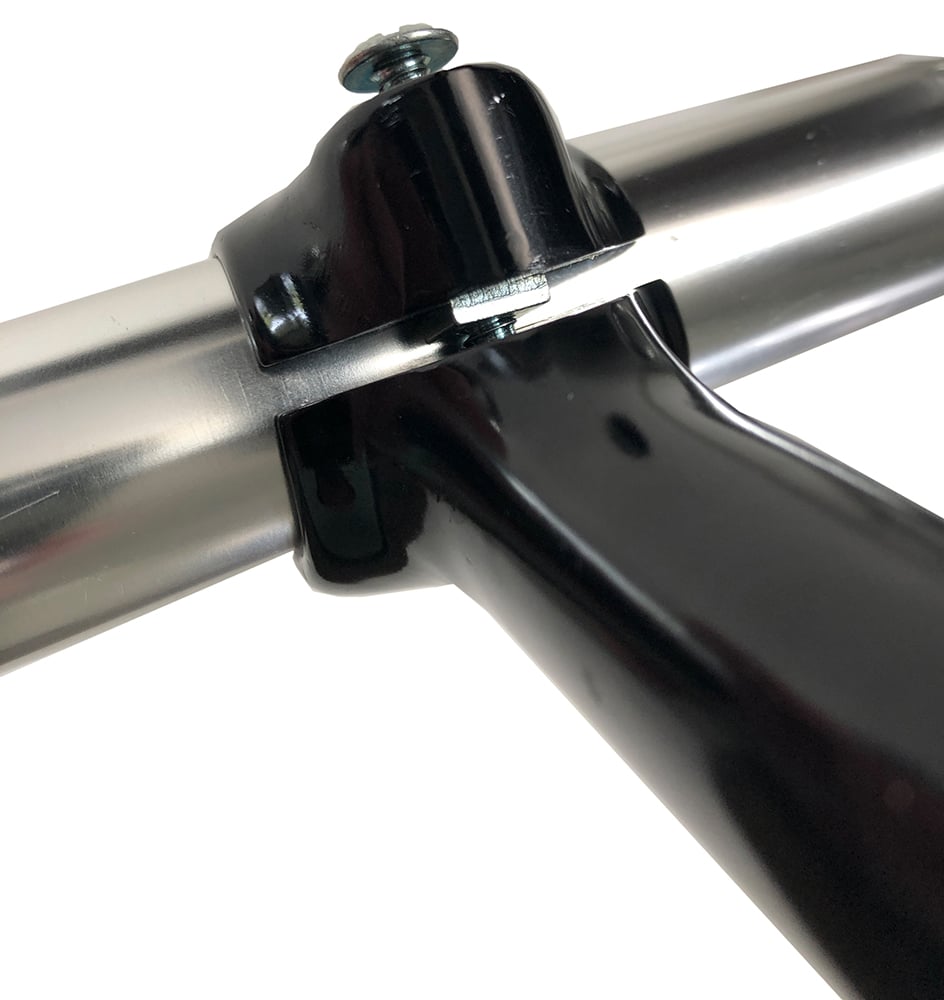
Fitting a handle bar in a quill stem can create scratches on the surface of the handle bar is the clamp hole is too tight, particularly on the top thicker section of the handle bars which often have brand & model markings which are important to preserve to enhance the aesthetic of the bicycle.
This trick can be used for quill stems that have an enclosed threaded section for the clamp bolt as illustrated in the diagram below.
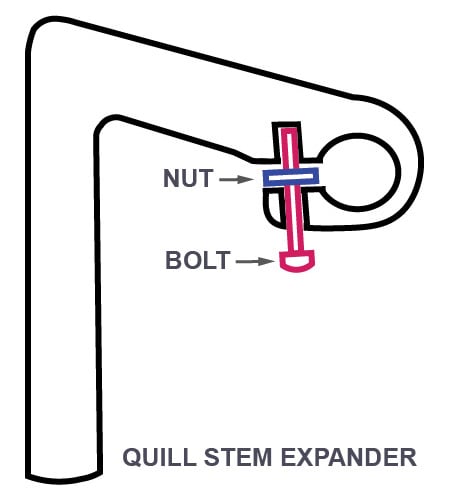
Expander Bolt & Nut Specification
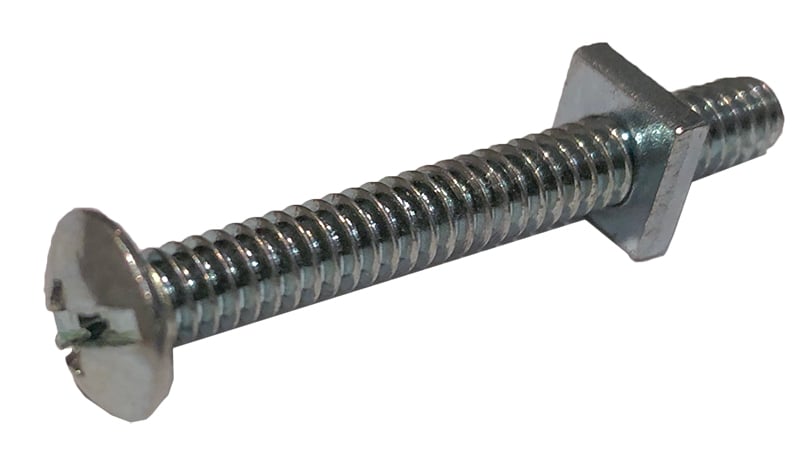
I found the bolt and nut shown above to expand the opening of my 3ttt quill stem. The bolt must be smaller in diameter than the bolt supplied with the stem and must also be longer so the head of the bolt protrudes when fully inserted into the stem as shown. The nut must be thin enough to slot into the gap as shown. The bolt I used has the following specifications;
Bolt length: 38mm
Bolt Diameter: 4.56mm
Nut Thickness: 2.3mm
Steps
- Use your fingers to make sure the nut does not rotate.
- Screw the bolt down into the stem. The bolt will eventually bottom out in the stem.
- Continue slowly screwing the bolt further into the stem. The clamp opening for the handlebars will now begin to expand.
- Open the hole 1 to 2mm and test if the stem can be fitted onto the handlebars without scratching the wider top section of the handlebars. You may need to widen the hole a little more if it doesn’t.
- Once the stem is in position on the handle bars, simply unscrew the bolt and remove the nut.
- Now you can screw in the original stem bolt to clamp the bars in position.
Disclaimer!
Whilst I enjoy working on my own bikes, I am not a qualified bicycle mechanic. The content of this article is purely illustrative and does not constitute professional advice. For your own safety, this type of work should only be undertaken by a qualified bicycle mechanic. Incorrect assembly of parts could result in equipment damage, personal injury or death.
About Me.
I have been riding and working on my own bikes for many years now. I wanted to share my experiences, knowledge and research with others. My aim is to inspire people to get involved in all aspects of this amazing sport. Cheers.
Comments.
I welcome reader feedback in the comments section. Should you wish to suggest an amendment, please include a note advising the source of your information so that myself and other readers can ascertain the accuracy of your information. Note: Trolling or argumentative comments will be removed as they are counter-productive.
I have installed/removed many bars by simply using a narrow wedge at the clamp slot. This works for both threaded clamp stems and earlier stems without theeading utilizing a bolt and an exposed nut. Preferrable wedge material is hard plastic to avoid any aesthetic damage at slot; or a soft metal for same reason. Any small wedge with a slight taper can be used however (steel, even hardwood) to obtain the same results if done carefully. I have often used a thin flat blade screw driver to do this; but you need to be care not to cause any aesthetic damage from driving the head too far to where, if round, the shank of the driver enters the slot due to there now being only a small surface area in contact with the clamp. Also, as a precaution, I wrap one side of the bar with celophane tape (any thin tape generally works) to prevent inadvertent scratches on the bar. You only need to wrap areas that will not be exposed after installing the bar wrap or grips; especially if you are just wrapping the drop section of the bar or using a hand grip (e.g. track bar, “moustache” style bar, etc.)
Always start by expanding the slot only about 1mm and try to install. You can always drive in the wedge to expand another .5mm-1mm if needed even with the bar already partially installed past the curved section(s) of the bar. I have had no issue with this method causing damage to either the bar or stem. I have also used extremely fine (600-800 grit) to delicately “soften” the often sharp edge of the stem clamp. Keep the sand paper inside the clamp tube! This is not really aesthetically noticeable unless you angle the sand paper so much that you sand the exterior surface around the clamp. You only need a couple a light swipes near the edge to make it a little more dull. This prevents more severe scratches from occurring, and also keeps the clamp from catching and tearing the thin protective tape if you have opted the “pre-wrap” as previously mentioned. None of the above methods take more than a couple minutes to perform and the wedge and sand paper can be used multiple times. Material cost is also very minimal if you do not already have suitable materials, and far outweighs the damage that can be caused on a new or hard to find vintage bar.
Take care,
Jesper
Hi Jesper, thanks for your comments, sounds like a good idea.
Using a thinner bolt and nut as shown is a great idea. I use a screw driver but have to be careful with it slipping and scratching the bars. can’t wait to try your way! Thank you
Thanks for your comment, hopefully this option works for you as well.
How do you turn the nut? I recon there’s not much space..
Never mind -I get it:)