Introduction
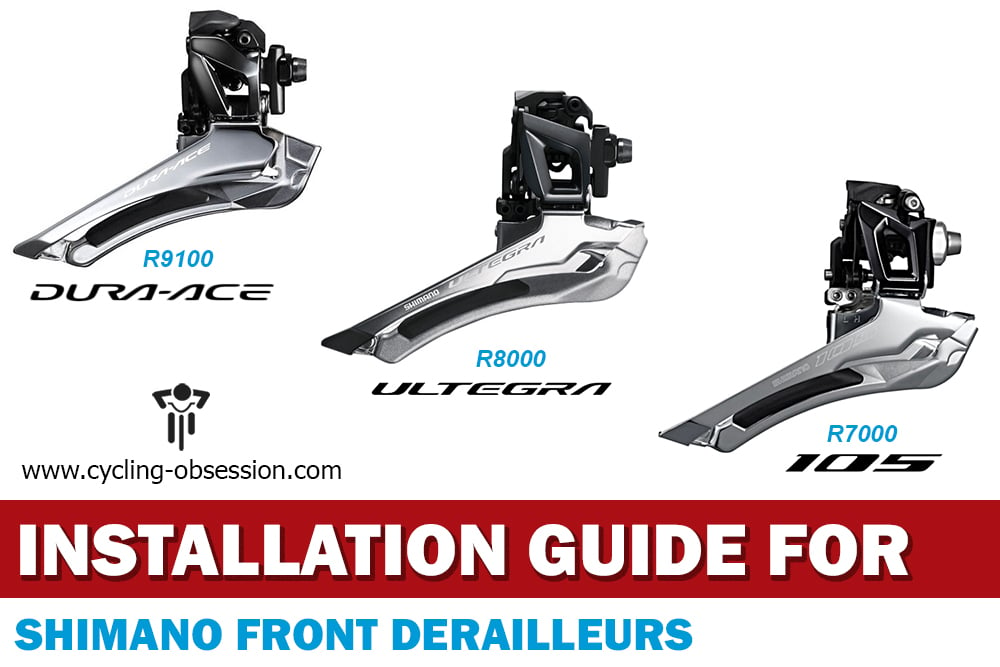
In 2016 Shimano released the new Dura-Ace R9100 mechanical groupset and one of the major innovations was a completely redesigned front derailleur. This new front derailleur features a new ‘toggle’ mechanism that is completely different to the ‘pivot’ design of previous models.
Over the past few years, Shimano has updated other group sets including Ultegra (R8000), 105 (R7000) and GRX to feature the same modern front derailleur design. Shimano state the advantages of this derailleur to be;
- Reduced shift effort at the lever.
- More cable routing options (cable outer can now be terminated at the derailleur itself).
- Integrated cable tension adjustment (to eliminate the need for an inline barrel adjuster).
- Shorter minimum chainstay length of 410mm for disk brake equipped bikes (with 135mm OLD).
- Precise and easy front derailleur setup.
Overview
Shimano’s new front derailleur design features a few variations to the installation procedure used for older versions of Shimano’s front derailleur such as cable tension adjustment and how to set the high limit bolt. I have written this guide based on Shimano Official Dealer’s Manual and my own experience. The images in this article are of a Shimano 105 front derailleur, but the installation procedure is the same for all mechanical front derailleurs for the following Shimano group sets;
- Shimano Dura-Ace – R9100 front derailleur (FD-R9100)
- Shimano Ultegra – R8000 front derailleur (FD-R8000)
- Shimano 105 – R7000 front derailleur (FD-R7000)
- Shimano GRX – front derailleur (FD-RX810, FD-RX400) – as advised by a contributor in the comments.
There are 2 mounting optons for the front derailleur; clamp mount or braze-on mount. The instructions in this guide are specific to the braze-on mounted front derailleur, but once the derailleur is fitted, the steps for derailleur alignment, cabling and adjustment processes are identical for both.
At this stage you will probably find yourself in one of 2 scenarios;
- The front derailleur is already installed but needs adjustment or;
- You want to install a front derailleur on a new bike.
If you only need to adjust a modern Shimano front derailleur, please read my article on How to Adjust a Shimano Front Derailleur.
Before deciding if this is a process you want to try, please note that this article is an overview of how I fitted my own front derailleur and should not be treated as professional advice. Please read my disclaimer at the end of this article. I also recommend reading through the whole article before commencing work.
Tools Required
The following tools are required to install the front derailleur.
- 2mm Hexagon Wrench (Allen Key)
- 4mm Hexagon Wrench (Allen Key)
- 5mm Hexagon Wrench (Allen Key)
- Cable cutters or pliers
- Torque Wrench (with 4mm & 5mm Hexagon fittings).
Highly recommended to avoid stripping the thread on the nut that secures the cable to the derailleur.
Adjusting a Shimano Front Derailleur
If your front derailleur needs adjustment, then at least one of these issues is likely the cause.
- Incorrect cable tension
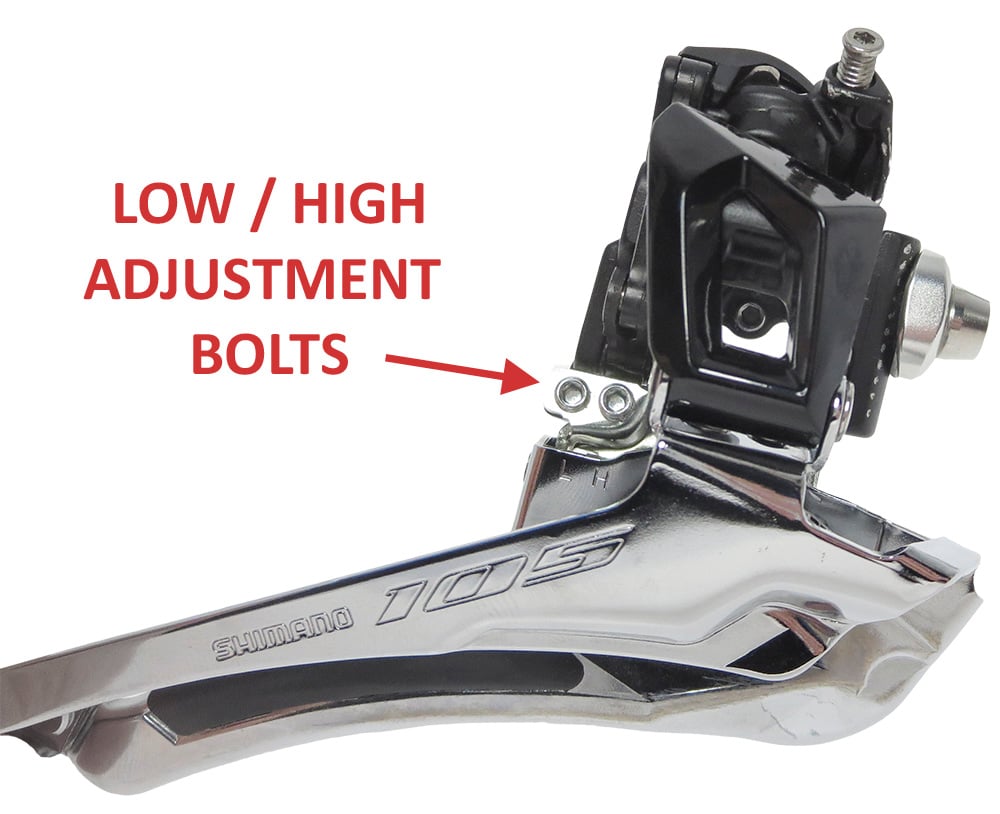
- Incorrect adjustment of the High or Low Limit bolts
- Incorrect positioning of the front derailleur with respect to;
- Height above chain rings
- Alignment angle in relation to the chain rings
At this stage it is important to mention that the cable tension adjustment and limit bolts work a little differently on this new derailleur when compared to older designs. If you are having problems adjusting your front derailleur, I recommend you perform each of the installation steps in this article to ensure all aspects of the front derailleur are correctly configured.
Installing a Shimano Front Derailleur
Here are the steps for installing your front derailleur.
1. Reset the Front Derailleur Bolts
If you have a brand new front derailleur out of the box, then all the bolts should already be set correctly for a new installation.
Based on the feedback from Simon in our comments section (4th July 2026), the bolt settings as pre-configured on a new R7000 derailleur from factory are;
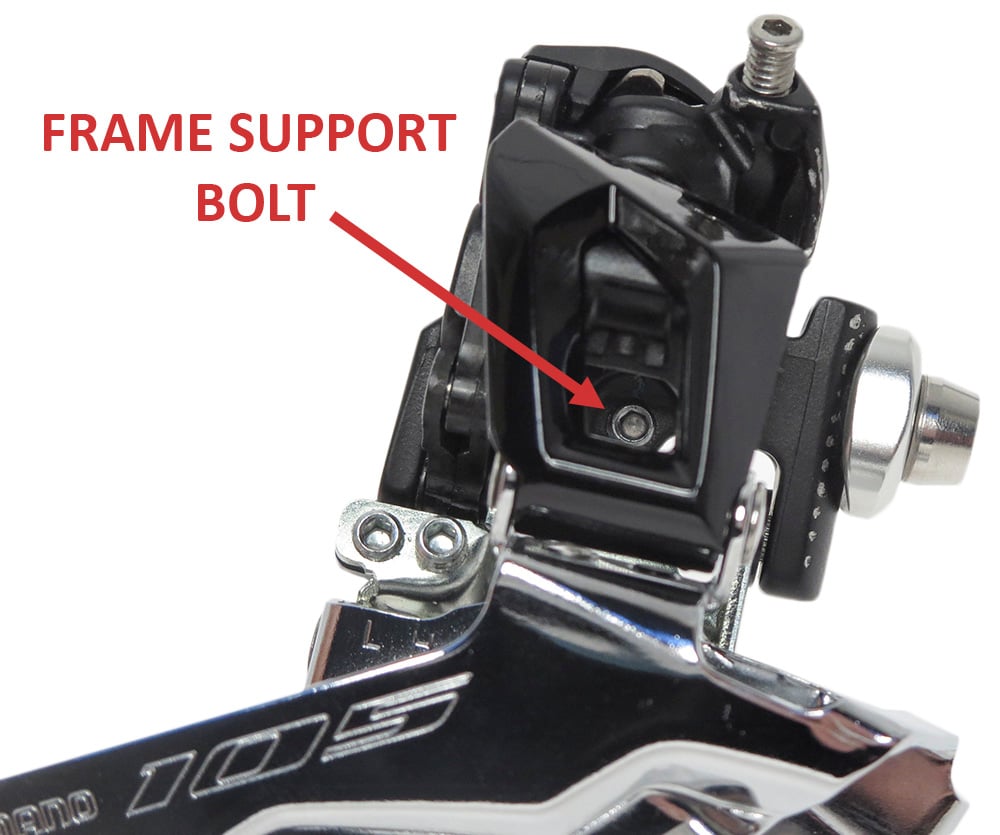
The Frame Support Bolt is retracted such that the ‘tip’ of the bolt is flush with the back of the derailleur. The High and Low ‘limit’ adjustment screws as being set at approximately 50% ‘screwed in’ but the High screw is slightly more screwed in than the Low screw. There is therefore quite a bit of ‘slop’ i.e. free movement of the top ‘toggle link’ part of the derailleur that the cable attaches to.
This information can be helpful if you have a derailleur that is already installed on a bike or has been used previously as Shimano don’t mention this in the manual, however I wrote these instructions using different initial bolt settings. It’s up to you how you want to proceed. Disconnect the shift cable and reset all 4 bolts as recommended below.
Reset the Low Limit Bolt and the Frame Support Bolt
Unscrew (turn anticlockwise) the following 2 bolts so they are fully retracted. We don’t want these bolts affecting the initial set-up.
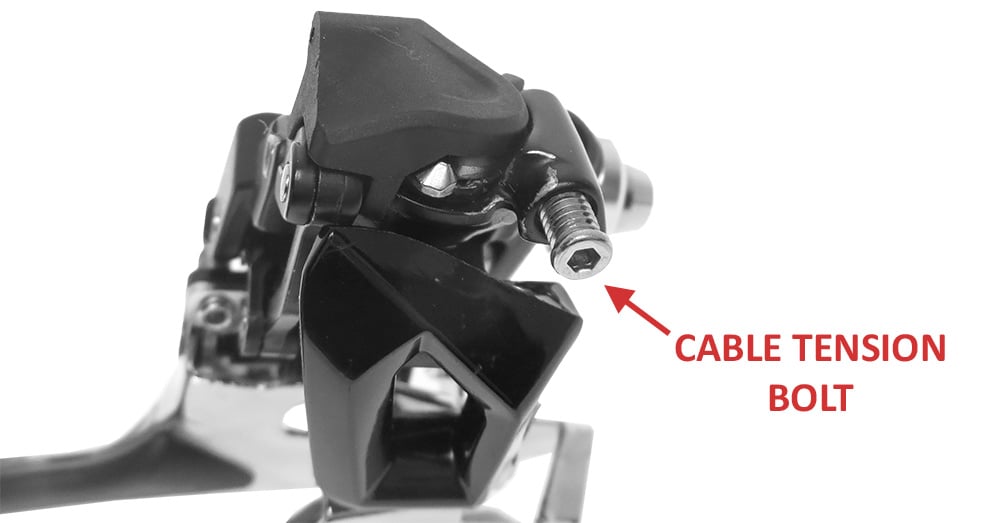
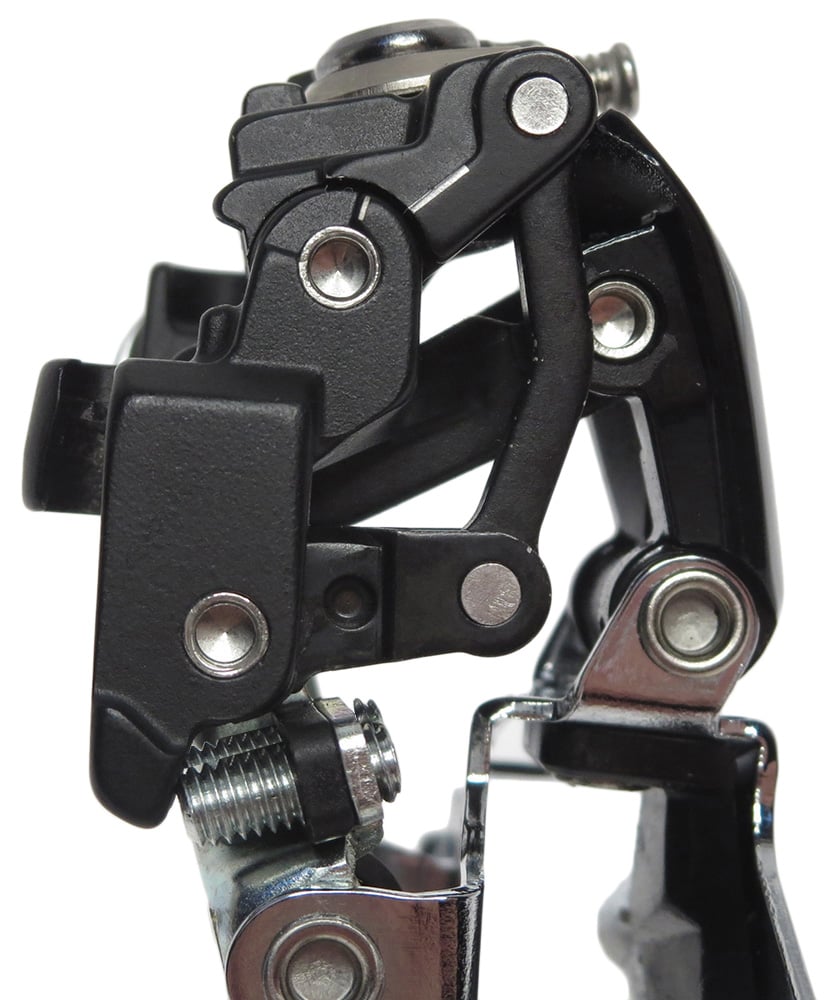
Reset the Cable Tension Bolt
Firstly remove the black plastic cover from the top of the derailleur by rotating it anti-clockwise and lifting it at the same time. It should easily come off. Put it aside for later, don’t lose it.
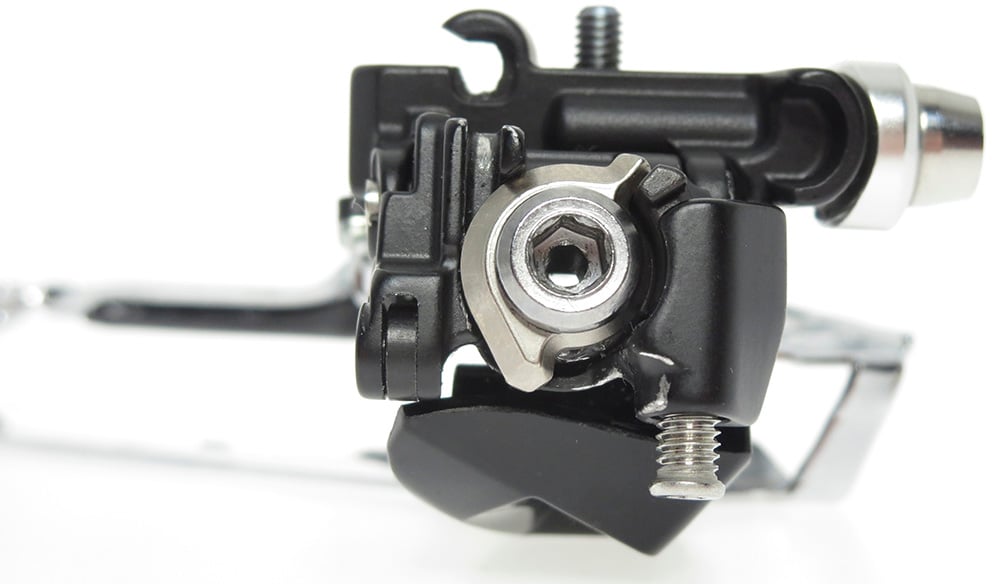
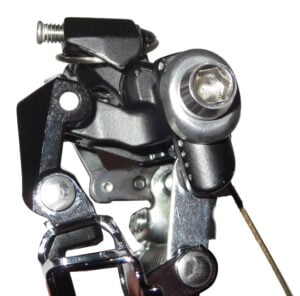
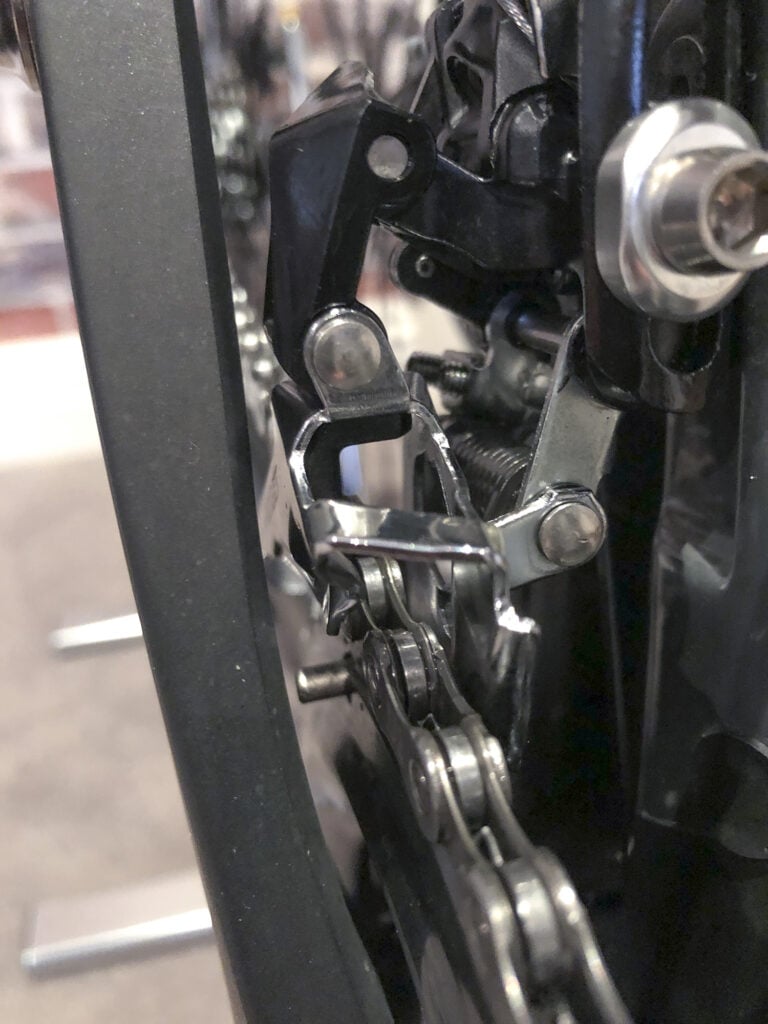
Unscrew the cable tension bolt (refer image 1) and push the black rotating tension lever back into the housing (refer image 2). If you are having trouble moving the black rotating tension arm back in, unscrew the cable tension bolt further. Note: Image 2 shows the black rotating tension lever fully recessed inside the housing. Once you have done this then continue.
This is the initial setting of NO Tension.
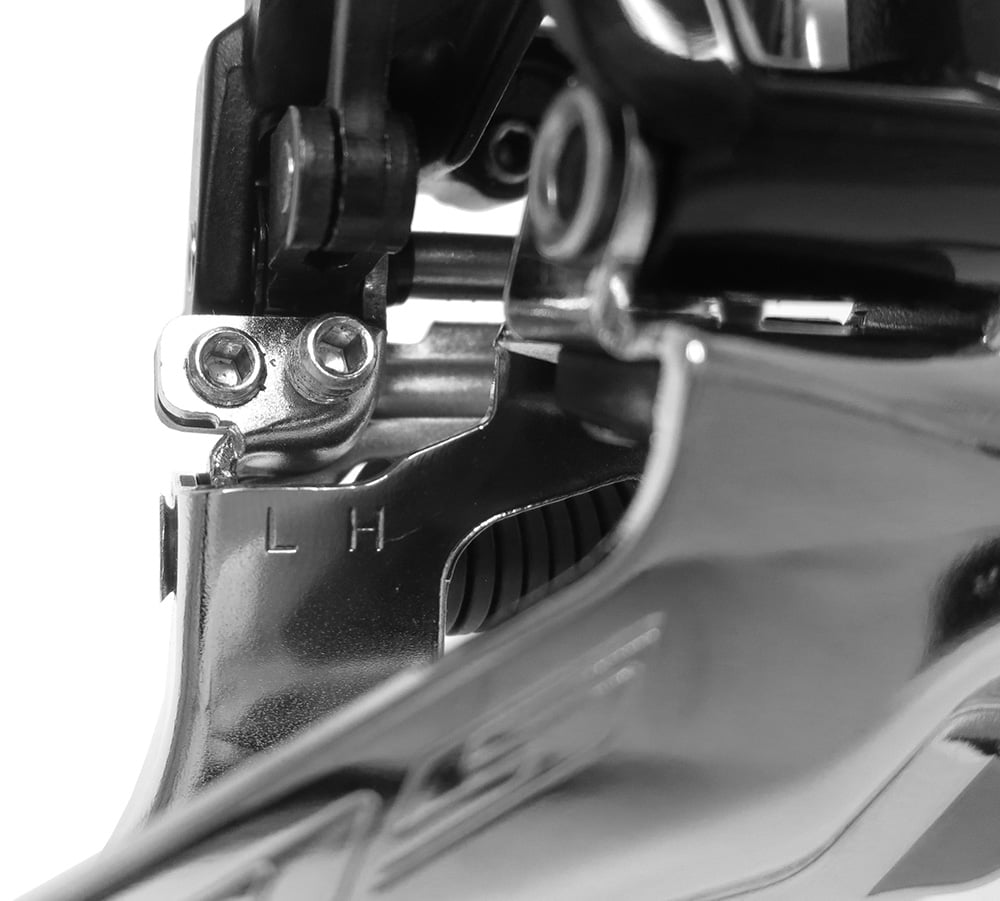
Reset the High Limit Bolt
Unscrew the High Limit bolt until you are able to lift the upper ‘toggle’ section of the derailleur away from the derailleur body (refer image 1). Now gradually tighten the High Limit bolt (turning it clockwise). The upper ‘toggle’ section will begin moving down. Once this upper ‘toggle’ section of the derailleur sits flat on the derailleur body (refer image 2), stop turning the High Limit bolt.
With this High Limit setting, the shift cable will have maximum pull force on the derailleur to shift the chain to the large chain ring. Fine tuning of the High Limit bolt happens later on in the installation.
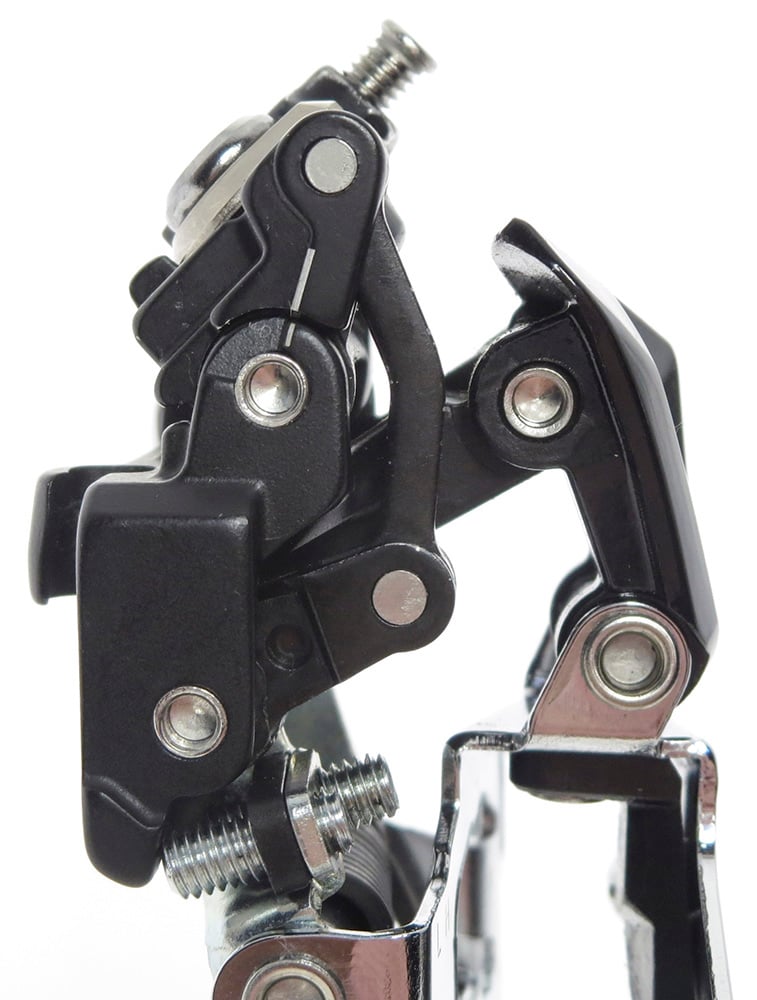
Upper section can be lifted up.
Upper section no longer lifts up.
2. Fit Front Derailleur to the Bike
- Unscrew the derailleur mounting bolt and washer, then fit the derailleur to the braze on mount on the frame. The curved washer and bolt are fitted to the right side of the frame braze mount as shown below.
- Tighten the bolt just enough to secure the derailleur in position as we will be adjusting it again shortly.
- Tighten the Low Limit bolt and the derailleur cage will begin to move out toward the large chain ring.
- Keep tightening this bolt until the front outer plate of the derailleur cage is in line with the teeth of the large chain ring. You can use the flat side of a hex wrench to check the alignment as shown in the image below. By holding it against the teeth of the large chain ring, it should just touch the outside edge of the derailleur cage.
3. Adjust Front Derailleur Clearance Above Large Chain Ring
If your derailleur is brand new out of the box, it was probably supplied with a plastic sticker to help with the derailleur height adjustment. If your derailleur does not have this sticker, that’s OK, just continue with the steps.
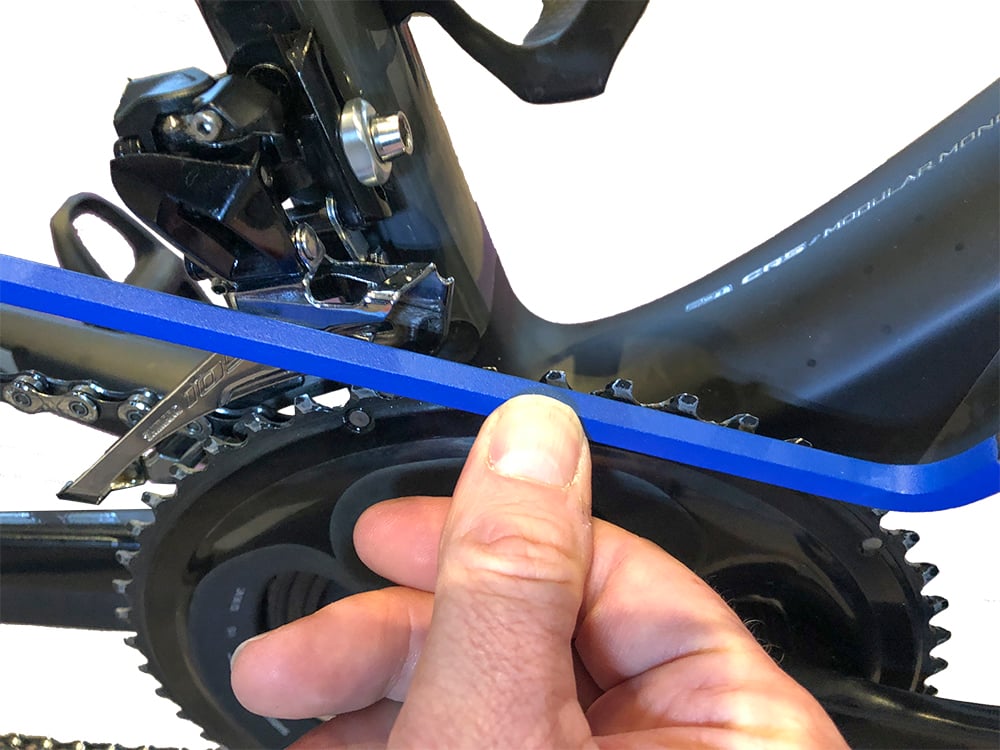
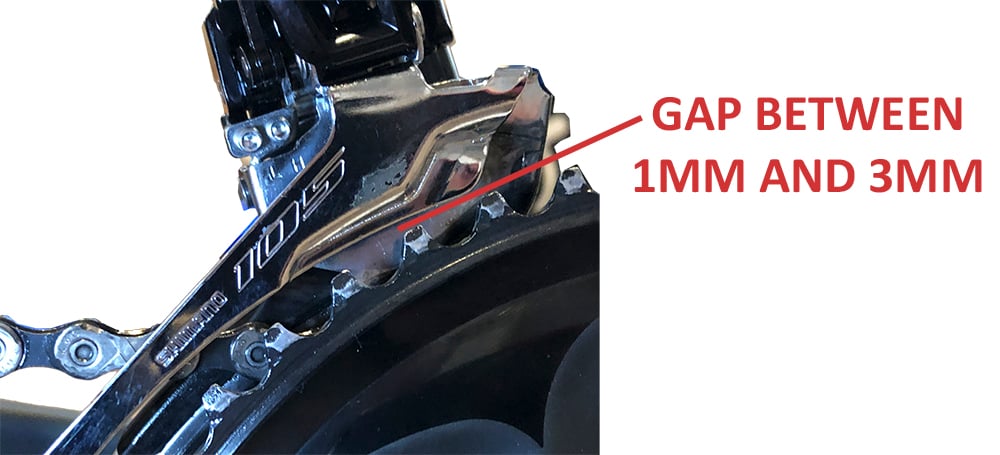
Loosen the derailleur mounting bolt and slide the derailleur up or down until there is a 1 to 3mm gap between the teeth of the large chain ring and base of the OUTSIDE EDGE of the derailleur cage.
Note: The teeth on the large chain are not uniform in height, so perform a full rotation of the cranks to find the teeth that sit at the highest point. Now double-check there is still a 1 to 3 mm gap.
4. Align Front Derailleur with Large Chain Ring
Next we will set the angle of the front derailleur in relation to the large chain ring, but make sure when doing this adjustment, you don’t change the height adjustment we just setup in the previous step.
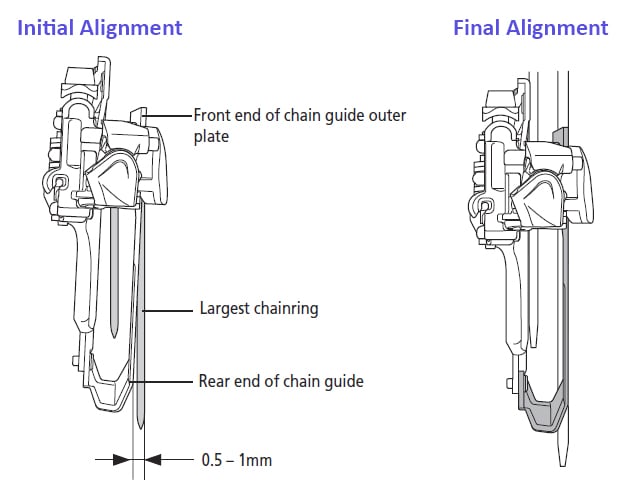
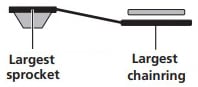
Shimano recommend you initially setup the derailleur with the rear end angled 0.5 mm to 1 mm inward from the large chain ring as pictured in the INITIAL ALIGNMENT shown above. If you are able to setup the derailleur like shown, it will be adjusted to the FINAL ALIGNMENT (parallel to chain rings) when we tighten the frame support bolt later on.
If you are unable to setup the recommended derailleur angle, then set the derailleur to the FINAL ALIGNMENT (parallel to chain rings) instead. Regardless of which option you choose, the end result will be the same – Front Derailleur is aligned PARALLEL to chain rings.
Once the derailleur is in correct position, Shimano recommend tightening the derailleur mounting bolt to a tension of 5 to 7 Nm.
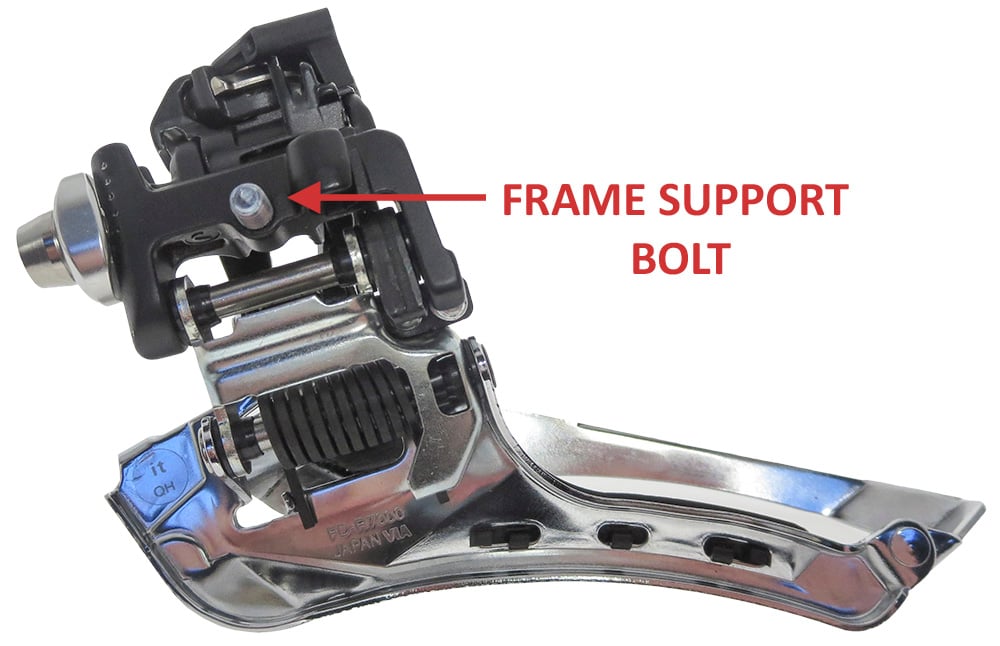
5. Tighten Front Derailleur Support Bolt & Fit Frame Protection Plate
Setting the front derailleur frame support bolt is an important step that can be easily overlooked as the bolt is hidden away from view. Setting this bolt correctly improves shift performance as this bolt provides a secondary contact point to counter shifting forces.

Carefully turn the support bolt (clockwise) until it is near – but NOT touching the frame. Note the location of where the bolt would contact the frame. Now we need to attach the frame protection plate to the frame.
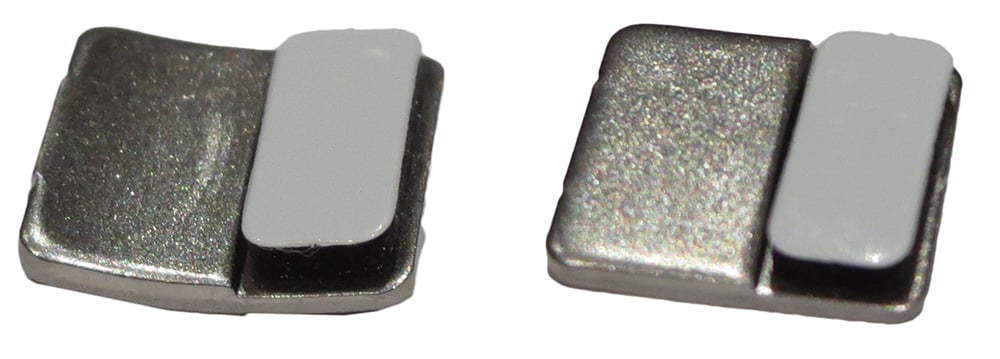
Shimano provide 2 different frame plates, one a little more curved than the other. This metal plate is designed to protect your frame (and paint) from stresses exerted through the derailleur support bolt when shifting the front derailleur. Fit the plate that best suits the shape of your frame in the location your derailleur frame support bolt will make contact with the frame.
When fitting this plate, you may need to move the derailleur and repeat steps 3 & 4. However, you should only have to fit this plate once, so it’s worth taking your time and getting it in the exact right spot. If you ever change the size of your large chain ring, you may need to do these steps again.
backing tape to stick to the frame prior to the derailleur support bolt pressing it into position.
Once the frame protection plate is fitted and the derailleur is back in the correct position, screw the derailleur frame support bolt until it just makes contact with the frame protection plate, then follow one of these steps;
- If your derailleur cage is already parallel to the chain rings, then only tighten the bolt to a point where it contacts the frame protection plate, but does NOT change the angle of the derailleur cage in relation to the chain rings.
- If your derailleur cage is slightly angled inward from the chain rings, between 0.5 to 1 mm as recommended by Shimano, then tighten the support bolt until the derailleur cage moves parallel with the large chain ring.
6. Connect Shift Cable to Front Derailleur
One of the main advantages of this new front derailleur is that it does not require an inline barrel adjuster to adjust tension in the shift cable. Instead, cable tension can be adjusted using the tension bolt on the derailleur itself. Now we will attach the shift cable to the derailleur;
- Press the INNER LEFT shift lever on your handle bar multiple times until it no longer clicks. This will ensure you have released all the cable from the shifter.
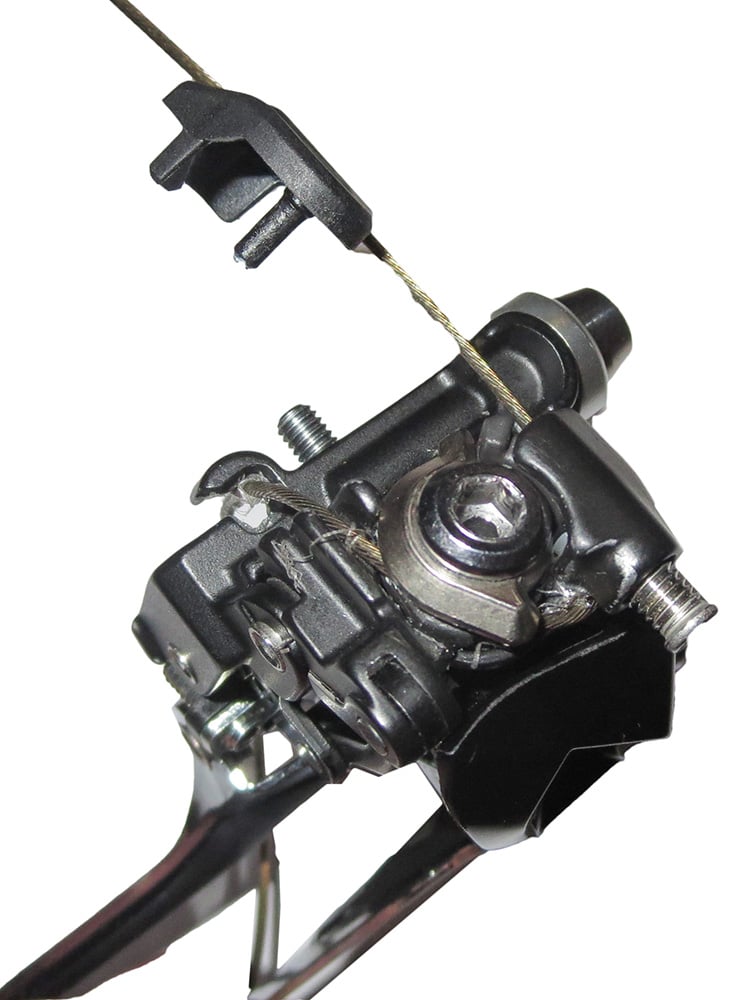
- Feed the shift cable from the bottom bracket up through the cable stop fitting located on the back side of the derailleur.
- Pass the cable under the silver washer and pull it out toward you.
- Pull the cable tight to remove any slack.
- Moderately tighten the cable clamp bolt so the cable will not pull free when testing the shifting in the next step. Use a torque wrench when tightening this bolt as it can be stripped if excessive tension is applied. Shimano specify a final torque setting of 6 to 7 Nm.
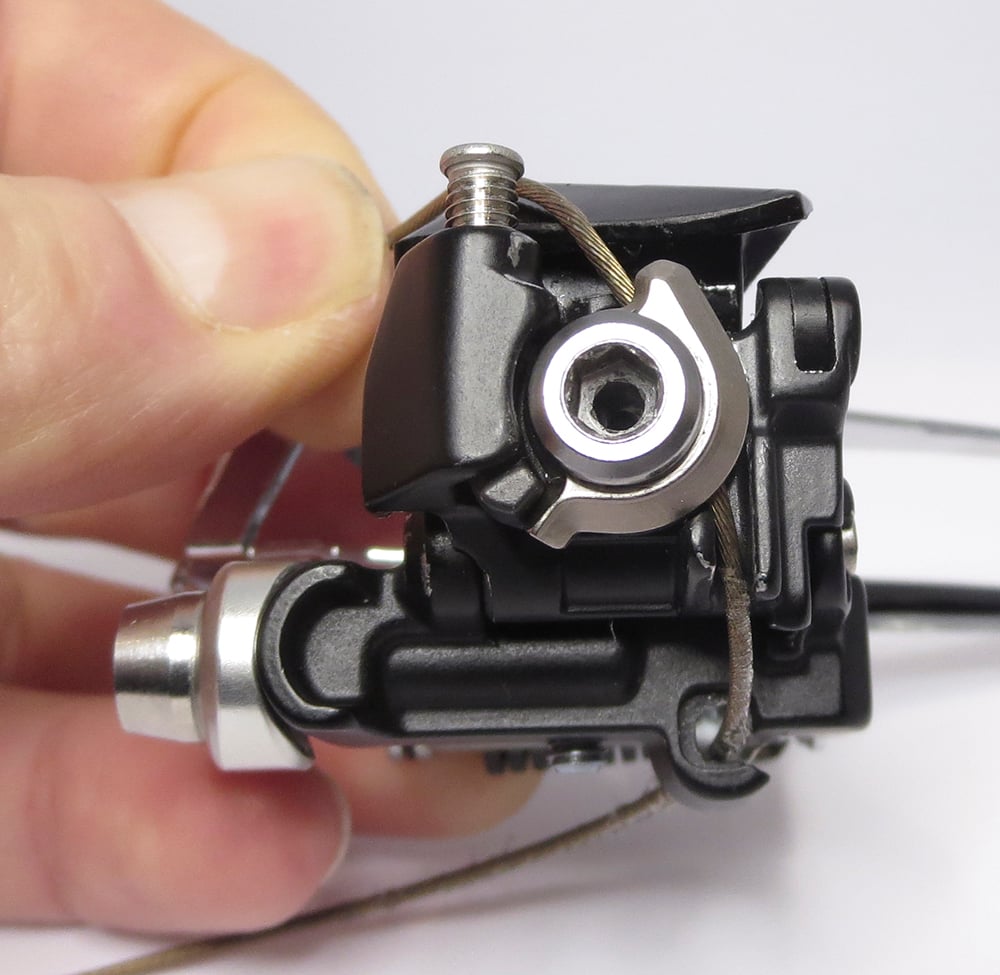
Cable passes up through hole located at rear of the derailleur,
under the silver rotating washer and out toward you.
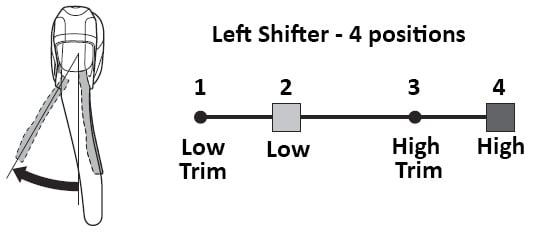
7. Front Derailleur Shift Positions
Before we adjust the shift cable tension, we need to mention the 4 shift positions of the front derailleur as illustrated in the following chart;
If you have a chain fitted to your bike, you will need to turn the cranks whilst shifting. Fit your bike into a workshop stand to make this process easier.
- Pressing the left brake lever all the way to right moves the front derailleur to the HIGH position which is the most outward position of the derailleur in relation to the frame. This setting is for riding the large chain ring and the smaller rear sprockets.
- Pressing the small inner shift lever once, moves the front derailleur to the HIGH TRIM position which is a small inward movement toward the frame. This position is for riding the large chain ring and the larger rear sprockets.
- Pressing the small inner shift lever again results in a larger movement shifting the front derailleur to the LOW position and forces the chain to change to the small chain ring. This position is for riding the small chain ring and the smaller rear sprockets.
- Pressing the small inner shift one last time, moves the front derailleur to the LOW TRIM position. Now the derailleur is closest to the frame. This position is for riding the small chain ring and the larger rear sprockets.
8. Adjust Cable Tension Setting
Now we need to set the correct tension of the shift cable. If your chain is fitted to the bike, turn the cranks when moving the left brake lever all the way to the right to move the derailleur to the HIGH position. At this early stage, the chain may not shift to the large chain ring. If the derailleur doesn’t move much, you will need to loosen the cable clamp bolt and pull the cable tighter (and repeat step 6). Once the slack has been eliminated and the derailleur is moving out further, we can fine tune the cable tension setting.
On previous designs of Shimano front derailleurs, there was no way to accurately judge the correct amount of cable tension. However, this new derailleur design features 2 markings that allow you to fairly accurately set the cable tension and therefore eliminate most of the guess work. Whilst the tension adjustment marks may be in visual alignment, the cable tension can be varied by small amounts whilst the 2 indicators remain aligned as discussed further in the Troubleshooting section later in this guide. This is how we set the cable tension;
- Move the left brake lever all the way to the right (turning the cranks if a chain is fitted). When the lever will travel no further, we are in the HIGH position.
- IMPORTANT: Press the small inner shift lever once to move the derailleur down to the HIGH TRIM position.
- Once in the HIGH TRIM position, we look at the 2 markings on the rear of the derailleur as pictured. We want both the lines to line up to form a straight line. To achieve this, turn the CABLE TENSION bolt as required. This bolt was identified in step 1 (at the top of this article). Turning the cable tension bolt clockwise will move the upper line anticlockwise and visa-versa.
When they make a single straight line,
the cable tension is perfect.
Once the alignment is correct, use the front derailleur shift levers to move the derailleur through a full range of movement a few times, then return to the HIGH TRIM position to check the alignment is still perfect. If not, make a small adjustment otherwise this step is complete.
An inline barrel adjuster should not be required to fine tune cable tension. Try to use the cable tension bolt only. If the bolt is not able to adjust tension adequately, then the shift cable is either too loose or too tight. Loosen the cable clamp bolt and adjust the cable in or out (as per step 6) to fix the problem. Attempt this step again.
9. Adjust Front Derailleur High Limit Bolt
The HIGH LIMIT bolt is designed to control the outward movement of the front derailleur, but this bolt works differently on the new Shimano ‘toggle’ style front derailleurs when compared to the traditional ‘pivot’ style front derailleurs of the past. The difference being;
Traditional Pivot Style Front Derailleur: the high limit bolt simply RESTRICTS how far out the front derailleur can travel. In essence the high limit setting resists any over-tension of the shift cable when shifting onto the large chain ring. You would adjust this bolt so the front derailleur does not rub the inside of the crank arm and the chain does not rub inside the derailleur cage when riding on the large chain ring and smallest sprocket. This setting would only affect the front derailleur in the HIGH shift position.
New Toggle Style Front Derailleur: the high limit bolt still determines how far out the front derailleur can travel, but it it achieves this in a completely different way. The high limit bolt works in conjunction with the shift cable tension, not against it. The high limit bolt determines where the derailleur is positioned relative to the tension of the shift cable. For this reason, the setting of the high limit bolt also changes the position of the front derailleur in both the LOW and HIGH TRIM shift positions as well. Keep this in mind.
Shimano instructions recommend you adjust the High Limit bolt to stop the chain rubbing the front inside face of the front derailleur cage (closest to the frame).
This setting is done with the chain on the large chain ring and largest sprocket. This gear combination may seem a bit counter-intuitive as it is not recommended practice to ride with a crossed chain, however, you MUST change to this gear combination before adjusting the High Limit bolt. Also, the chain must be fitted at this stage of the installation.
- Move the left brake lever all the way to the right whilst turning the cranks. When the lever will travel no further, we are in the HIGH position. The chain should be on the large chain ring.
- Shift the chain is on the largest sprocket at the rear.
- The chain is now on the large chain ring and largest sprocket.
- Important: Press the small inner shift lever once to move the derailleur to the HIGH TRIM position.
- Now slowly turn the cranks and adjust the High Limit bolt until there is a 0 to 0.5mm gap between the inside front face of the derailleur cage and the chain. We want to achieve the smallest possible gap between this surface and the chain. If you create too much gap here, you could experience rubbing in other gear combinations, so start with a very conservative gap. It can be readjusted at any time by repeating this step.
Note: In my experience, adjusting the high limit bolt can be fiddly and require some time and patience. In step 11 of this article, you will most likely need to fine tune the high limit bolt further.
10. Adjust Front Derailleur Low Limit Bolt
The final adjustment is the Low Limit bolt. This adjustment is designed to set the lowest position the front derailleur can shift down to. This setting is designed to eliminate any chain rub on the inside face of the front derailleur when the bike is in it’s lowest gear ratio. But, if the low limit bolt is screwed in too far, you may effectively cancel out the LOW TRIM position of the front derailleur. If this happens, shifting from LOW to LOW TRIM or visa versa will result in no visible movement of the front derailleur as the low limit bolt is stopping the front derailleur shifting down to the LOW TRIM position.

Important: Press the small inner shift lever whilst rotating the cranks. When the shift lever no longer clicks, we are now in the LOW TRIM position.
The chain should now be on the SMALL chain ring.
Shift the chain to the LARGEST sprocket at the rear.
The chain is now on the small chain ring and largest sprocket.
Slowly turn the cranks and adjust the Low Limit bolt until there is a 0 to 0.5mm gap between the inside face of the derailleur cage and the chain. We want to achieve the smallest possible gap between this surface and the chain. Again, start with a very conservative gap. It can be readjusted at any time by repeating this step.
Note: Depending on your bike, you may need to over-shift the lever a little past the ‘click’ to shift the front derailleur from the LOW TRIM to the LOW position. This is due to a combination of acute cable angle, high spring tension and small cable pull.
11. Test All Gear Combinations
Now all the hard work has been done and you are familiar with how to set these adjustment bolts, we need to do a final test shifting through all possible gear combinations. At this stage, you can fine tune the HIGH and LOW limit bolts further if there is still some chain rub. I also recommend doing a test ride on a quiet road to double check for chain rub in all gear combinations when riding.
The good news is that once the derailleur height, angle and limit bolt settings are correct, you shouldn’t need to touch them again for a long time (unless you need to change the derailleur or your largest chain ring). Cable replacement should be a breeze with the built-in tension alignment feature of this front derailleur.
You may hear noise when riding in either of the 2 crossed chain positions;
- Large Chain Ring & Large Sprocket
- Small Chain Ring and Small Sprocket
The noise may be front derailleur rub or caused by the teeth of the cogs interacting with the chain at extreme angles. Riding with a crossed chain is not recommended (and not necessary) as there are very similar gear ratios that can be achieved by shifting to a different front/rear gear combination. Professional riders sometimes do this, but they don’t have to pay for their equipment. Riding with a crossed chain will increase wear on components and it can be noisy.
It may not be possible to completely eliminate chain rub in all gear combinations, particularly when riding with a crossed chain or a nearly crossed chain. You may need to find a compromise when setting the high limit bolt so there is no chain rub in the gear combinations you regularly use.
Disc Frame Notes: If your bike is fitted with disc brakes, you may experience chain rub when your chain is on the smallest chain ring and second smallest sprocket. This is because road bikes fitted with disc brakes (135 mm quick release or 142 mm thru-axle) both have the same wider rear hub spacing of 135 mm versus a traditional road bike with rim brakes narrower 130 mm rear hub spacing. This extra 5 mm width results in the cassette being located 2.5 mm further out from the center line of the frame, but Shimano have NOT moved the chain rings to compensate for this difference. So there is an increased chain angle from small chain ring to the smallest sprockets.
Finally, the chain stay length of some disc brake road frames is shorter than Shimano’s specified minimum length of 410 mm. Bike manufacturer’s do this to give the bike more snappy handling, but shorter chain stays can affect the chain line to a small degree.
12. Troubleshooting
Problem: Having followed all the steps in this guide, you are still experiencing some chain rub in the front derailleur cage using these gear combinations;
(i) Front derailleur in HIGH TRIM position, Chain on large chain ring and second largest sprocket (almost cross-chain). Chain rubs inside face of front derailleur cage.
(ii) Front derailleur in HIGH position. Chain on large chain ring and smallest sprocket (highest gear). Chain rubs outer face of front derailleur cage.
Solution: This is most likely due to shift cable tension being either a little too loose or too tight. Whilst the tension adjustment marks may be in visual alignment, the cable tension can be varied by small amounts whilst the 2 indicators remain aligned. By making small adjustments to the cable tension bolt and the high limit bolt independently, you should be able to find a setting that provides front derailleur clearance for scenarios (i & ii) mentioned above which are generally the problem areas.
13. Fit Front Derailleur Top Cap
Once you are happy with the installation;
- Wrap the cable under and around the top section of the derailleur. You will need to use the shift lever to move the derailleur and get clearance to do this.
- Pass the cable through the larger hole of the plastic top cap.
- Fit the top cap to the derailleur.
- Cut any excess cable and crimp a ferrule onto the end.
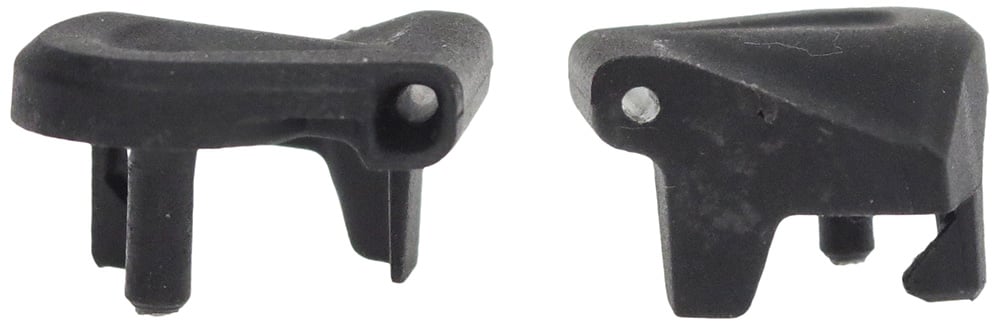
Shimano derailleur top plastic cover.
Left image: Cable entry hole (larger).
Right image: Cable exit hole (Smaller).
14. Clearance Between Front Derailleur and Crank Arm
I was asked a question about how much clearance there should be between the front derailleur and the inside crank arm ie. when front derailleur is shifted to the HIGH position ie. chain on large chain ring, front derailleur shifted fully outward from the frame.
I measured this gap on my 105 (7000 series) group set to be approximately 3.5 mm. The gap to the crank arm was about the same for both the black upper body of the derailleur and the outside face of the metal chain cage.
Note: This gap may be slightly different on your bike, but you need to make sure that the front derailleur does NOT touch the crank arm when riding under load. If the front derailleur is too close or touching the crank arm, you may have allowed for too much clearance between the cage and chain when in the Large chain ring / Smallest rear cog gear combination. If so, first check the cable tension is correct (in High Trim position), then re-adjust the high limit bolt to move the front derailleur closer to the frame. Ultimately, you only want the MINIMUM distance required to achieve NO chain rub inside the front derailleur cage when riding in this highest gear combination.
Hopefully you now have a perfectly tuned front derailleur setup. Enjoy the ride.
If you are curious about how Shimano’s latest 12 speed di2 groupset performs, check out my article on Ultegra R8170: Best Ultegra groupset ever?
References
I hope you found this article interesting. I have listed the following website pages as general references.
Shimano Dealer’s Manual for Front Derailleur Installation
Disclaimer!
Please remember that this information is only to be used as a guide.
I consider myself an enthusiast, not an expert. The information I have presented in this article is only a guide.
Whilst I enjoy working on my own bikes, I am not a qualified bicycle mechanic. The content of this article is purely illustrative and does not constitute professional advice. For your own safety, any type of work should only be undertaken by a qualified bicycle mechanic. Incorrect assembly of parts could result in equipment damage, personal injury or death.
About Me.
I have been riding and working on my own bikes for many years now. I wanted to share my experiences, knowledge and research with others. My aim is to inspire people to get involved in all aspects of this amazing sport. Cheers.
Comments.
I welcome reader feedback in the comments section. Should you wish to suggest an amendment, please include a note advising the source of your information so that myself and other readers can ascertain the accuracy of your information. Note: Trolling or argumentative comments will be removed as they are counter-productive.
This is a great guide (and also applies to the new GRX FDs, source: https://si.shimano.com/#/en/iDM/GAFD001/installation/TOC_INSTALLATION). It seems like even a decent number of professional bike mechanics aren’t familiar with the correct installation and adjustment of these new toggle FDs. I got a new bike with tons of drive train noise in gear combinations where there shouldn’t be chain rub. After asking the bike shop to adjust it twice and them making things worse I read through the dealer’s manual and realized that they forgot to extend the support bolt. That fixed a lot of issues and I’ve slowly been getting a better sense for adjusting it, but these instructions are much more clear than the dealer manual instructions!
Hi Austin, thanks for posting your comment. I am SUPER HAPPY you found the guide helpful.
I completely agree with your comments. I suspect a lot of mechanics just assume it works the same as the previous ones, but there are small differences that can greatly affect the end result.
I believe the support bolt was first added on Shimano’s 1st gen di2 electonic front derailleur (7970 series). It was added to provide an additional point of contact with the frame to counter the powerful shifting forces exerted by the electric motor. The support bolt concept was then also applied to the mechanical versions of the group sets that followed; beginning with Dura Ace 9000 series which had a longer (and more powerful) pivot arm design.
Enjoy riding the bike and keep on tinkering!
Hi there
Thanks for the great guide. I haven’t been happy with the shifting from the small ring to the big ring with my R7000 front derailleur. Compared to the 5800 FD on my old bike, it requires much more effort. However, I’ve just realised the FD was installed without the cable stop. Could this be the issue do you think? If so, do these cable stops come with the FD or can they be purchases separately? Thanks for your help.
Hi Tom. Just to confirm, when you say installed without the cable stop, do you mean the plastic or steel ferrule that goes onto the end of the gear cable outer?
If your gear cable outer terminates at the front derailleur, I don’t think a ferrule cap will make much difference, but any bike shop should have heaps of them around the workshop and give you one. These ferrules are supplied with the gear cable kits, not the front derailleur. On my bike, only the shift cable travels from the bottom bracket to the front derailleur (not the outer) and it shifts with a nice action at the lever.
I think you may need to investigate the shift cable rather than the derailleur setup. The original R7000 (105) Shimano cables are optimised for low friction shifting, so it may be you don’t have an original Shimano [Optislik] cable and that is causing extra friction, or the cable may be kinked, or the path of travel may need to be checked.
It may well be worth replacing the cable. You can buy just the Shimano Optislik inner cables as a pair or you can buy a complete shift cable kit which includes the outer cables as well. When installing the cable, if the cable is internally routed inside the frame, try to ensure it does not get wrapped around any other cables that are also inside the frame as that may add extra friction.
Once the cable is correctly routed from the shifter to the front derailleur, you can feel the resistance in the cable by gently pulling on it from either end. For this to work;
1. don’t pull the cable ferrule inside the shifter
2. don’t cut the cable and connect it to the front derailleur yet.
When you pull the cable, you want it to feel smooth and consistent, not grabby or very resistant.
Best of luck, let us know if you figure out the cause.
This is such a helpful guide, thank you! After months of waiting I received new bike in August and have been attempting to figure out how to adjust the front derailleur (105 R7000). All the guides I’d seen refer to traditional FDs… No wonder I was getting confused.
I need to fiddle a bit more I think but one thing I’ve noticed is that even with the cable tension bolt fully screwed in, the lines don’t quite align (step 8). Do I need to pull the cable tighter by loosening the pinch screw, then fine tune, do you think? It’s only slightly out, like maybe 5-10 degrees away from being a perfect straight line.
Hi Ben, I’m glad you found the guide helpful. I certainly recommend getting the cable tension indicators to align using the bolt. But you don’t want the cable tension bolt screwed all the way in to achieve this as you need to be able to add tension in the future using this bolt to eliminate any cable stretch or housing compression. It may be a bit fiddly getting the cable tension just right now, but once it is done, it will be quick to adjust the tension in the future using just this bolt.
Here are a couple of ideas on how to add more initial cable tension;
1. If you have an inline barrel adjuster fitted to your front derailleur cable, you could also loosen the cable tension bolt on the front derailleur, tighten the inline barrel adjuster to add more tension to the shift cable, then use the cable tension bolt on the derailleur to add the last bit of tension required to align the 2 indicator lines.
2. You can manually pull the derailleur outward (away from the frame) and wedge something small (like a small piece of rubber, plastic etc) between the derailleur and the frame to stop the derailleur returning back to it’s original position. Then pull the shift cable tight and fastened it to the derailleur as usual. Finally, remove the wedge from behind the derailleur and let the derailleur return back to it’s original position. The shift cable should now be tighter. Be careful to use a wedge that won’t scratch your frame. This technique works well for older pivot style derailleurs.
What a fantastic reference this is , I am building a new bike with a new frame and swapping over my
Shimano 8000 groupset. I knew somewhere you had to reset the 8000 F.D limit screws if they where already set on the previous bike. I was not really sure until I found this. Brilliant step by step setup. Big Thank you for your time on this.
Thanks for your great feedback Jonathan. Good luck with the group swap to the new bike!
Hands down this is the best guide I’ve come across! I like to think I’m a somewhat competent home bike mechanic, but I’ve spent way to many hours trying to dial these in. New ones I could install just fine following the Dealer Manual, but when it was time for new cables, I could never get them set up as well again. I always had my suspicion it had to do with the limit screws, since these operate quite a bit different than traditional FD limit screws. The part about ‘resetting’ the H/L limits was like finding the Holy Grail. That and shifting though all the positions then re-checking the alignment were the missing links. Thank you for publishing this. Great work!
Hi Casey, thanks for posting your comments which are really appreciated. I completely agree with you, many of us have been left a bit perplexed with this new design. Interestingly Shimano released this new toggle front derailleur design (after decades of every group set manufacturer using the same FD pivot design) and then drops mechanical shifting from 2021 Ultegra and Dura-Ace line-up.
Hey Rouleur,
That’s funny because I thought the same thing to myself last night after getting my derailleur set up. This has only been out for one generation, and it’s already on it’s way out on Ultegra and Dura Ace? Dura Ace, I get, but I’m bummed about Ultegra. I’m a simple guy who still likes mechanical shifting Hopefully they keep GRX 800 mechanical for some time.
This is exactly what I needed to help me install a used derailleur. The note about re-setting the screws (especially the high-limit) made all the difference. Many thanks.
Thanks for posting your comments Andrew, glad the guide was helpful to you.
Thank you so much! This guide in its clarity and step-by-step instructions is so helpful and easy to follow! Amazing work.
Thanks for posting your comments Rob, glad to hear you found the guide helpful.
Thank you so much for taking the time and effort to post this – consise, clear-as-mud (!) step-by-step instructions and images to help visualise the instructions, with explanations of ‘why’. Great article. Cheers!
Cheers Ashok, thanks for taking the time to post your comments. Glad the guide was of help to you.
Thank you for posting this detailed article! This information is just what I needed!
Great to hear it was helpful Jim, thanks for posting a comment.
First of all thanks for this guide. Helped a lot in helping me inderstand how it works.
Im currently facing the problem in section 12 (ii) where my fd is rubbing the chain in the big ring and 3 small sprockets. When tensioning the cable, does my left hand shifter have to be in a certain position (eg. high, high trim, low, low trim)?
Thanks!
Hi, glad to hear that the article has been of help. You can tighten or loosen the cable tension bolt with the front derailleur in any position. But when checking the alignment of the 2 front derailleur tension markings, the front derailleur needs to be in the HIGH TRIM position (as per section 8).
Presumably you already have the markings aligned but are still experiencing chain rub as described. Make MINOR adjustments of the cable tension bolt (and possibly the high limit bolt) to get the clearance just right in all non-crossed gear combinations. I also recommend that after making an adjustment to cable tension, press the INNER shift lever multiple times to shift the front derailleur all the way back into frame, thereby releasing cable tension, before shifting the front derailleur back out to the position you are testing for clearance. This step will ensure the front derailleur is now positioned in it’s new location based on your adjustments.
Alright, got it fixed. Thank you so much!
This is such a concise guide, thank you for taking the time to do it. I have a question regarding the spacing between the crank arm and the outer edge of the FD cage. I have the FD set up as per your fantastic guide, however there’s very little clearance between the Ultegra crank arm inner and outer edge of the FD cage – around 1mm<
Is this correct? It seems dangerously tight to me..
Thanks for your kind feedback. I measured this to be about 3.5 mm which is a fair bit more than the 1 mm you currently have. Your 1 mm clearance reminds me of my 1980’s vintage steel bike fitted with Campagnolo Super Record, which is about all you get! Thankfully in the modern age the clearances are far more generous. I have updated the article with further discussion and a photo.
Thanks so much for this! My chain was rubbing on the highest gears, and I couldn’t fix it with the limit bolts without affecting the other lower gear end. By going through this guide I soon noticed that the derailleur was not parallel with the chain ring.
All good Mateus, thanks for your comments. Glad the article was able to help you fix the problem.
Mate, thanks for sharing, and all your efforts. It’s a very technical little item. Shimano kickbacks would be approved.
Thanks for posting, a Shimano kickback would be nice! Yes it a bit more technical and still surprises me that Shimano completely re-invent the mechanical front derailleur only to discontinue mechanical group sets in the next iterations of Ultegra and Dura Ace.
Hi, thanks for this great article. I went through the process of adjusting my front derailleur using the older, traditional method and, as you can imagine, the end result was worse then where I had started. Your instructions above helped me get things back on track. However, I went through the full installation instructions twice and both times ended up with the following issue that I was wondering if you might be able to help troubleshoot. With the chain on the small front ring, it rubs on the outer face of the front derailleur cage (furthest side from the frame) when I get to about the fourth smallest cog in the rear. I understand that there might be some rub on the very smallest cog due to the crossed positioning, but it seems to be happening too soon. I also have difficulty discerning any movement in the front derailleur when moving back and forth between the low and low trim positions and suspect that this is a related issue (it almost seems as if it goes directly from high trim to low trim and I can’t get into the low from either direction, which is where I think I would want to be in that gearing combination). I know you mentioned above that this lack of movement between low and low trim could be caused by the low limit bolt being screwed in to far, but I’ve reset it in accordance with your instructions above. And when I try to fine tune in order to eliminate this rub, it creates rub on the other side in other positions. Any thoughts would be greatly appreciated.
Hi Bob, chain rub in small chain ring and 4th smallest cog sounds like a setup issue. I doubt the chain angle of your bike is more extreme than my road bike which has disc brakes and short 405mm chain stays. I experience front derailleur (FD) chain rub in the 2 smallest sprockets when on the small chain ring. There is a possibility that if the cable tension is too tight, the shift lever may not be able to move to all 4 positions.
First thing to check; whilst rotating cranks, shift the FD ALL the way out to HIGH position (big chain ring). Next press the inner shift lever 3 times as follows. The first click is HIGH to HIGH TRIM, the second click is HIGH TRIM to LOW, the third click is LOW to LOW TRIM. If you are not able to get 3 clicks, try disconnecting the shift cable and repeat the test. If it still doesn’t click 3 times, probably an issue with the shift lever, however if it DOES click 3 times after disconnecting the shift cable, then the shift cable was too tight and restricting the internal mechanism.
Otherwise if the shifter clicks 3 times, here are some more tips;
Assuming the FD alignment and height is correct and there is nothing behind the FD restricting inward travel, I would start by loosening off the low trim screw (to remove it from the equation), then gradually increase cable tension to see if you can get the front derailleur shifting to the 4 different positions. Remember it will only be small movements for some positions. The cable tension is likely about right when you (sometimes) need to slightly over-shift the lever to move the derailleur from LOW TRIM to LOW positions. Once the front derailleur is moving to all 4 positions, then shift the FD all the way down to LOW TRIM position and set the low trim screw as described.
Unfortunately, changing cable tension will affect the derailleur position in all settings, so you will probably need to re-adjust the high limit screw. When testing, always pay attention to the trim setting of the derailleur as it is easy to get confused thinking the chain rubs, when the derailleur is in the wrong trim position. If you really get stuck, visit an experienced mechanic at your local bike shop should be able to sort out the issue pretty quickly as these derailleurs are pretty common now-a-days.
I’m having the issue described above: no discernable movement between low-trim and trim positions, combined with chain rub in the small chainring/smallest 3 cogs. The low limit is backed all the way out so this isn’t causing it. (although needing to be backed all the way out suggests another issue?)
I suspect the issue is with the angle at which the cable approaches the FD (I was previously unable to correctly set up an older 6800 FD).
As a possible solution, I tried using a cable housing end cap fitted into the FD (even though my cable is unhoused) – this is what the GRX FD documentation advises. However, this resulted in the issue described in a comment by Charlie on your ‘adjustment’ version of this page: a very large movement from low to low-trim when shifting down from the big chainring (almost equal in movement to the full shift itself), but then no movement in either direction once in low-trim. Oddly enough, this was the exact same problem I encountered with the 6800. Low could only be reached from the big chainring and not from low-trim. The other comment mentioned needing to overshift, however I couldn’t replicate this. Also, based on setting up other other FDs, isn’t being able to overshift a sign of incorrect tension? (The old way of setting correct cable tension by introducing an overshift then to gradually remove it).
Hi Neil, has this frame been successfully setup with any (indexed) cable actuated front derailleur? If so, it should be possible to successfully install Shimano 6800 as that was old school design. Have you checked the chain line? Shimano design the front derailleur to work with chain rings located at a specific distance from the centreline of the frame, if they are not within that specification, it could cause front derailleur problems. Chain line can be varied by incorrect bottom bracket fitted into the frame as determined by the frame BB shell width and crankset design.
From an operational perspective, there must be cable tension holding the front derailleur in the LOW position. Shifting down from LOW to LOW TRIM releases this cable tension and the derailleur spring can pull the derailleur back in toward the frame. Then the LOW LIMIT bolt adjustment will restrict how far in the derailleur can travel (as no longer any cable tension). If there is NO movement when shifting from (LOW to LOW TRIM) or (LOW TRIM to LOW) then there is not enough cable tension. We only need a small amount of cable tension to hold the derailleur in the LOW position.
With no movement between LOW and LOW TRIM, both these settings = LOW TRIM position, hence the chain rub when using 3 small cogs with small chain ring. I’ve only set this group up on a modern frame, so no need to use ferrules etc. just fed the cable straight from frame to front derailleur. I always suggest trying a good bike shop if you really get stuck as once it is setup correctly, it will require little maintenance until your cable requires replacement. If you figure out the problem, please post your solution for others. Best of luck.
Shimano front derailleur link is dead.
Ok Thanks, I have updated the link to Shimano’s new location for the user manual.
Cheers, great article. But i received a 2nd-hand one without the frame pads. Maybe this is the reason, but even after following the guide, operation is better, but still worse than i could setup with a FD-6800 in 10 minutes. Imho this is over-engineered to point of being a joke. 🙁 Happens to all technology nowadays i guess.
Sorry to hear that Steve. It is certainly more tricky to setup than traditional front derailleurs. The small metal frame pad is required to protect a carbon frame (or the finish on an alloy or titanium frames). The support bolt is required to provide a crisp shift up to the large chain ring. Assuming the derailleur is aligned and positioned correctly as per the guide, most problems are related to either cable tension or the high limit bolt setting. Hopefully there is a good bike mechanic in your area that can assist further. Once setup, they generally work well. Alternatively you should be able to fit a traditional Shimano front derailleur from any of the previous (1st generation) Shimano 11 speed group sets. Looking at the Shimano Compatibility Chart (pages 17 & 20) all parts are compatible across Shimano 11 speed Road groups.
Yeah, i tried to substitue a hard piece of plastic attached with double sided tape (for the missing frame pad) but the point of contact is well back on a round tube, and is also hindered by the deraileur clamp. Any force from the screw just dislodges the plastic. … I wonder if this happens much with the shimano plate.
Anyway, I raised the deraileur to give about 3mm clearance, and can now get a rub-free crosschain on small to small. Probably doesn’t help i’m running a 10 speed crankset – Sworks! ;>. I guess bodges can only get you so far. Cheers
Great guide. I am almost finished setting up an R7000 groupset. Front derailleur is almost perfect. Followed all the steps. However, when I change from Low Trim to Low, there is a click but the derailleur does not move. Cable tension was adjusted with lines matching in the High Trim position. I set the high and low settings as Shimano recommends using the big chain ring and that works fine. However, because there is no outward movement of the derailleur when I switch from Low Trim to Low, the outer plate of the derailleur rubs the chain for the higher gears on the back cassette.
Does this indicate that I need to tighten or loosen the cable at the pinchbolt? I would have thought that the tension adjustment (with the matching lines) would have taken care of this.
Hi David, there is some scope for adjustment of gear cable tension and the lines still match. May need to experiment a little to see if you can get a better adjustment. Using small chain ring with smallest 2 sprockets may rub on the FD. Shifting between Low and Low Trim is usually a very small movement. You may need to over-shift the lever past the click to get the FD to move from Low Trim to Low position. Also note, if the low limit bolt is screwed in too far, you may also effectively cancel out the LOW TRIM position of the front derailleur. Low and Low Trim will be the same position as the FD cannot move inward any closer to the frame due to the Low limit bolt setting.
Hi Rouleur. Thanks for your fabulous step by step guide. It all made sense by the 3rd attempt and I’m at a loss think what was confusing me on the first 2 attempts. But I still don’t think I’ve managed to acheive the optimal setup. The cage moves just fine when I click between High and High Trim but the movement between Low and Low Trim is weird. On the way down to the small chainring there’s a significant difference from Low Trim to Low but coming the other way the cage hardly moves at all. Any idea how to deal correct this?
Hi Clive, yes, shifting between High and High Trim is a much more noticeable movement than between Low Trim and Low (which hardly moves at all). If the front derailleur is not rubbing in the easiest gears (small chain ring, largest sprockets), nothing further to be done really. Also note, if the low limit bolt is screwed in too far, you may also effectively cancel out the LOW TRIM position of the front derailleur. Low and Low Trim will be the same position as the FD cannot move inward any closer to the frame due to the Low limit bolt setting.
Precious. I had been wading through so many YouTube postings in my hitherto futile attempts at understanding the peculiarities of 6 yr old “new” Shimano FD’s. Thank you, thank you and thank you. I suppose I’m among those who are able to make sense of a (well) articulated explanation, accompanied by the occasional well placed photo, over against a video that makes sense to its poster, but often to few others.
Now I freely confess that I required multiple readings of your instructions before it all gelled. But when it did, it was mine. It was another man’s gift to me. Furthermore, from the very first brief perusal I knew that I had found the balm that would quell my mounting frustrations.
Only someone that’s prepared to give so generously would offer his time to this measure. What more can I say? You led me out of the woods.
Grateful in Medford, Jim.
Great to hear the post was able to help you sort out your setup. Thanks for posting your comments. Happy riding.
Rouleur, thanks so much for this installation guide. Super helpful. I have a question. I installed a new r7000 105 group set on an older road bike I recently purchased. It had an old Dura Ace (I believe 7800) 10 speed that wasn’t working well. And I needed more flexibility with lower speeds.
Not really that experienced with this stuff. I got everything to work but for the front derailleur. It’s the brace-on type. It seems too far from the frame, even with the L adjustment screw fully unscrewed. It keeps rubbing the chain. It almost looks like the mount is protruding too far from the frame. Is it possible that the derailleur is not compatible with this frame? I can’t see this being a case because the old Dura Ace derailleur work just fine. Any thoughts?
Hi jdar, I believe the chain line for road bikes has been pretty similar over the years, so the new R7000 should work fine with your frame. Based on your comment that the derailleur is located too far out on the frame (assuming no cable tension and low limit screw wound out), I would be checking the width of your bottom bracket is correct. If the width is too narrow, then the chainrings will sit too close to the frame and likely causing this issue.
Awesome article, can you just explain “Note: Depending on your bike, you may need to over-shift the lever a little past the ‘click’ to shift the front derailleur from the LOW TRIM to the LOW position. This is due to a combination of acute cable angle, high spring tension and small cable pull.”
Hi Darren, sometimes you may need to push the shift lever past where it clicks (but not to the next click) to get the derailleur to move out from the frame. It depends on your bike and cable tension.
Awesome Guide and I use it always for setting up my front derailleurs ever since I discovered it.
Just one question.
Do you think fixing the chain rub issue (section 11.) with a 2.5 mm spacer on the crank spindle at the drive side is worth a try or at least not contra productive?
Was thinking a bigger Q-factor would be beneficial for me as a bigger rider anyway and I could put some spacers on the non drive side pedal or move the left cleat to be symmetrical again.
Many thanks.
Hi HeinzGurke, thanks for your comments, glad to hear the guide has proven useful for your bikes. Yes, changing the Q-Factor of the cranks would counteract the different position of the cassette caused by wider disc brake rear frame spacing, but the problem with increasing Q-Factor by fitting spacers between bottom bracket and crank arms is the length of the crank spindle is not designed for it. As Q-Factor needs to be increased evenly on both sides of the frame, by adding 2.5mm spacer to drive side, you also need to add 2.5mm spacer to non-drive side which means the crank spindle is now 5mm too short. You may recall when connecting the non-drive side crank arm to the notched end of the crank spindle and there is a little hole that a small plastic latch clicks into. This is a safety feature to ensure the crank arm is fitted correctly to the crank spindle and that latch will not engage the hole when the non-drive side crank arm is located 5mm further out.
The simplest solution is to switch group sets. I believe both SRAM and Campagnolo marginally increased the Q-Factor of their cranksets to overcome some of the chain line difference caused by disc brakes. Shimano GRX is apparently 2.5mm wider each side, here is an article discussing this.
This article helped me tremendously to get a shifting problem solved on my FD-R8000 derailleur. Thank you for the very detailed and helpful article. Especially the part about the screw resetting, which isn’t mentioned in the Shimano dealer manual. (I understand that manual is probably from an initial installation perspective but it would be good if they add a sub chapter on ‘reinstallation’ and add that information).
Correcting the height/distance of the derailleur cage to the chainring, resetting the screws, and starting with a lot more ‘initial tension’ on the cable before fastening the clamp bolt were probably the three major parts in the solution of my front shifting problem.
Thanks for your comments. Super happy the article helped you sort out your front derailleur setup.
I just said to my parents “I need to leave a reply and thank that guy” – without your information regarding the H-Limit Screw reset position, I would be still sitting here trying to figure out what I did wrong. If you forget adjusting it to its reset position first, your cable tension will be all but correct.
You will notice that if you cannot feel the four positions of the FD (up/down and both trims) anymore while shifting through all front derailleur positions.
This was of so much value for me, I just screwed in the H-Limit screw so that the upper part of the inner parallelogram body (the one with the big cable tensioning bolt) does not lift upwards anymore, checked if the derailleur was still parallel to the large chainwheel – and voila. Everything working now like it should.
It is a bummer Shimano themselves do not mention this “lovely” detail – but luckily you do and saved me and others some trouble. Thank you very much for your helpful article.
Hi Yannik, it gives me great joy to hear you got everything sorted out and thanks for posting your comment.
Nice guide! I have 3 questions please:
Q1
On part 4. Align Front Derailleur with Large Chain Ring
“Next we will set the angle of the front derailleur in relation to the large chain ring, but make sure when doing this adjustment, you don’t change the height adjustment we just setup in the previous step.”
What do you do to do the adjustment? Is this the part where you use the low limit bolt? Do you use the support bolt at all to do this adjustment?
Question 2:
How can you push the rear end of the chain guide so that it is inward of the big chain ring?
Question 3:
If I have an inline barrel adjuster for the tension cable, what should be its initial position at the very beginning? I imagine it should be loose at the very beginning so that we can tighten it later if the tension cable loosens up later on. Any thoughts on this?
Again thank you for the great guide.
Hi Regi,
A1. Depending on how the front derailleur mounting ie. clamp or braze mount, you may be able to set the angle of the derailleur to your preference of either parallel or slightly inward of the chain rings. The support bolt can also be used to change the angle of the front derailleur (if required) as discussed in step 5. The low limit bolt is not used to set the angle of the front derailleur, only clearance to the chain.
A2. Not all bikes/mounting options will allow you to angle the rear end of the chain guide slightly inward. I can’t on my bike, but it is not a problem as we want it’s final position to be parallel.
A3. The main advantage of this new derailleur design is that an inline barrel adjuster is not required. There is a special cable tension bolt on the derailleur with a marking to set the correct cable tension. I would remove the barrel adjuster and replace the shift outer housing with a new one to the correct length, but if you don’t want to do that, you can set the barrel adjuster where you like and no longer use it.
I also cannot adjust angle the rear end of the chain guide inwards because I have the braze on. Do you know what I can do if the rear end is outwards of the chain ring while the front end chain guide is still inwards of the chain ring? I am having trouble making it parallel because of this weird angle.
Hi Regi, that’s a problem, probably best to visit a bike shop to see that they can do for you.
A+ on the photos! Thank you. How can this be so much better than the Shimano instructions LOL!
I think the Shimano instructions were made by the team at Ikea..haha
Hi Rouleur,
So glad to find your article as some of the Youtube videos are not either accurate or cover so many details. It’s really helpful! Thanks!
Everything works well so far but I still have one thing to double-check: In step 1 I unscrewed both H and L, then adjusted H to make sure the upper ‘toggle’ was unmovable. But the L adjustment in Step 2 (derailleur cage is in line with the teeth of the chain ring) will set the upper ‘toggle’ free again. Is this normal or have I missed something? (What I did was lift up the upper toggle while pulling the cable)
Thank you
Hi Michael, yes your observation is correct, tightening the Low Limit screw will cause the upper portion of the front derailleur to become loose again. The instructions for resetting the derailleur were the steps I used to set the derailleur to a default state as nothing is documented in the Shimano instructions. It would be interesting to see the factory setting for these screws on a brand new derailleur. I know from experience that if the upper toggle is too loose, the cable pull will not be enough to shift the chain to the big ring. Ultimately the tension screw setting + the high limit setting, determine how far out the front derailleur will travel when the shifter pulls in the shift cable. This is a departure from the traditional front derailleur design where the high limit bolt restricts the outward travel of the derailleur, rather than contributing to it.
Thank you. This is much more clear than the Shimano manual.
After 5 decades of Italian bikes with Campy components my latest vintage rebuild is a Bianchi Mondiale SLX. It came with Shimano Tricolor Ultegra bits and pieces, of which the headset and bb were already fitted. Removal and maintenance of both requires standard tools, nothing Shimano specific there. But there are other components like a cassette hub I’d like to strip and service. I always use this site for tips for which, like in this article, many thanks. I also access VeloBase but this is no longer on the net as far as I can see. Anybody know what happened?
Best from Bavaria
Colin
Hi Colin,
Glad to hear that my site is a useful source of information for you. Not sure what happended to Velobase unfortuantely. Best of luck with the Bianchi rebuild.
OMG…! This is fantastic. Your walk-through with explanations are fantastic; I followed it paragraph by paragraph. Your explanations are fantastic. I’ve bookmarked this particular Shimano-toggle-front-derailleur-escape-from-hell-directions and will scour your entire site because if you’ve done great work on this one point of irritation there’s a high probability your other work will also scratch my other itches. I’ve been working on bikes since 1986 and these new toggle derailleurs have bothered me to no end. I purposely avoid touching them if they’re ‘good-enough’. Today is the first day of the rest of my life because of finding your work. Thank you.
Hi JayDeePee,
Thanks for your amazing feedback. Wonderful to hear that the article was able to help you with the new Shimano mechanical front derailleur.
Dude … THANKYOU so much for this very clear set of instructions. I’m an experience mechanic, and while my brain was still thinking about how to set up a traditional front derailleur (which of course wasn’t working), I found the Shimano Dealer Manual instructions utterly baffling. Despite using western letters and the English language, their instructions may have well been from a different solar system. Yours were SO MUCH CLEARER.
Rich,
Bike Education Director,
Bike New York
Hi Rich, thanks for your nice comment, it’s fantastic to hear that the page has been so helpful for everyone.
Excellent guide. The key part missing from the other videos and articles I looked at was adjusting the high limit right at the beginning, to flatten the top cap. That solved my problems 🙂
Many thanks!
Hi George, great to hear the guide was able to help.
Just bought a bike with 7100. Front shifting was pretty bad. Took it back to the bike shop who had a go at remedying the problem. They got it better but not good enough probably because shop mechanics rarely ride the bikes they work on. I came across your instructions – so good. Once I got my head around the bits and what they all do I had a go at the adjustments. I now have a nice bike with a front mech that does what it’s supposed to. So thank you very much. Your article now has pride of place in my favourites.
Hi Bill, wonderful to hear that this article helped you sort out your front derailleur. Enjoy riding your bike.
Great instructions, which I think I have followed correctly…. But I am still having an issue, whereby the front derailleur doesn’t move at all when toggled across from HIGH to HIGH TRIM. Do you have any troubleshooting tips to get this to work?
Hi Martin, the front derailleur should MOVE IN toward the frame about 3 or 4 millimeters when shifting from down HIGH to HIGH TRIM position as it reduces cable tension. Make sure your chain is on the large chain ring and smallest sprocket when testing. Check the derailleur cable loosens a bit when shifting from HIGH to HIGH TRIM. It must not be catching on anything.
I think it is most likely a small setup issue with the HIGH LIMIT BOLT and/or the cable tension. Fiddle with each of these adjustments (one at a time) to see if you can get the derailleur to actually move when shifting between these 2 positions. Once it moves the correct amount then work on the other adjustments. Remember, before trying to tighten cable tension, it’s best to shift the front derailleur all the way back down to LOW TRIM position first to take tension off the bolt, then it can be adjusted without the resistance of a tight shift cable. Test them both in small increments.
Amazing – thanks for this – really clear instructions, diagrams clear. It has made me question why I don’t have a Low limiter screw – is the normal?
Thanks
Hi Brain, I presume you mean the low limit screw has fallen out? It should be possible to find a substitute as I highly doubt Shimano would sell them as spare parts. It may be the same size as older front/rear Shimano derailleurs if you have one.
Yeah, I’ll have a look at getting one. Thanks
My Domane AL5 was delivered with some FD rubbing, so I fiddled and made things worse. I must admit I had no idea about the trim functions at the time, so it’s possible it was set up correctly to begin with, haha. However, this guide educated me and ultimately gave me the confidence to set up and adjust it myself. Thank you for this.
Hi Mike, great to hear you the guide was of help.
My derailler doesn’t even move with the lever. I’ve followed your guide up until step 8, but I cannot continue because the tension bolt doesn’t move the white lines and the derailler won’t move with the lever. I’m totally lost. Do you have any tips?
Hi Zach, that could be caused by the incorrect starting setting of the High Limit Bolt. I suggest you go back to step 1 and carefully check the setting of the High Limit Bolt. The correct setting is crucial before you do any of the other steps or you can experience the issue you are having.
First of all, thank you for developing this amazing guide.
I share my problem with you in case you can give me a solution:
I received a new bike with a complete mechanical shimano 105 12s groupset and when I took it out of the box and adjusted it I noticed that the front derailleur rubs against the chain with the small chainring and large sprocket. The problem is that after following all the steps, I have seen that the lower and inner part of the front derailleur (which contains the spring) touches the frame, so there comes a point where loosening the lower adjustment bolt L does not make the derailleur move inwards. What do you think I could do?
Thank you very much!
Hi Guillem, if it is a new bike then the supplier should fix that problem for you.
At a guess based on your description, it sounds like the wrong bottom bracket may be fitted to your frame. The bottom bracket axle determines where the chain rings sit in relation to the frame tubes. If you have set up the front derailleur correctly and it rubs as described, the chain rings may be too close to the frame. Different frames and chain sets require different bottom brackets to ensure the correct chain line.
This guide saved my ass after 3 days of failed attempts to tune my GRX FD. This is a very odd new system, and the key that got me stuck was the initial setting of the HIGH Limit screw being off base. It was impacting all the ensuing steps, and in general these new limits are very wonky to deal with compared to typical FD’s. I appreciate the clarity.
Hi Bryn, great to hear that the article was useful to you. I had the exact same issue when I was installing a used derailleur and that preliminary step wasn’t mentioned in any of the official literature from Shimano at the time. One of the reasons I decided to write the article.
Rouler, thank you for your meticulous detail regarding this, it was such an immense help.
I thought I was going mad trying to figure out what was wrong having followed the Shimano guide twice without success.
Your information regarding setting up the H,L screws initially before starting was the key.
Cheers thanks Brian.
Je suis tombé par hasard sur votre page après une après-midi à galérer sur le réglage de ce dérailleur avant… J’ai réussi grâce à vos indications, merci beaucoup !
Si je comprends bien, la prochaine fois que je change de cable de dérailleur j’ai juste à me référer aux deux traits de repère sur le dérailleur et à les aligner de la même façon qu’actuellement pour que le réglage soit identique ?
(J’écris en français car j’ai supposé qu’avec le pseudo “rouleur” vous l’étiez)
Translated to English:
I stumbled upon your page by chance after an afternoon of struggling with the adjustment of this front derailleur… I succeeded thanks to your instructions, thank you very much!
If I understand correctly, the next time I change my derailleur cable, I just have to refer to the two reference lines on the derailleur and align them the same way as now for the adjustment to be identical?
(I’m writing in French because I assumed that with the nickname “rouleur” you were.)
Hi Jan,
Great to hear the article was able to help. I haven’t replaced my front derailleur cable yet as they last substantially longer than a rear derailleur cable. I would expect you should only need to adjust the cable tension screw to get it working correctly. I am not French, but France is definitely one of my favorite countries. In terms of a cyclist, I am probably most like a Rouler.
Thank you so much for this. I’d followed several YouTube mechanics guides and still ended up with a badly adjusted front mech. Your guide covered everything and I now have perfectly working gears again!
Hi Andy, wonderful to hear you were able to get your shifting working perfectly again. Thanks for posting a comment.
It’s obvious to me that the Shimano docs made a mistake in labeling the order of the positions: Low-Trim, Low, High-Trim, High, and there is no reason to perpetuate that mistake. If you want to say that the Low-Trim position is achieved when you hit the paddle until it stops clicking, then it only makes sense that the High-Trim position is achieved when you push the brake lever until it stops clicking, and therefore the rightmost position would be High-Trim, which is at least consistent, but completely stupid.
It should be obvious to any serious cyclist, that the ordering of the front derailleur positions is Low, Low-Trim, High-Trim, High. Let’s be practical…anyone who has ridden a bike for more then five years knows that you when you shift to the big ring you are in the High position and you are going at a faster speed, then if you start shifting into bigger cogs in the rear to make pedaling easier as the grade flattens or steepens, you will start to here the chain tinkling against the inside of the front derailleur cager, therefore you trim the front derailleur to move the front derailleur cage slightly inboard. Likewise, when you shift the front derailleur to the small chainring, you are shifting the front derailleur to the Low position because you are going uphill and you need an easier gear. If you need even easier gears, you shift to bigger cogs in the rear. Then, as the grade gets less steep and flattens, you shift to smaller cogs in the rear, and as you go faster and faster, shifting to smaller and smaller cogs, inevitably you will start hearing the chain tinkling against the outside of the front derailleur cage. At that point, I personally shift the front derailleur to the big ring, but you *can* trim the front derailleur outward slightly by pushing the inner paddle one click to the Low Trim position. Therefore, from here on out, let’s all agree that the proper ordering of the front derailleur positions is: Low, Low-Trim, High-Trim, High. Just as you can’t shift directly into the High-Trim position from the Low position, neither can you shift directly into the Low-Trim position from the High Position. See how everything is consistent and makes practical sense when that is the order of the front derailleur positions?
And, let’s all agree on another thing: Shimano’s new style front derailleurs are an abomination and totally suck. While they might feature some neat engineering, they just do not work as well as the old style front derailleurs, where the high and low limit screws set hard stops for the movement of the front derailleur cage. Did anyone ever break a Shimano front derailleur? I never did, and I rode 350 days a year for 5 years on a mountain bike equipped with a Shimano front derailleur. And, even if the front derailleurs did break, say, every five years, they are cheap to replace, so who cares?
Hi John, I’m not really concerned about the naming of Shimano’s shift positions, my article was written to help people setup or adjust this new design derailleur based on my own experience. I adopted Shimano’s terminology to provide consistency for people referencing Shimano’s documentation. Shimano have simply based the naming of the positions on whether the shift click makes a large derailleur movement (Low / High position) or a small derailleur movement (Low-Trim, High-Trim position).
In regards to your other comments, no doubt the design of this derailleur is considerably different. I believe the new design was created to eliminate the need for an inline cable adjuster, but it also resulted in a different adjustment process. Ultimately the derailleur works well once the adjustment is correct, but it requires learning and perfecting a different adjustment technique. Electronic shifting will eventually replace mechanical shifting and for most people that is the best system. Electronic is easy to adjust and once setup requires no ongoing tune-ups, gives perfect gear changes and auto trims the front derailleur. You can use all gear combinations with no chain rub. The small trade-off being you need to occasionally charge the battery. I’ve currently got bikes with mechanical friction shifting, mechanical indexed shifting and electronic Shimano Di2, but I love using Shimano Di2 the most.
Whilst you are of course welcome to share your opinions I have to say those same opinions are remarkably unwise and ill-informed. I commend Rouleur for having the time and patience to respond in such a measured manner to your rant.
Cheers Tim.
Thank you so much for this guidance! I had had my damaged 13-year-old 105 FD replaced with Ultegra by a professional bike mechanic shop. However there was some chain noise when using the large chain ring and the 4 largest spockets, and there was no difference between HIGH and HIGH TRIM.
I had no possibility to take the bike back to the shop, but following this article I was able to resolve the issue.
The frame support bolt was untouched and its plate was missing. I cut a small aluminum plate and used 2-component adhesive to glue it on the frame.
Following your installation steps I was able to set the FD so that all gears work smoothly and without chain rattle!
For some reason I was not able to perform the preliminary cable tension setting step completely: the 2 white lines remained nicely aligned even though I was turning the pretension screw.
There is still no FD movement between HIGH and HIGH trim – I can see that the cable is moving very little, but not causing any observable movement in the derailleur. Anyway this is not a big issue anymore because the gears work nicely even without HIGH TRIM, maybe thanks to the frame support bolt stabilizing the entire assembly.
Hi Matt, glad to hear that this article was able to help you achieve a result you were happy with. The frame bolt is important to give the derailleur a solid platform when shifting the chain up onto the large chainring.
As others have said, this guide beats Shimano’s own manual and any Youtube ‘how-to’ videos I have come across anyway.
I have previously fitted two 105 FD-R700 front derailleurs, the first of which went together using the Shimano guide alone and no fine tuning. Second one was a bit more troublesome but this guide really helped me get to the root of the problem.
Currently though I am attempting to set up an Ultegra FD-R8000 front derailleur and seem to be going round in circles. I seem to be at Section 12 – Troubleshooting except that in the HIGH TRIM position I get rub on the inside plate for the first three big sprockets AND in the HIGH position I get rub on the outer plate for the last two smallest sprockets on the cassette. So on the big chainring there are only 6 gears in the middle I can use even using the trim position, which seems a bit silly to me! No amount of ‘tweaking’ either the High limit H screw, or the cable tension adjuster, seems to be able to make this any better at either end of the cassette, or at least if I cure the rub at one end, it gets way worse at the other end! Any ideas what could be causing this? Its as if there is insufficient capacity within the FD, between the HIGH TRIM and HIGH positions! I have a full outer cable run on this bike, which is why I went for this FD instead of the perfectly serviceable FD-R6800 pivot style FD I already had, just in case the full outer makes any difference to my problems! Thankyou!
Hi Simon, thanks for your kind words. I haven’t setup the Ultegra FD-R8000 front derailleur, but it should be identical to the 105 in terms of operation, so that is an unusual situation experiencing rub on so many cogs when the large chainring is used. There should be NO chain rub on the small cog when shifter is in HIGH position (ISSUE 1) and some rub when (cross-chaining) on the largest cog in HIGH TRIM position (ISSUE 2). Assuming the front derailleur is aligned correctly, what you are describing is not having enough cable tension to pull the front derailleur out far enough the frame. Is there a chance the bottom bracket is not correct size so the chain rings sit further out from the frame than they should? In terms of FD setup, I recommend trying;
1. Disconnect the cable from the front derailleur.
2. Reset the High Limit Bolt again. This step is super important (and not mentioned in the Shimano instructions) and if it is not done correctly it can cause ISSUE 1.
3. Make sure the shifter is in the LOW TRIM position (again super important).
4. Make sure the cable is pulled tight (no slack) and continue with Step 6 of the guide.
Hopefully FD now moves further out as it should.
Once you have eliminated ISSUE 1, then you can focus on ISSUE 2 which will just require tweaking the high limit bolt to minimise chain rub on the larger cogs, whilst not reintroducing it on the smallest cog.
Best of luck.
Many thanks for the quick response!
I have since double checked the BB width. I had never had a problem with it previously (with the FD-R6800 pivot style front derailleur) but it is a PF30 with 24mm adaptors so I disassembled and re-assembled it just to double check the ‘cup to cup’ measurement, which was fine at bang on the 91mm nominal required by Shimano (for a normal Hollowtech II BB in a 68mm shell). I have also re-checked FD alignment and height which is still good. I had been hoping to avoid loosening the cable (as usually after having been fully tightened once, I find the cable is too flattened/damaged to be properly clamped again, so requires replacement) but as I couldn’t be 100% sure in what position the high limit screw was when I first installed it, I went through your steps above, ‘resetting’ the screws. I am wondering if the Shimano manual gets around this issue by using the low limit screw to align the outer plate with the outer chainring before clamping? Or perhaps I got lucky by pulling the upper toggle section slightly upwards when I initially installed it and pulled on the cable before tightening the clamp bolt? When I first installed it per the Shimano manual in this way, I think I actually ended up with too much cable tension as the upper adjustment line was actually slightly too far past (anti-clockwise) the lower/fixed line and the tension adjustment screw was fully wound out already, so that first time I had to slightly release some of the cable tension (by loosening the clamp bolt, which was not fully tightened at that point) and then was able to turn the adjustment screw a few turns to move the upper adjustment line anti-clockwise and align with the lower/fixed line.
So because this scenario wasn’t really covered by the Shimano manual, to eliminate this as a potential problem, I have now fully loosened the cable, reset the screws and followed the steps above again. However, I still get the same problems unfortunately, i.e. ISSUE 1 and ISSUE 2 as above! I am totally flummoxed by this one! With cable tension set, and high limit screw set so that I just start to have light ‘rub’ in largest chainring and largest sprocket (i.e. cross-chaining) in HIGH TRIM, by the time I get to the HIGH position I start to get rub on the inside of the FD outer plate by around the fourth smallest sprocket! If I then adjust the high trim screw again to get no rub in this state and in the smallest sprocket (i.e. ISSUE 1 above) when I go back up the cassette and into the HIGH TRIM FD position, I start to get rub on the inside of the inner FD plate by about the fourth largest sprocket, maybe even slightly before.
For clarity, when the chain ‘rubs’ on the inner plate (ISSUE 2), it is contacting the *metal* inner face so is quite noisy. When it ‘rubs’ on the outer plate (ISSUE 1) it is contacting the small rivetted *plastic* inner face/plate so is a little less noisy than metal-to-metal, but still very obvious. Am I just meant to let this rub away in the higher gears (smaller sprockets) until the plastic wears away sufficiently to not rub any more I wonder? I don’t remember this happening with either of the two FD-R7000 builds I have done previously!
Per your final comment, again since re-doing it all, if I eliminate ISSUE 1 to start with, no amount of tweaking the high limit screw (or the cable tension adjuster), in either direction, will get rid of ISSUE 2, just as with my original setup!
I have no reason to suspect the shifters and they were ‘playing nicely’ with the FD-R6800 unit.
As a Plan B I have also ordered a brand new FD-R7000 derailleur just in case there is something peculiar with my (also brand new) R8000 FD and also because these have worked for me in the past, but holding the two next to each other, I can see no differences that could lead to a change in the ‘throw’ of the FD.
Any further suggestions very much appreciated!
I haven’t thought of a ‘Plan C’ yet!
Hi Simon, I think you have checked pretty much everything and as you have previously set a few of these up successfully, you would know what the correct operation is. Hopefully the replacement derailleur solves the issue. Otherwise maybe a good bike mechanic in your area can solve it?
Re: resetting the derailleur bolts. The most important part of the reset process is resetting the High Limit Bolt. Shimano didn’t mention this in the manual because I think their instructions are to install a new derailleur that has the bolts preset correctly at the factory. But, if you have a derailleur with bolts not in the original factory configuration, then if you don’t get the high tension bolt set correctly, my experience was that the cable tension setting will not be accurate and the derailleur does not travel out far enough from the frame to shift the chain to the large chainring.
When you get the new derailleur, it would be interesting to know how the 3 bolts are set by the Shimano factory.
I presume the upper section of the derailleur is sitting firmly on top of the main body? It doesn’t move up and down freely?
Best of luck.
I do have the new R7000 derailleur and as supplied the Frame Support Bolt is retracted such that the ‘tip’ of the bolt is flush with the back of the derailleur. I would describe the High and Low ‘limit’ adjustment screws as being set at approximately 50% ‘screwed in’ but the High screw is slightly more screwed in than the Low screw. There is therefore quite a bit of ‘slop’ i.e. free movement of the top ‘toggle link’ part of the derailleur that the cable attaches to. I have actually decided not to fit it though (for the time being anyway. It was only £20 so can sit in my spares box for now). This is for two reasons, 1) going over it and the R8000 version with a digital vernier I couldn’t measure the slightest difference in any of the geometry. Any perceived differences to my existing R7000 FD are I think probably due to it being fitted to a rim brake bike and a 12-25 cassette! So I don’t think there is any ‘fault’ with my R8000 FD… and 2) I had another ‘tweaking’ session with the R8000 FD two nights ago, test rode it last night and think I have come up with an acceptable ‘compromise’ adjustment position. In the High Trim position I have a ‘hard rub’ in sprockets 1 and 2. This is not a big problem as these are gears I’d never use due anyway due to the transmission noise. In sprocket 3 I get a ‘light rub’ but only when out of the saddle. I would only very occasionally use this gear combination when say powering over the crest of a hill and not wanting to change down/lose momentum by going to the inner chainring. Sat in the saddle there was no rub. Gears 4 to around 7 are then fine in High Trim and I now don’t constantly seem to be flitting between High Trim and High in my most commonly used gear on flattish terrain (which was one of the reasons I started adjusting it in the first place, post rebuild!). Then in the High FD position and the last 4 sprockets there is no rub until I get to 11the gear. Here there is a tiny amount of rub, but it is so slight, and against a plastic insert, that I don’t hear it, particularly with all the other wind, transmission and road noise (not to mention breathing!) that usually comes with being in the 11th sprocket. I rarely ever use the top couple of gears anyway. So it is a bit of a ‘compromise’ but one I can live with. Its just frustrating that I didn’t need to live with this compromise when the R6800 pivot FD was fitted! My problem now is that I need to replace the (brand new with the R8000 derailleur) cable as after releasing and re-tightening the pinch bolt about a million times, the cable is now a bit less than new and I’m not happy to leave it as-is. I have been wondering if there is any way I can retain my existing High and Low adjustment settings and just change the cable and reset the cable tension but I think with everything I have learnt about these derailleurs, that is one thing you can’t do! So I am going to be back to ‘square one’ with the new cable and I’m just praying to the Shimano FD gods that I can get back to my current settings quickly this time around! Literally the only reason I am not going back to the R6800 FD is due to the ability to run full outer cable housing to the R8000/R7000 FD’s (which I need on this frame). In all other respects the toggle link FD’s seem to be an inferior product to me and a bit of a backward step!
Hi Simon, no problems, thanks for posting information about the original bolt configuration of the derailleur from factory. I might add that to the post for reference. All the best swapping the cable. Now you’ve had so much practice in tuning this derailleur, I’m sure you will get it sorted fairly quickly. Having owned di2 for some time now, it’s just so simple to setup and use. You don’t need to trim and the FD can move in ways a mechanical unit cannot to completely eliminate chain rub in any gear combo, but still rarely drop the chain. Cheers.
Thanks. Really helped (after my bike shop failed).
Fantastic Nick, great to hear.